Lesson 22: Ways to Spend Gold: Unlocking / Upgrading characters
So in the previous lesson we’ve implemented a way to collect gold, an in-game resource. But the trouble is: there’s no way to spend it yet. Let’s fix it today!
I am planning to do two things today: make characters unlockable and enable „upgrade” button for unlocked characters. All characters (except for human) are going to be locked by default. As soon as player collects 1000 gold – he can unlock a character. The amount of gold is up to you. I think 500 is a good amount, because we’ll be able to introduce In-App-Purchases later which would grant enough gold, but also player can gather enough once he played some time (without paying a dime).
Alright, so let’s modify our progress file first. We’re going to adjust it gradually, according to the changes what we are making. First thing that we are going to do, let’s make a separate array of levels of each character. 0 will mean that the character is locked, any value above that will simply mean character level (1+). Introduce the following constants / variables:
public static final int CHARACTER_PRICE = 1000; // price to unlock a character

public static int levels[]; // level of each character, 0 = locked

private static final String SAVE_KEY_PLAYER_LEVEL = "playerlevel";
We’re going to init the array in our Load function. Since we are saving/loading multiple values, we’re simply going to add an index to the key.
public static void Load()
{
    levels = new int[CharacterRecord.CHARACTERS.length];

    Preferences prefs = Gdx.app.getPreferences(PROGRESS_SAVE_NAME);

    for (int i = 0; i < CharacterRecord.CHARACTERS.length; i++)
    {
        levels[i] = prefs.getInteger(SAVE_KEY_PLAYER_LEVEL + i, i == 0 ? 1 : 0);
    }
Something similar goes to saving. In our Save() function, add the following code:
for (int i = 0; i < CharacterRecord.CHARACTERS.length; i++)
{
    prefs.putInteger(SAVE_KEY_PLAYER_LEVEL + i, levels[i]);
}
This should do it for saving/loading. Now that the backend is (somewhat) handled – let’s adjust the menu to allow the magic to happen!
So, first, let’s modify our “Start” button to be replaced with “Unlock” button if character is locked. The code is pretty simple:
if (GameProgress.levels[GameProgress.currentCharacter] == 0)
{
    TextButton startBtn = new TextButton("Unlock(1000 Gold)", buttonStyle);
    startBtn.setPosition((uiStage.getWidth() - startBtn.getWidth()) / 2, uiStage.getHeight() / 6);
    startBtn.addListener(new ClickListener() {
        public void touchUp (InputEvent event, float x, float y, int pointer, int button) {
            if (GameProgress.currentGold >= GameProgress.CHARACTER_PRICE)
            {
                GameProgress.currentGold -= GameProgress.CHARACTER_PRICE;
                GameProgress.levels[GameProgress.currentCharacter] = 1;
                prepareUi();
            }
        }
    });
    uiStage.addActor(startBtn);
}
else
{
    // start / upgrade button code goes here
    TextButton startBtn = new TextButton("START", buttonStyle);
    startBtn.setPosition((uiStage.getWidth() - startBtn.getWidth()) / 2, uiStage.getHeight() / 6);
    startBtn.addListener(new ClickListener() {
        public void touchUp (InputEvent event, float x, float y, int pointer, int button) {
            dispose();
            game.setScreen(new GameScreen(game));
        }
    });
    uiStage.addActor(startBtn);
}
We just add a different button in case the character is locked.
You might have noticed that we have to call uiStage.clear() before every prepareUi call. So, this is redundant. Let’s simply move uiStage.clear() to the beginning of prepareUi() and remove all other uiStage.clear() calls on this screen.
Run the game and try switching characters. If you set the CHARACTER_PRICE to lower value for debugging purposes and try unlocking a character – you’ll see that it becomes available.
After that, let’s get to upgrade button. But first, I think it makes sense if we add a label with character level or just a warning (“char locked!”). First, move textStyle declaration/initialization on top of our prepareUi function, right above the buttonStyle declaration.
Now, let’s make a new label, after our heroSprite definition. (Because we’re going to use that as an orientation / position settings).
uiStage.addActor(heroSprite);
// char level
int lvl = GameProgress.levels[GameProgress.currentCharacter];
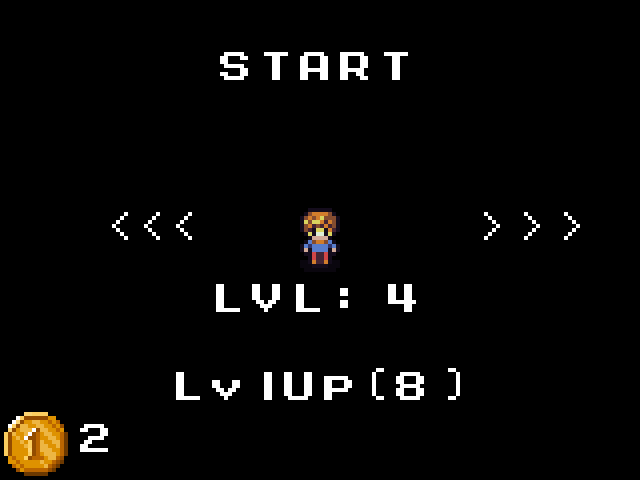
Label statusText = new Label(lvl > 0 ? "LVL: " + lvl : "LOCKED", textStyle);
statusText.setPosition(heroSprite.getX() + (heroSprite.getWidth() - statusText.getWidth()) / 2,
heroSprite.getY() - statusText.getHeight() - 5);
uiStage.addActor(statusText);
Now we can finally get to upgrade button. You might have noticed, that the interface is getting a bit overcrowded. Let’s move the start button to the top and levelup button to the bottom (where there’s Unlock button for locked chars).
Here’s how the code looks like:
else
{
    // start / upgrade button code goes here
    TextButton startBtn = new TextButton("START", buttonStyle);
    startBtn.setPosition((uiStage.getWidth() - startBtn.getWidth()) / 2, uiStage.getHeight() * 5 / 6);
    startBtn.addListener(new ClickListener() {
        public void touchUp (InputEvent event, float x, float y, int pointer, int button) {
            dispose();
            game.setScreen(new GameScreen(game));
        }
    });
    uiStage.addActor(startBtn);


    TextButton upgradeBtn = new TextButton(
            "LvlUp(" + GameProgress.getNextUpgradeCost(GameProgress.currentCharacter) + ")",
            buttonStyle);
    upgradeBtn.setPosition((uiStage.getWidth() - upgradeBtn.getWidth()) / 2, uiStage.getHeight() / 6);
    upgradeBtn.addListener(new ClickListener() {
        public void touchUp (InputEvent event, float x, float y, int pointer, int button) {
            if (GameProgress.currentGold >= GameProgress.getNextUpgradeCost(GameProgress.currentCharacter))
            {
                GameProgress.currentGold -= GameProgress.getNextUpgradeCost(GameProgress.currentCharacter);
                GameProgress.levels[GameProgress.currentCharacter] += 1;
                prepareUi();
            }
        }
    });
    uiStage.addActor(upgradeBtn);
}
The start button code pretty much remains unchanged, except for Y position, which has moved to top of the screen.
UpgradeBtn is similar to start button, but it invokes getNextUpgradeCost function (will get to it later). The position is the same as the old “start” button position. The click function acts in a similar way, checks the next level upgrade cost and if it’s fine – takes the money and increases the character level. Looks good? Let’s go to GameProgress and define the function to get next level cost. As an experiment, I think it’s fine if we multiply the current level value by 2.
public static int getNextUpgradeCost(int currentCharacter) {
    return levels[currentCharacter] * 2;
}
I’ve also noticed a bug, CharacterSelectionScreen does not have resize handling, so resizing gets ugly. Let’s fix that!
@Override
public void resize(int width, int height)
{
    super.resize(width, height);
    uiStage.getViewport().update(width, height, true);
}
Run the game! If you have some gold already – upgrade your character. For now, the upgrade is only visual, but don’t get upset – we’re going to fix this in the next lesson! See you then.
Git commit: https://github.com/vladimirslav/dodginghero/commit/564990aeed19a887e568666bf85d9b52865c7466