Adding Different Playable Heroes
Allright, our enemies attack differently. But how can we diversify the gameplay of our player? Let’s introduce different playable characters.
First, let us ask ourselves, what do we want to display here? We want to make a screen where player chooses (and later – unlocks/upgrades) the character he wants to play with. Each character will have its strengths: it is important to give choice when it comes to game decisionmaking.
We’ll need to make a separate screen for that. In our screens package, create a new class, name it “CharacterSelectionScreen.” Make it extend DefaultScreen.
Similar to our GameScreen, we need a stage that is going to process player input / display UI elements. Declare it:
Stage uiStage;
We also need to track the currently selected character. Let’s make an integer index specially for that.
int currentCharacter;
The constructor is simple:
public CharacterSelectionScreen(DodgingHero _game) {
    super(_game);
    currentCharacter = 0; //TODO: Load it from settings later
    FitViewport viewport = new FitViewport(160, 120);
    uiStage = new Stage(viewport);
    Gdx.input.setInputProcessor(uiStage);
}
We create a stage using fit viewport to always maintain the resolution. We use our stage as inputProcessor, because it would allow stage to capture the inputs. Now we need to define dispose and render functions. Let’s make them real simple first.
@Override
public void render(float delta)
{
    Gdx.gl.glClearColor(0, 0, 0, 1);
    Gdx.gl.glClear(GL20.GL_COLOR_BUFFER_BIT);
    uiStage.act(delta);
    uiStage.draw();
}

@Override
public void dispose()
{
    Gdx.input.setInputProcessor(null);
    uiStage.dispose();
    super.dispose();
}
Render simply clears the screen, updates the stage and draws it. Dispose resets the input, then frees resources taken up by stage.
Finally, go to our DodgingHero.java class, and change
setScreen(new GameScreen(this));
to:
setScreen(new CharacterSelectionScreen(this));
This will make the game show us Character Selection Screen instead of GameScreen (at once) where we’ll be able to pick necessary characters. Run the game. You should see the black blank screen. Great! That means we could set our new screen.
Now, to progress further, let’s add a simple “Start” button. Well, not really a button since it’s going to be a text caption that you need to press to start the game. Still, it’s going to be great.
In our CharacterSelectClass, let’s prepare a new function, name it prepareUi(). We’re going to call it at the bottom of our constructor (right after Gdx.input.setInputProcessor(uiStage);).
The first version of the function looks like this:
void prepareUi()
{
    TextButton.TextButtonStyle buttonStyle = new TextButton.TextButtonStyle();
    buttonStyle.font = game.res.gamefont;
    buttonStyle.fontColor = Color.WHITE;
    TextButton startBtn = new TextButton("START", buttonStyle);
    startBtn.setPosition((uiStage.getWidth() - startBtn.getWidth()) / 2, uiStage.getHeight() / 6);
    startBtn.addListener(new ClickListener() {
        public void touchUp (InputEvent event, float x, float y, int pointer, int button) {
            dispose();
            game.setScreen(new GameScreen(game));
        }
    });
    uiStage.addActor(startBtn);
}
We’re creating a TextButton that has “Start” writte on it. First, we make the button style where we define the font and color of the font. If you have graphics – it’s also possible to define up/hover/down states of the button (however, I – don’t).
Then, the button is being initialized by passing the text and the style and setting the position. The trickiest part is handling button clicks: in this case we’re calling addListener and defining our own version of ClickListener, by overriding the touchup function. At this point, as soon as player clicks our “Start” button, the screen is going to switch for our GameScreen.
Finally, don’t forget to add out new button to the stage by calling addActor method! After that, run the game.
Good, we have a start button. Now let’s display our hero and make arrow-like buttons (that are going to be used later). Again, in this lesson, let’s just do a simple display, without functionality. At the end of our prepareUi function, add these lines:
Image heroSprite = new Image(game.res.player);
heroSprite.setPosition((uiStage.getWidth() - heroSprite.getWidth()) / 2,
                       (uiStage.getHeight() - heroSprite.getHeight()) / 2);
uiStage.addActor(heroSprite);

TextButton nextBtn = new TextButton(">>>", buttonStyle);
nextBtn.setPosition(uiStage.getWidth() * 5 / 6 - nextBtn.getWidth() / 2, uiStage.getHeight() / 2);
uiStage.addActor(nextBtn);

TextButton prevBtn = new TextButton("<<<", buttonStyle);
prevBtn.setPosition(uiStage.getWidth() / 6 - prevBtn.getWidth() / 2, uiStage.getHeight() / 2);
uiStage.addActor(prevBtn);
That’s it! After you run the game, you should see something like this now:
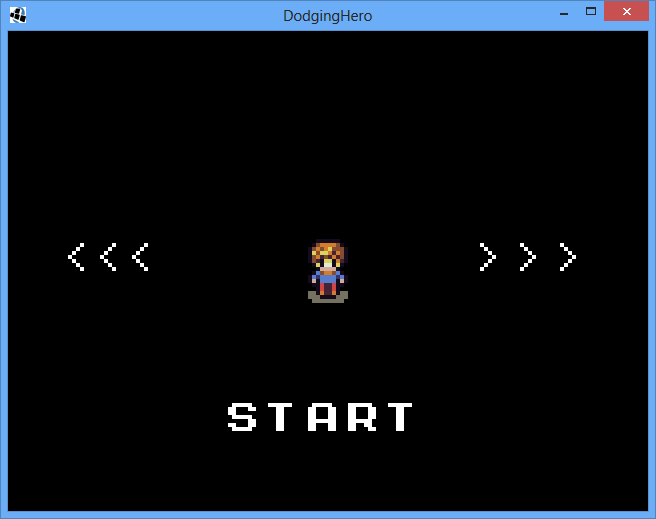
That concludes lesson 19! In the next lesson, we’re actually going to work on implementing the character choice, but for now the screen should be enough. Relevant git commit: https://github.com/vladimirslav/dodginghero/commit/e46d43eac5dcba21b3e3df502a0706d1436885c3