Preparing Assets
So, we have the background, maybe now it’s the time to get to the elements in the front. We’ll try to display a walkable tiles (4×4), and a player.
Since there’s really no way to indicate the walkable tiles, let’s draw a simple „base” first. Make a small picture 16×2 and draw something like a base where character can stand at. Here’s mine (I’m really not an artist):
![]()
This will indicate where player can move. Save it as base.png. One thing that I’ve learned as I started to develop games is that this type of bases should never be as big as the character. Since our characters are 16×16, it might seem like a good idea to make the base as the square (which will be drawn around our character). Nothing can be further from the truth! If we do this – the characters will look ‘caged’ in the tiles which makes the game look bad.
As for the player, we pick one from the same tileset by Lanea Zimmerman (http://opengameart.org/content/tiny-16-basic). Just open up characters.png and cut out 16×16 tile with any character you like. Here’s mine:
![]()
Cool. Save it as player.png.
Let’s add those resources in our Resources class. Similar to our ground and wall declarations, let’s declare two more TextureRegions: player and base.
public TextureRegion player;
public TextureRegion base;
Load them the same way you loaded wall and ground.
player = gameSprites.findRegion("player");
base = gameSprites.findRegion("base");
Ok, we’re done here. But before we proceed to actual drawing, we need to determine WHERE to draw them, right?
Programming The Coordinates
Again, we need to position those things in a good way. The way I approach it is that I usually create some sort of SizeEvaluator class which calculates the stage width and gets me the relative positions of the elements on the stage. Let’s get to programming! In our graph package, add a new class. Name it SizeEvaluator. This will actually calculate where we should place our hero / enemy / tile bases.
Add the private variable Stage measuredStage; this one will be pointing towards the current game stage. Also, add the private variable Resources which will be pointing, you’ve guessed it correctly, to the game resources.
The SizeEvaluator will also contain the max X and max Y the base tile can have. We have 4×4 field, so x and y will limit to 3 [0..3]. Similar to the screen coordinates, X will go from left to right (0 being the leftmost, 3 being the rightmost) and Y go from bottom to top (0 at the bottom, 3 at the top).
The SizeEvaluator constructor is going to accept a stage as parameter and assign the value to measuredStage. The same with resources: we’ll need them to get the tile sizes in order to properly calculate the distances. We’ll also need to pass max base x and max base y to it.
This is how it should look at first:
public class SizeEvaluator {

    Stage measuredStage;
    Resources resources;

    private final int maxTileBaseX;
    private final int maxTileBaseY;

    public SizeEvaluator(Stage _stage,
                         Resources _resources,
                         int _maxTileBaseX,
                         int _maxTileBaseY)
    {
        measuredStage = _stage;
        resources = _resources;

        maxTileBaseX = _maxTileBaseX;
        maxTileBaseY = _maxTileBaseY;
    }

}
It still does nothing. Let’s fix it! We’ll write the function which will give back the tile coordinates. We’ve talked that our hero (and the walkable tiles) are going to be located on the left. That means that we can simply take the width of the stage, split it into two then add some margin and take the position of the base into account.
We’ll implement the public function getBaseScreenX(int baseX) and getBaseScreenY(int baseY). It will take the x and y coordinates of the base (x and y can range from 0 to 3 included) and return their position on the screen.
The first implementation of functions is going to look like this:
public float getBaseScreenX(int baseX)
{
    return measuredStage.getWidth() / 2 - resources.TILE_SIZE * (1 +
maxTileBaseX - baseX);
}
Quite simple: as we discussed before, we split the stage width by two (getting the coordinates of the middle), then we substract as tile widths to get to our necessary base x. (i.e. if we pass 0 as base X, we’ll take middle of our scene (call it midX) and substract (4 – 0) * 16 from it, getting the leftmost base tile coordinate).
We’re adding 1 to maxTileBase coordinate in order to handle the max case effectively. If we would not do it, the tile would be drawn over the middle (you can experiment and see what happens if you take away “1 +” part from the equation).
public float getBaseScreenY(int baseY)
{
    return measuredStage.getHeight() / 2 - resources.TILE_SIZE * ((maxTileBaseY + 1) / 2 - baseY);
}
getBaseScreenY looks a bit different. We want to center it vertically (equal amounts of tiles on top and bottom): to do that, we take the vertical middle of the scene and substract the half of total possible base field height (we have 4 bases with 16 sized tiles), so we substract 32 right now.
Adding SizeEvaluator to our Game Screen
Time to implement it now! In our GameScreen, declare a private variable SizeEvaluator sizeEvaluator; Declare constants MAX_BASE_X and MAX_BASE_Y, that we’re going to pass to our SizeEvaluator.
private static final int MAX_BASE_X = 3;
private static final int MAX_BASE_Y = 3;
Initialize the SizeEvaluator in GameScreen constructor (right at the end of it, after we’ve already initialized gameStage). Here’s how my GameScreen constructor looks now, see final line:
public GameScreen(DodgingHero _game) {
    super(_game);
    batch = new SpriteBatch();
    bg = new Background();

    ExtendViewport viewp = new ExtendViewport(STAGE_W, STAGE_H);
    gameStage = new Stage(viewp, batch);
    sizeEvaluator = new SizeEvaluator(gameStage, game.res, MAX_BASE_X, MAX_BASE_Y);
}
Now we can proceed to drawing the bases. Let’s add function drawBases(), right here, in GameScreen class:
private void drawBases()
{
    batch.begin();
    for (int x = 0; x <= MAX_BASE_X; x++)
    {
        for (int y = 0; y <= MAX_BASE_Y; y++)
        {
            batch.draw(game.res.base,
                    sizeEvaluator.getBaseScreenX(x),
                    sizeEvaluator.getBaseScreenY(y));
        }
    }
    batch.end();
}
Before every drawing, we start our batch batch.begin(). After we are done drawing everything, we call batch.end(). We’ll go through our cycle and draw MAX_BASE_X + 1 columns, each containing MAX_BASE_Y +1 elements. (4×4, like we’ve planned).
Add the drawBases call in our render function, right after we call bg.draw:
bg.draw(gameStage, game.res);
drawBases();
Run the game and see what happens.
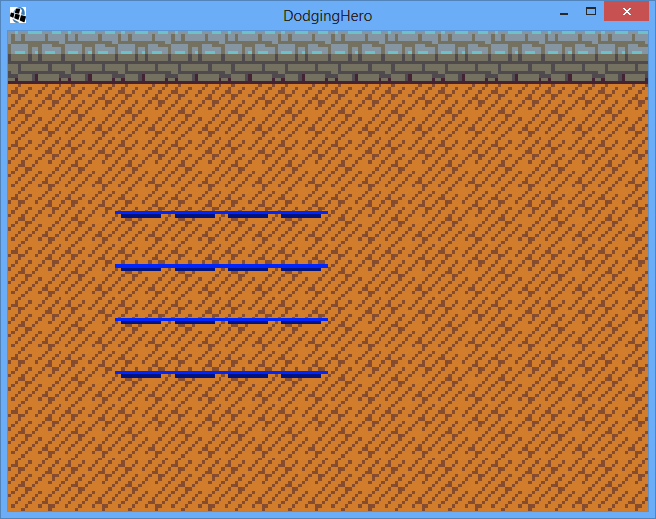
Tiles, first version
Well, we got some results, right? But it does feel somewhat off. Firstly, the bases are too tightly put together. Let’s add some margin before them.
Get back to our SizeEvaluator class and implement a new int constant: BASE_MARGIN, which will be equal to 2 (pick any number you like, but be reasonable: it’s the distance between bases).
private final int BASE_MARGIN = 2;
Now add this to getBaseScreenX and getBaseScreenY equations. We want it to affect the distance between every tile, that’s why we’re putting it in the TILE_SIZE part (which essentially means the distance between tiles).
public float getBaseScreenX(int baseX)
{
    return measuredStage.getWidth() / 2 - (resources.TILE_SIZE + BASE_MARGIN)
            * (1 + maxTileBaseX - baseX);
}
Now do the same with getBaseScreenY:
public float getBaseScreenY(int baseY)
{
    return measuredStage.getHeight() / 2 - (resources.TILE_SIZE + BASE_MARGIN)
            * ((maxTileBaseY + 1) / 2 - baseY);
}
Run the game again.
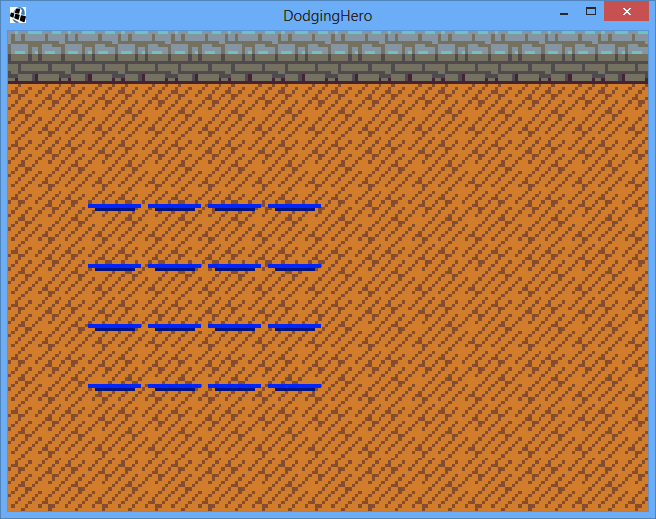
Tiles, distanced
Looks much better! We can clearly distinguish the separate walkable bases. Let’s just draw the player somewhere. We’re actually going to rework that part, but I want us to feel good about ourselves. Time for instant gratification!
In our drawBases function, right before batch.end() call, add the following line:
batch.draw(game.res.player,
        sizeEvaluator.getBaseScreenX(1),
        sizeEvaluator.getBaseScreenY(1) + 2);
Run the game.
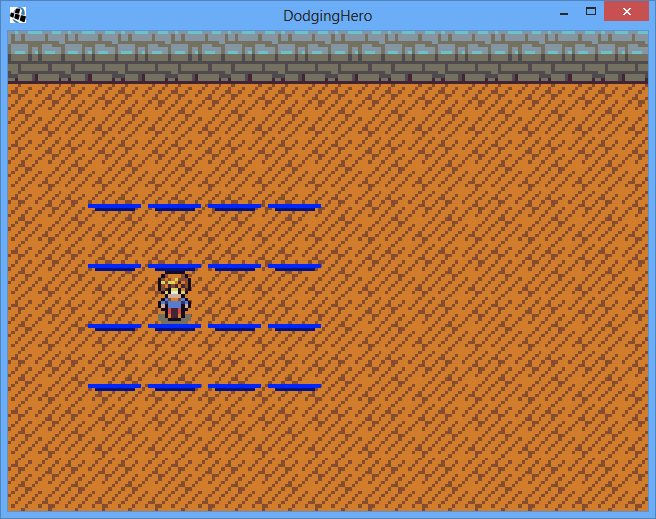
Oh no! The dreaded ‘cage’ effect, our player looks stuck between tiles. Obviously, this distance won’t do. Let’s reduce the distance between bases by 1/3. Rewrite getBaseScreenY function:
public float getBaseScreenY(int baseY)
{
    return measuredStage.getHeight() / 2
            - ((resources.TILE_SIZE * 2) / 3 + BASE_MARGIN)
            * ((maxTileBaseY + 1) / 2 - baseY);
}
basically, we’re multiplying TILE_SIZE by two thirds, essentially reducing the distance by 66%. Save the code and run it now.
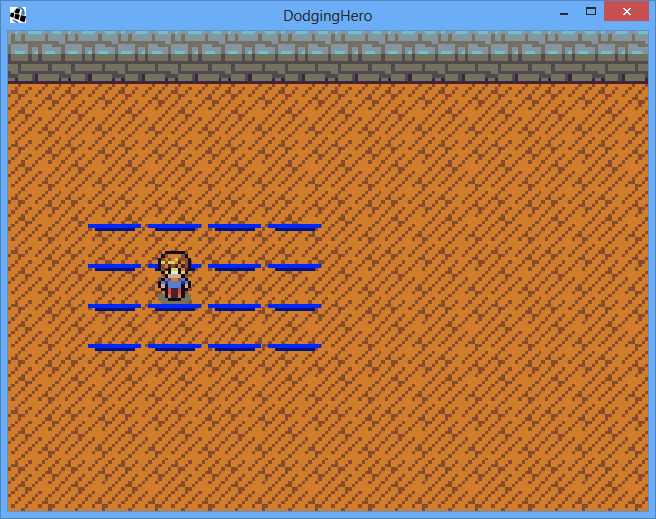
It does look better, looks more like our hero is standing on one of the bases instead of being stuck between two levels.
Good job, now you have a solid tiles positioning. In the next lesson, I’ll actually address the player movement.
Relevant git commit: https://github.com/vladimirslav/dodginghero/commit/3de79268966817849163eecbc538ba804fa7afd1
Hey man i don’t know if you still check this, I’m trying to get through your tutorial and I keep getting a java.lang.NullPointerException. I’ve followed the video to a T and I cant seem to find my mistake.