Hey everyone!
After learning things from different tutorials on Internet, I wanted to contribute something. There are lots of tutorials on how to make games. I want to make a tutorial that would go through the whole process: from setting up the work environment to game publishing.
Here’s the video of the project, but in case you’re more into reading, the transcript is given below.
Setting up our project
I’ll be making a multiplatform game that you will be able to run on PC, but my end goal is to publish it on Android. You don’t really need the Android device to follow this tutorial: I’ll explain how to make the game run on your desktop machine, without the need to launch it on Android.
The game idea is simple: on half of the screen, we have a 4×4 field and a character that moves between tiles to dodge enemy attacks. On the right side, there’s an enemy (or group of enemies) that stand and attack the hero (or, rather, some of the tiles).
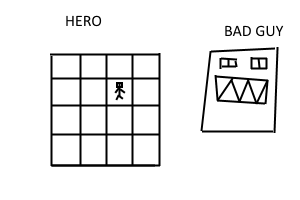
Game Idea
If anyone promises to make you a gamedev expert simply from doing one tutorial – he’s probably lying. In this tutorial, the end goal is to make a game, but it’s up to you, my reader, to continue perfecting your skills. To me, game programming is a matter of curiosity and experimenting. You’ll have the initial base, but it’s up to you to try new things and experiment by trying out new ideas in the way you want to.
Requirements (In order of installation):
- Java Development Kit 8 installed, http://www.oracle.com/technetwork/java/javase/downloads/jdk8-downloads-2133151.html
- Android Studio, https://developer.android.com/studio/index.html
- Libgdx Setup App: https://libgdx.badlogicgames.com/download.html
Here’s more info on preparing the environment in case you’re struggling with something: Link to Libgdx Article
Extra tools I’m using:
- Git Client (For Source control), I’m using the command tools, but you can GUI at https://desktop.github.com/
- Far Manager (For easier file managing + command line tools), get it for free at http://www.farmanager.com/ If you don’t want to use it, simply use windows explorer + command prompt
Creating Version Control Repository
You can skip this step if you want to, but I strongly advise you to store your code somewhere. Version control, like git/svn/mercurial is a perfect way to do this. Since this is a public project (you will be able to see my code), I will use github to create a project. If you want to focus on private projects, you can use mercurial (hg) or git, in combination with http://bitbucket.org, which provides free storage for your code soruce control.
First, create a new project (repository). Then, pull it to your machine. With git, I use the following command:
git clone http://linktomyrepo
With hg, it’s something similar:
hg clone http://linktomyrepo
Setting Up The Game Project Itself
After you install JDK8 and Android Studio, it’s time to launch Libgdx Setup App.
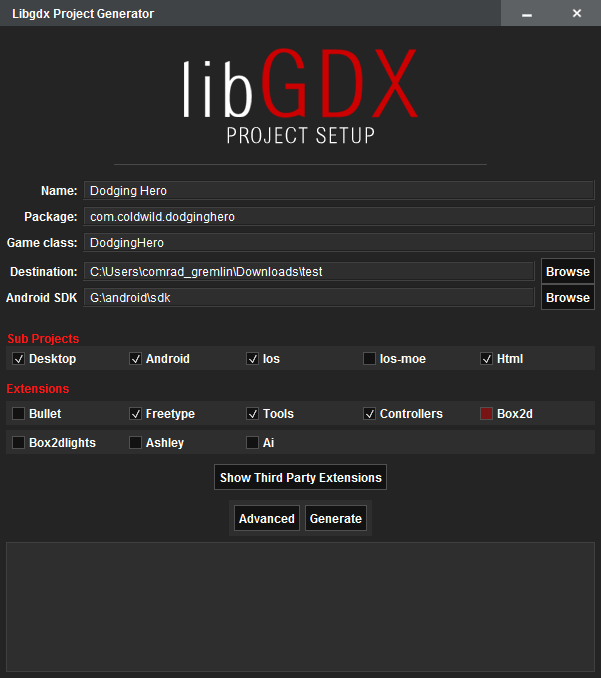
Gdx Project Setup Screen
You can name the project however you want to. I’ll name mine Dodging Hero. The package name should be somewhat descriptive. The usual format is com.yourname.gamename, in my case (Since I’m the owner of coldwild games studio), I’m going to name it com.coldwild.dodginghero.
The game class is where the initial setup and high-level launch things happen. The name should not contain spaces.
The destination is up to you, if you are using source control, just pick the folder where you’ve checked out the Git repository. Try not to have destinations with spaces though. Might save you for potential issues later on. Android SDK is the folder of your android software development kit. It should have been installed with Android Studio. In my case the folder is G:\android
In sub Projects, you generally pick the Platforms that you want to support. This will probably require extra work, but we’re not here to rest. Mark “Desktop”, “Android”, “Ios”, “Html”
Extensions are the helping tools/code snippets and libraries that can make development much easier. Put the checkboxes under following options: “Freetype”, “Tools”, “Controllers”. Uncheck everything else. If you hover the mouse buttons on checkboxes, you are told what every tool means, feel free to read up on the other ones on internet and use them wisely when developing your next games.
To explain a bit more of our choices: “Freetype” – this is the font generation, OpenGL (which is basically behind libgdx) cannot simply display True Type Fonts (.ttf) that are used in our operating systems, so we’ll need to generate the images that contain letters in order to. “Tools” are various supporting functions, in our case we’ll need Texture Packer that comes with them. It will allow us to pack all of our smaller images into one big image, which can be faster process by graphic cards. “Controllers” is the controller/joystick support, I think it will be nice if we add it for our desktop if we have time.
Finally, press “Generate.” You might get a warning telling you that android build tools version is newer. Don’t mind it, confirm the build. After that, you’ll get a warning about Freetype extension not compatible with sub module HTML. This is perfectly fine, we’re not going to use it there. Go ahead and say “Yes, build it!” After that, the process starts, the dependencies are downloaded and after some time the generation is complete.
The time has come to import our project into Android Studio. Open up Android Studio, go to “File” -> “Open” -> go to your generated project folder and select “build.gradle” file. After that, the project is being imported. Great, we have our project opened! Congratulations on finishing the first step.
Setting up the Desktop Version
First thing’s first, let’s make testing the game comfortable without having to run it on Android. We’re going to configure libgdx project to run as a desktop application. In Android Studio, go to Run -> Edit Configurations -> Press the ‘+’ Icon (Add new configuration) -> select ‘Application.’
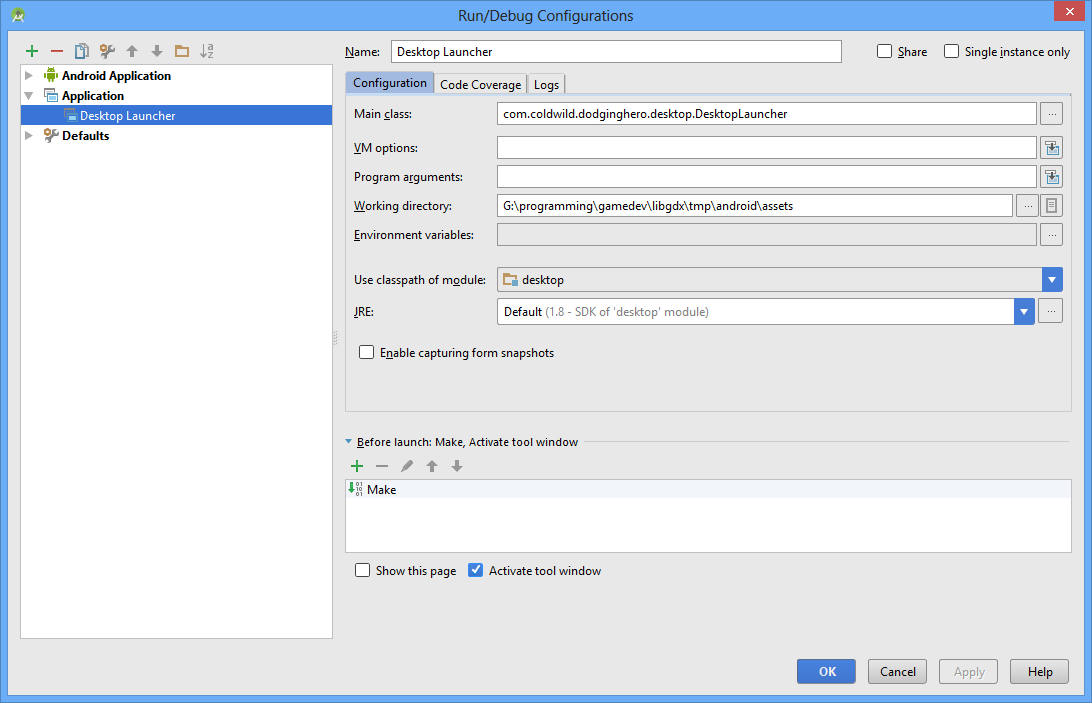
Launcher Settings
At the top of the window that appeared, in the “Name” field, replace “Unnamed” to “Desktop Launcher.” (or whatever name you want to, this is purely cosmetical and is there for your own convenience).
In Main Class field, select your “DesktopLauncher” class.
The working directory should be located in YourProjectFoler/android/assets. This is necessary so that our desktop application would be able to read sprites intended for android.
“Use Classpath of module” should list “desktop.”
Press OK.
The new option should appear in the dropdown list on top of the screen (near the run button triangle). Choose it.
Then press “Run” button. (The green triangle to the right) or simply press “Shift + F10.” This will build and launch your program. Here’s what you should see:
Great, you’re the boss! You see the initial screen, this is what the template project for libgdx looks like.
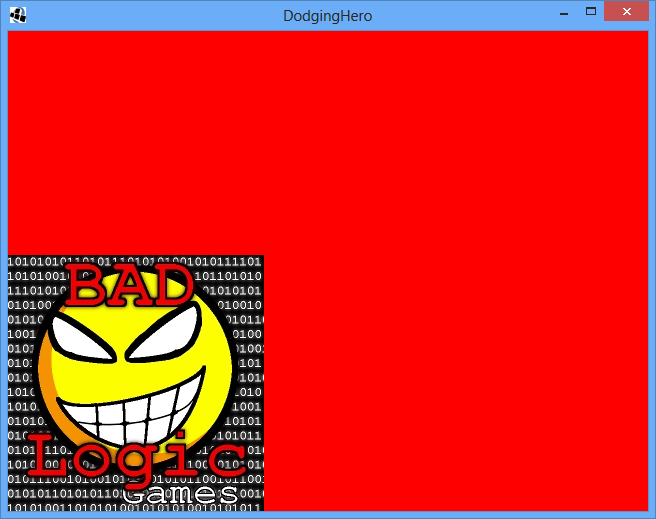
Initial Screen
Going Further, Project Structure Explained
In the panel on the left, you see the list of our subprojects/packages.
There’s the core module, which contains the code of our game. It is universal for all platforms (Desktop/Android/Ios/Html). But if you go for the desktop folder, you’ll see that it contains DesktopLauncher class. It is responsible for running our game on Desktop Platforms. We’ll be writing the Desktop Specific code here. Same is relevant for all the other platforms. For example, our Android Package Folder will contain ad handling code. Since the mechanism of how ads are displayed will probably be different on every platform, we can’t put Admob’s code (google’s library for displaying ads on Android) into core folder.
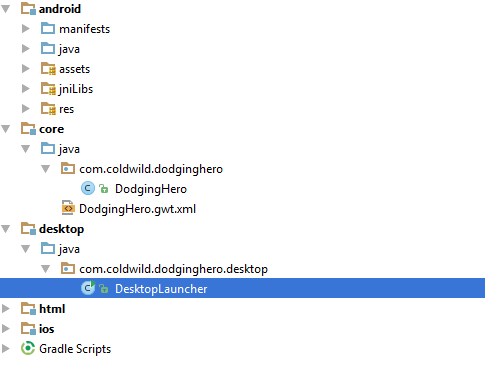
Project Structure
That concludes lesson 1. In lesson 2, we’ll try loading sprites and create a simple background.
Git commit: https://github.com/vladimirslav/dodginghero/commit/c37a9292d8bf06551abb8f5db289e1f033d5effc
Hi Vladimir!
I’ve just started going through this tutorial and am enjoying them, so far. I have one concern I’d like to raise unrelated to the tutorials rather with the tutorial pages themselves.
The main page with the parts listing seems fine, but when I go into any of the individual parts, I notice some large resource leak issues. The pages are using up to 25% of my cpu at all times, and after I left one running for more than a day, it got all the way up to 1GB of memory used. I’m not sure what might be causing the issue, but I just tracked down my problem to the pages here. In the meantime, I’m just going into each page as I need it.
Thank you for this tutorial, and I look forward to reading it to the end!