Tag Archives: gamedev

Developing Multiplatform Game With Libgdx, Part 7: Adding Enemy

Adding basic enemy

In the previous lesson, we’ve implemented a possibility to show the effect before the enemy attack. But to actually send attack effects, we need an enemy to do that. Today, let’s try adding the enemy.

First thing: open our character tileset (http://opengameart.org/content/tiny-16-basic) and cut out any enemy that you’d like. It should be a 16×16 sprite. I’m going to save it as spider.png (It’s up to you how you want to save yours, just make sure you load it properly in our resource class).

Spider

Spider

Now go to your project, and open Resources class. In it, declare:

public Sprite enemy;

Initialize it as we initialize the player sprite (make sure to change the region name though!):

enemy = new Sprite(gameSprites.findRegion("spider"));

Next, right beside our Player object (in our logic.objects package), let’s declare another class, called Enemy. It, too, will be derived from Sprite class.

Opposite from player, it won’t have fieldX and fieldY (we’re always drawing our enemy in one place, right?), so in constructor let’s simply set the sprite value to be equal to our spider sprite. For that, we need to pass Resources to our constructor, just to be able to set the enemy sprite properly.

public class Enemy extends Sprite {

    public Enemy(Resources res)
    {
        set(res.enemy);
    }
}

We’ll also need a draw method(), which will take our size evaluator and set the enemy position accordingly.

To make it possible, let’s go to SizeEvaluator class and introduce two new methods that return float values: getEnemyX() and getEnemyY(). Both will accept enemy Sprite and use it’s length to center the enemy at the right half of the screen.

public float getEnemyX(Sprite enemy)
{
    return (measuredStage.getWidth() * 3 / 4) - enemy.getWidth() / 2;
}

public float getEnemyY(Sprite enemy)
{
    return measuredStage.getHeight() / 2 - enemy.getHeight() / 2;
}

In case of X coordinate, we take the coordinates of second half of the screen (first half is measuredStage.getWidth() / 2, and add an half of an half (measuredStage.getWidth() / 4), thus resulting in (measuredStage.getWidth() * 3 / 4). From that value, we’re decreasing enemy width divided by two, so that our enemy will be exactly centered in the middle of the right half.
In case of Y, we simply take the vertical middle of the stage and substract half of enemy height (for the same, exact centering purpose).

Now go back to our Enemy class. Let’s introduce the draw method, which will set position of our enemy sprite in the necessary coordinates and then will call parent’s (sprite’s) draw method. We should get something like that:

public void draw(SpriteBatch batch, SizeEvaluator sizeEval)
{
    setPosition(sizeEval.getEnemyX(this), sizeEval.getEnemyY(this));
    super.draw(batch);
}

A bit of side thoughts: I’ve been reevaluating my Player class, and I think it’s a better idea if we make constructor similar to enemy’s contructor. Pass the resource class to constructor, everything will be set inside the class itself. It’s a good idea to make class modifications inside the class itself. So, let’s rewrite the Player class in this way:
Constructor:

public Player(int fx, int fy, Resources res)
{
    fieldX = fx;
    fieldY = fy;
    set(res.player);
}

Add a draw function:

public void draw(SpriteBatch batch, SizeEvaluator sizeEval)
{
    setPosition(sizeEval.getBaseScreenX(fieldX), sizeEval.getBaseScreenY(fieldY));
    super.draw(batch);
}

It will do the same thing as our enemy’s draw function. Now let’s do some refactoring. Go to GameScreen, remove RefreshPlayer function.

Also, in GameScreen constructor, remove following line:

player.set(game.res.player);

We won’t be setting a sprite in GameScreen anymore, this should be an inner doing of Player class. In our render function of GameScreen’s class, player drawing should look like this:

player.draw(batch, sizeEvaluator);

After that, let’s adjust our GameLogic class. I think it’s fair if we let it store the pointer to our DodgingHero class (which, in turn, will allow to access game resources). In GameLogic class, declare DodgingHero game; variable. Modify GameLogic constructor to actually assign the variable value and pass game.resources to our player Constructor. Here’s how it looks now:

DodgingHero game;

public GameLogic(DodgingHero _game)
{
    game = _game;
    player = new Player(
            MathUtils.random(MAX_BASE_X),
            MathUtils.random(MAX_BASE_Y),
            game.res
    );
    effectEngine = new EffectEngine();
}

This should suffice for now. In GameScreen class, make sure to change logic initialization:

logic = new GameLogic(game);

Try running the game. Try resizing the window. Everything should work fine now.
Let’s finally get to our enemy now. Go back to GameLogic, and, besides our Player, let’s declare our Enemy:

Enemy enemy;

Make the necessary import (alt + enter), there won’t be a choice. Initialize our enemy in GameLogic constructor.

enemy = new Enemy(game.res);

Create a getter that will return the pointer to our enemy object (similar to getPlayer function).

public Enemy getEnemy()
{
    return enemy;
}

The only thing that remains to do is to draw our enemy in our GameScreen! We are not going to do the same thing we did with Player in GameScreen (where we called logic.getPlayer() only once, inside the constructor), because our enemies might change while player remains the same. So simply do this. After our:

player.draw(batch, sizeEvaluator);

call, add

enemy.draw(batch, sizeEvaluator);

Run the game, it should show something like that:
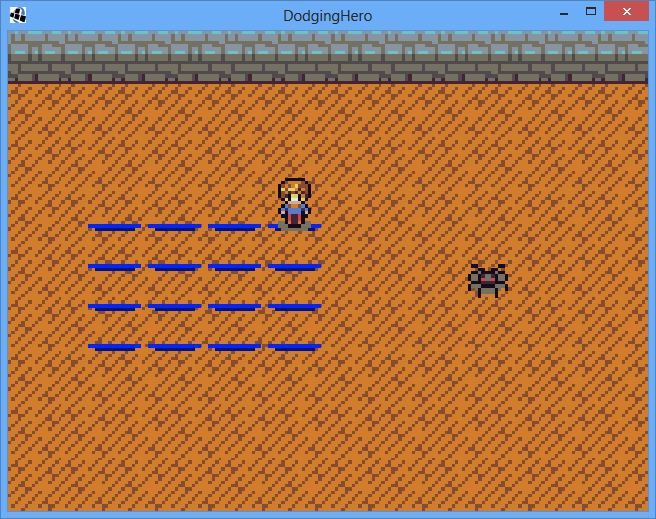
Our Enemy!

Our Enemy!

Now we have an enemy which will attack us!
Don’t worry, I still remember that we made an Effect which will show above the battlefield. We’re definitely going to use it in our next lesson, in which we are actually going to teach our enemy how to attack.
Don’t forger to commit your changes! Also note that you have to run manual git add command every time you add a new file. I actually had to add spider drawing by using „git add” command before commiting.

Here’s the relevant git commit: https://github.com/vladimirslav/dodginghero/commit/1e86d0af762486ad9425e28c82e4e46a59033522

Developing Multiplatform Game With Libgdx, Part 6: Adding Battlefield Effects

We have the field where our character can walk. But what’s the point of walking if you can’t get anywhere? Or rather, if we cannot dodge the attacks of the enemy?

We’ll try to address this today. Let’s add the base marks on the field that will indicate where will the next enemy attack will go (essentially telling player to avoid these bases). We’ll just show a huge exclamation mark above the dangerous bases for now.

After exclamation mark passes, the player will be damaged if he stays on the marked fields. Even though it’s a graphical effect, we’ll need it to essentially affect the game logic (trigger an attack after it’s done showing).

In our graph package, let’s create „effects” package. Inside that package, create „EffectEngine” class. Create an empty public constructor and leave it as is for now. The effect engine will contain the list of all effects that are currently present in the game. It will also update them and issue drawing commands.

Let’s create an “Effect” abstract class in the same package that will implement Pool.Poolable.

To get back on this: if we’re making a game for android, it is good to reuse objects instead of creating them anew. Imagine if we have one effect in place, it vanishes and then the new one appears. If we reallocate the memory for it, it will take much more time to do this (especially with Android’s Garbage Collector). Instead, we’ll make a Pool of objects that we’re going to reuse.

For our base Effect class, we’ll just keep the most necessary things. To me, it usually comes down to two variables. Each effect should have its lifetime counted. We also need to know if the effect is alive or not (so that EffectEngine will know when to destroy it). Declare them this way:

public abstract class Effect implements Pool.Poolable {

    protected boolean isAlive;
    protected float timeAlive;

They need to be declared protected, as it means that they will be accessible by derived classes. Since those will be reinitialized often, the constructor won’t do much apart from setting the variables to initial values.

public Effect()
{
    isAlive = false;
    timeAlive = 0;
}

After this, let’s actually get to our Init function, which will reset the values to zero and will add the effect to the engine (will add it a bit later). The release function should also be there in case we’ll need extra disposal.

public void Init(EffectEngine parent)
{
    isAlive = true;
    timeAlive = 0;

}

public void release()
{

}

Now to other functions: there is a need for draw() and update functions. Update will update the current effect (most of them will have the lifetime, update will be responsible for checking if our effect has expired). In our case, we simply adjust the timeAlive.

public void update(float delta)
{
    timeAlive += delta;
}

draw is self-explanatory. It will take the batch and draw the effect. Since we do not plan to instantiate the effect class, declare draw function abstract.

public abstract void draw(SpriteBatch b);

One more thing remains: let’s allow to access isAlive variable to check whether effect is alive by adding isAlive method:

public boolean isAlive()
{
    return isAlive;
}

Now, let’s get back to EffectEngine class. First thing we need to do: declare a List of Effects:

List<Effect> effects;
public EffectEngine()
{
    effects = new ArrayList<Effect>();
}

The whole interaction is going to happen with this list. Our EffectEngine essentially needs only four functions: draw(), update(), clear(), add(). Draw will be calling draw() on all existing effects, add will be used to add a new effect to the list, clear will clear all the effects (in case we exit the gamescreen) and update will do the necessary updates (and remove the dead effects from the list). Let’s start with add function, as it is going to be the simplest one out there:

public void add(Effect effect)
{
    effects.add(effect);
}

Nice and simple, just add a new effect to an existing list. The update function is going to be a bit trickier though. First, we’ll go through the effect list and call their ‘update’ functions. After that, it’s time to root out the dead (expired) effects.

public void update(float delta)
{
    int i = 0;
    while (i < effects.size())
    {
        effects.get(i).update(delta);
        if (effects.get(i).isAlive())
        {
            i++;
            // just go forward in our list
        }
        else
        {
            effects.get(i).release();
            effects.remove(i);
        }
    }
}


First, we call the update function of every separate effect. After that, we check if the effect is alive. If it is, we simply proceed to the next effect in our list. But if it is not, we remove the effect with the current index (and do not increase our index, because the next element in the list moved to the current index).

The draw function is much simpler:

public void draw(SpriteBatch batch)
{
    for (int i = 0; i < effects.size(); i++)
    {
        effects.get(i).draw(batch);
    }
}

Go through all effects and draw them. And finally, clear function. The idea behind it is to mark the effects reusable (released) so that the next time (in case we restart the GameScreen) our effect pool won’t need to create any new elements, but reuse the old ones.

public void clear()
{
    while (effects.size() > 0)
    {
        effects.get(0).release();
        effects.remove(0);
    }
}

Finally, go back to Effect class and modify it’s Init function: at the end of it, call parent.add(this);

Here’s how my code looks for Effect class:

public abstract class Effect implements Pool.Poolable {

    protected boolean isAlive;
    protected float timeAlive;

    public Effect()
    {
        isAlive = false;
        timeAlive = 0;
    }

    public void init(EffectEngine parent)
    {
        isAlive = true;
        timeAlive = 0;
        parent.add(this);
    }


    public boolean isAlive()
    {
        return isAlive;
    }

    public abstract void draw(SpriteBatch b);

    public void update(float delta)
    {
        timeAlive += delta;
    }

    public abstract void release();
}

And EffectEngine class:

public class EffectEngine {

    List<Effect> effects;
    public EffectEngine()
    {
        effects = new ArrayList<Effect>();
    }

    public void add(Effect effect)
    {
        effects.add(effect);
    }

    public void update(float delta)
    {
        int i = 0;
        while (i < effects.size())
        {
            effects.get(i).update(delta);
            if (effects.get(i).isAlive())
            {
                i++;
                // just go forward in our list
            }
            else
            {
                effects.get(i).release();
                effects.remove(i);
            }
        }
    }

    public void draw(SpriteBatch batch)
    {
        for (int i = 0; i < effects.size(); i++) { effects.get(i).draw(batch); } } public void clear() { while (effects.size() > 0)
        {
            effects.get(0).release();
            effects.remove(0);
        }
    }

Adding the warning effect

Well, time to do a bit more preparations before we actually .Let’s draw the Warning sign effect. (16×16). Here’s mine:
warning
Save it as “warning.png”

Now we’ll derive a new class (WarningEffect) which will show the warning on the field. In our effects package, create a new Java Class, name it “WarningEffect.” Make it extend the Effect class. Automatically implement the suggested methods (draw, release, reset). Create a constructor that won’t do anything but call super(), constructor of the parent. Here’s what we have now:

public class WarningEffect extends Effect {

    public WarningEffect() {
    }

    @Override
    public void draw(SpriteBatch b) {

    }

    @Override
    public void release() {

    }

    @Override
    public void reset() {

    }

}

Here’s where it gets a bit tricky: since every type of effect requires it’s own pool, I usually make a static Pool in every separate class. And make a separate function that instantiates the object (either by creating a new one or by taking an unused one from the pool).

At the bottom of our WarningEffect class, add a new static variable warningPool:

static final Pool<WarningEffect> warningPool = new Pool<WarningEffect>() {
    @Override
    protected WarningEffect newObject() {
        return new WarningEffect();
    }
};

Essentially it will initialize a new WarningEffect if there are no released ones that are available for reinitialization. In our release() function, write

warningPool.free(this);

Which will indicate that the current object is available for reuse.

Now we need a Create function that will take care of returning a new effect instance and setting the base values to it.

static public WarningEffect Create(int fx,
                                   int fy,
                                   SizeEvaluator sz,
                                   Resources res,
                                   EffectEngine engine)
{
    WarningEffect effect = warningPool.obtain();
    effect.init(fx, fy, engine, sz, res);
    return effect;
}

Now as you have probably noticed, there’s an error when you’re trying to call inti function. We absolutely need to pass the resources (will contain warning texture region) and SizeEvaluator (will allow us to draw the effect in a proper place).

Let’s add our own init method and add a few extra variables to handle that. Make a good habit of declaring variables and constants at the start of the class: that way you’ll be able to find them easier, it improves readability. Put these lines at the start of our class:

Resources resources;
SizeEvaluator sizeEvaluator;
public int fieldX;
public int fieldY;

And then add our init method:

public void init(float x, float y, EffectEngine parent, SizeEvaluator sz, Resources res)
{
    super.init(parent);
    fieldX = x;
    fieldY = y;
    sizeEvaluator = sz;
    resources = res;
}

Let’s go back to Resources. Add a new TextureRegion declaration named warning.

public TextureRegion warning;

All that’s left is to add update() and draw() methods. Initialize it the same way you initialize any other Texture Region.

warning = gameSprites.findRegion("warning");

Now go back to WarningEffect class. In draw() method, add the actual drawing of a warning.

@Override
public void draw(SpriteBatch b) {
    b.begin();
    b.draw(resources.warning,
            sizeEvaluator.getBaseScreenX(fieldX),
            sizeEvaluator.getBaseScreenY(fieldY));
    b.end();
}

The last thing we need to do here is to set the update function. At the start of the class, declare a constant:

private static final float WARNING_TIME = 2.0f;

Our warning will be shown for 2 seconds. After that, the player will get damaged if he did not get out of the way.

Let’s override the update function now:

@Override
public void update(float delta)
{
    super.update(delta); // pass the time change
    if (timeAlive > WARNING_TIME)
    {
        isAlive = false;
    }
}

The backend part is done, let’s connect it to our logic and ensure it draws fine on our GameScreen. In our GameLogic, declare the EffectEngine variable and initialize it in constructor:

EffectEngine effectEngine;

public GameLogic()
{
    player = new Player(
            MathUtils.random(MAX_BASE_X),
            MathUtils.random(MAX_BASE_Y)
    );
    effectEngine = new EffectEngine();
}

Add the update(float delta) method, and make sure effectEngine.update(delta) is called there:

public void update(float delta)
{
    effectEngine.update(delta);
}

Now in our GameScreen’s update function, make sure to call logic.update(delta):

private void update(float delta)
{
    gameStage.act(delta);
    logic.update(delta);
}

We also need a way to draw the effects. Make a getter inside GameLogic that would return a pointer to our EffectEngine.

public EffectEngine getEffectEngine()
{
    return effectEngine;
}

Now we need to call the draw from our GameScreen. In our render function, after drawBases() call, add:

drawBases();
logic.getEffectEngine().draw(batch);

Our Effect Engine seems to be done. The lesson is getting lengthy, so I think I’ll just add one effect for the show and call it a day.

In our GameScreen constructor, after logic has been initialized, add the following:

WarningEffect.Create(0, 0, sizeEvaluator, game.res, logic.getEffectEngine());

Run the game. The warning sign will show at the leftmost bottom tile. That should be enough for now, we’ll continue to add better warning effect changes and player damage in our next lesson.

Relevant commit: https://github.com/vladimirslav/dodginghero/commit/4a2ff247520baefbd2ba5895bd1bc41acff03b5c

Developing Multiplatform Game With Libgdx, Part 5: Adding Logic and Basic Player Controls

Getting to game logic and basic controls.

Great. In our previous lesson we’ve made the walkable indicators where player can step in. We’ve also displayed the player sprite. First thing’s first: we remove it now. The teaser is over, boys. We’re back into hardcore programming reality, a no-man’s land of writing game logic.

No, seriously, remove the following line from GameScreen:

batch.draw(game.res.player,
        sizeEvaluator.getBaseScreenX(1),
        sizeEvaluator.getBaseScreenY(1) + 2);

Thanks.

Whenever we develop an application, it’s always a good idea to split logic from graphics. Even if it is much easier to go all-in in one GameScreen class, we don’t want that. The mix of code will make project harder to maintain, but it’s not the only reason. Imagine that you want to pause the game. The game should draw everything properly, only the game objects on the scene stay paused. If you intermix the code, you’re in for lots of extra conditions and workarounds. The rendering part simply should not care about the logics.

Creation of GameLogic and Player classes

Let’s create a separate package called “logic”. (in my case it is com.coldwild.dodginghero.logic). In this package, create a new class, call it “GameLogic”

Make constructor public. Forget about it for now. Inside our logic package, create another package, called “objects” (in my case it is com.coldwild.dodginghero.logic.objects)

Inside our “objects” package, create a new class, call it “Player”, make it inherit from Sprite class. (public class Player extends Sprite). Declare two variables, fieldX and fieldY, those will indicate. Make a public constructor, that takes two integers, named  fx and fy. Assign them to fieldX and fieldY respectively. This is a field position of your player. Also, introduce getters and setters for fieldX and fieldY values. Final look of player class:

public class Player extends Sprite {
    private int fieldX;
    private int fieldY;

    public Player(int fx, int fy)
    {
        fieldX = fx;
        fieldY = fy;
    }

    public int getFieldX() {
        return fieldX;
    }

    public void setFieldX(int fx) {
        fieldX = fx;
    }

    public int getFieldY() {
        return fieldY;
    }

    public void setFieldY(int fy) {
        fieldY = fy;
    }
}

Now, go to move our constants from GameScreen class

private static final int MAX_BASE_X = 3;
private static final int MAX_BASE_Y = 3;

to GameLogic class and make them public (that you’ll still be able to access from GameScreen). Change all existing references to those constants by adding GameLogic. In front of them (For example, GameLogic.MAX_BASE_X).

Run the game and make sure everything still works (only you don’t have your hero, because you’ve removed the drawing of his sprite).

Starting to incorporate GameLogic into our GameScreen

Declare GameLogic type variable in our GameScreen class (GameLogic logic;). Initialize it at the end of the GameScreen constructor. Go back to GameLogic and declare Player variable there (Player player), make sure to import it by pressing Alt+Enter. Now here’s where the fun part starts: we’re going to give our player random coordinates at the game start. Inside the GameLogic constructor, initialize our player. player = new Player();

player = new Player(
        MathUtils.random(MAX_BASE_X),
        MathUtils.random(MAX_BASE_Y)
);

Even though the GameLogic is going to make most Player changes, we still need to give access to our GameScreen class, at least for drawing purposes. In our GameLogic class, make a function that returns pointer to the player created:

public Player getPlayer()
{
    return player;
}

Here’s how GameLogic class looks at this point:

public class GameLogic {

    public static final int MAX_BASE_X = 3;
    public static final int MAX_BASE_Y = 3;

    Player player;

    public GameLogic()
    {
        player = new Player(
                MathUtils.random(MAX_BASE_X),
                MathUtils.random(MAX_BASE_Y)
        );
    }

    public Player getPlayer()
    {
        return player;
    }

}

Cool. Now we’ll be able to properly draw it.

Go back to GameScreen. Declare Player variable there (Player player;) assign value to it after our logic has been initialized:

logic = new GameLogic();
player = logic.getPlayer();

Since Player class extends Libgdx class “Sprite”, we’ll be able to draw it quite easily. All we need to do is to assign coordinates and the actual picture that is going to be drawn.

At first, we’ll need to do a small change to Resources class. Change the type of public TextureRegion player; to Sprite (public Sprite player;) Import the necessary class from libgdx (press alt+enter) and then go to Resources constructor and replace player initialization to:

player = new Sprite(gameSprites.findRegion("player"));

Now go back to GameScreen. After our getPlayer function call, add following commands. The next one assigns the picture to player sprite:

player.set(game.res.player);

And then add the next one:

player.setPosition(
        sizeEvaluator.getBaseScreenX(player.getFieldX()),
        sizeEvaluator.getBaseScreenY(player.getFieldY()));

This one was easy: just set the coordinates of our player sprite to actually match the base where the player is standing. Do not get attached to above part of code. It is not a good idea to assign inner class things in the “outside” code. We will move the sprite image and coordinate setting into Player constructor in next lessons, but right now I want to make it easier to understand.

Looks fine, now let’s actually add the drawing call into our GameScreen render() function. After drawBases() call, write: three lines:

batch.begin();
player.draw(batch);
batch.end();

Our familiar batch begind/end calls and an actual call to draw a player. Run the game a few times. You’ll see that player is located on a new position every time. (Which is preeetty cool). But let’s not dwell on our successes! Instead, we should move forward towards new victories. Let’s make that player move! Make our GameScreen implement InputProcessor:

public class GameScreen extends DefaultScreen implements InputProcessor {

Android Studio is going to tell you that some methods are missing. Press Alt-Enter and choose to add the missing ones automatically. The one you’re going to need is KeyDown. But first, we need to tell our game to accept our GameScreen input. To do this, go to GameScreen constructor and add the following line, right at the end:

Gdx.input.setInputProcessor(this);

In our GameScreen’s dispose method, we need to manually say that the game should abandon GameScreen class as input processor. Add the line

Gdx.input.setInputProcessor(null);

at the end of dispose() method.

Now we’ll be able to track key/mousepresses. Our Keydown function (at least on desktop) will be used to issue movement commands to the player. Sure, most simple thing to do now would be to simply set player’s coordinates on keydown (especially since we have the means). But, remember, logic is split from rendering? What if we are going to have animations between moves (meaning that plainly setting coordinates won’t work and we’ll need to play some animations before player moves)?

We’re still going to implement movement in a simplified way that will need refactoring later, but it’s better if we just adjust the players logical field coordinates inside the screen. Time to add functionality to our GameLogic class. We’re going to add public boolean CheckMove(int fx, int fy) function, which will tell us if player can move to the tile or not. The function should check whether new coordinates are legit. For now it’s going to be really simple: return false if coordinates are out of bounds or true otherwise. In the future, we might extend it.

In the end, our function looks like this:

public boolean CheckMove(int fx, int fy)
{
    return (fx >= 0 &&
            fx <= MAX_BASE_X && fy >= 0 &&
            fy <= MAX_BASE_Y);
}

Since each of our comparisons result in a Boolean, we can simply return comparison result instead of using an if/else logical operator.

The next function will actually save the player coordinates. Let’s name it AssignPlayerPosition, it will accept the new coordinates of a player.

public void AssignPlayerPosition(int fx, int fy)
{
    player.setFieldX(fx);
    player.setFieldY(fy);
}


Now let’s go back to our good old GameScreen. In our KeyDown function, let’s add some movehandling code. If we think about it, it does not matter where we move: left,right,bottom,top: the only thing that differs is a coordinate. Therefore, let’s try to move away the move attempts to a separate function. Let’s make a function called AttemptMove, to which we’ll pass the change of coordinates and it will do the rest.

public void AttemptMove(int dx, int dy)
{
    if (logic.CheckMove(player.getFieldX() + dx, player.getFieldY() + dy))
    {
        logic.AssignPlayerPosition(player.getFieldX() + dx, player.getFieldY() + dy);
        player.setPosition(
                sizeEvaluator.getBaseScreenX(player.getFieldX()),
                sizeEvaluator.getBaseScreenY(player.getFieldY()));
    }
}

First, we’re checking whether the new coordinates are legit. If they are, we’re setting a new position of the player on the base. To finalize it, we’re adjusting the position of the player on the screen.

Now we only need to assign proper function calls from our KeyDown function.

@Override
public boolean keyDown(int keycode) {
    switch (keycode)
    {
        case Input.Keys.RIGHT:
            AttemptMove(1, 0);
            break;
        case Input.Keys.LEFT:
            AttemptMove(-1, 0);
            break;
        case Input.Keys.UP:
            AttemptMove(0, 1);
            break;
        case Input.Keys.DOWN:
            AttemptMove(0, -1);
            break;
        default:
            break;
    }

    return false;
}

Each direction key moves our character relative to the field coordinates. So if we press the Right key, the character moves by one tile to the right horizontally (dx = 1), and zero tiles vertically (dy = 0). Similar things happen with other directional keys. Run the game and try pressing the keys. Our hero is moving! It could be the end of tutorial, but try resizing our window: the hero is in a bad place (literally). To change this, we need to refresh player’s screen coordinates after every resize. In our gamescreen, find both instances of player.setPosition calls and move them into separate function RefreshPlayer():

public void RefreshPlayer()
{
    player.setPosition(sizeEvaluator.getBaseScreenX(player.getFieldX()),
            sizeEvaluator.getBaseScreenY(player.getFieldY()));
}

Add RefreshPlayer() call to our resize() function (and make sure to replace the existing setPosition calls in GameScreen constructor and AttemptMove to RefreshPlayer() call). Run the program and try resizing the window! Everything should be working now.

That concludes our hero movement tutorial. Next time we’re start implementing the enemy and think of the way to display/handle his attacks! Stay tuned! Vladimir is out.

Relevant commit: https://github.com/vladimirslav/dodginghero/commit/d02228f6ecb39fdbf98bb4ad54e57b5fb8f29b73

Implementing A* algorithm using C++ templates

While developing my game, blades of the righteous, I’ve decided to make better pathfinding both for AI and for the player (the units can be given orders to move through multiple tiles – we need to find the optimal path). As I’m probably going to encounter the problem quite often in my next games, I’ve decided to make a universal function for pathfinding that returns the tile path through the generic field. The use of C++ template comes to mind.

Used this article as a reference: http://www.gamedev.net/page/resources/_/technical/artificial-intelligence/a-pathfinding-for-beginners-r2003


A bit of a background: I usually make 2d game maps as 2d array of pointers to units. If tile is empty, it contains nullptr. Otherwise it points to the unit.

Unit* field[FIELD_W][FIELD_H]
field[0][0] = nullptr; // field with coordinates 0,0 is empty
field[1][1] = myUnit; // field with coordinates 1,1 contains myUnit

Seems pretty straightforward, but the problems began when I’ve introduced the units that take two tiles. The Unit class still has only one coordinate pair (x and y), but now the width has been added into the equation. That adds lots of border cases, like:

  • What happens, if our unit of length 2 tries to reach unit to the right of it? For the sake of example, let’s say that our unit is on tile (1,1), the unit that we need to reach is on (7, 1). In that case, the final destination is going to be (1,5) – because our unit occupies both (1,5) and (1,6) and therefore stands near by (1,7)
  • What happens if both units have the length of 2 tiles? What happens if our target is to the right? Then we’d have to approach (targetX – 2, targetY) coordinates.
  • What if our destination tile is empty, but is on the border of the map? That means our unit would not be able to stand there because he lacks length.

Additional data structures/functions are introduced:

// tile, == operator needed to use it with std::find
struct TileCoords
{
    int x;
    int y;
    bool operator==(const TileCoords& other) const
    {
        return x == other.x && y == other.y;
    }
};

// inner tile info, necessary for use within algorithm:
struct TileInfo
{
    TileCoords comeFrom;
    bool isStartingTile;
    bool isVisited;
    int G; // in my case - basically distance from starting tile if you follow 
           // the chosen path (in more generic case: how expensive is it to get here)
    int H; // our guess how much we need to move to reach destination from 
           // that time (it's inaccurate most of the time, but we need to use something as a prediction)
};

using tile_list = std::vector; // define a variable type name for better code readability

// do given x and y coordinates belong to the field with width w and height h?
bool areValidCoordinates(int x, int y, int w, int h) 
{
    return (x >= 0 && y >= 0 && x < w && y < h);
}

// prediction function for H value, basically calculates the distance between two points
int HFunc(int xStart, int yStart, int xDest, int yDest) 
{
    return std::abs(xStart - xDest) + std::abs(yStart - yDest);
}

Therefore, to make A* as generic as possible, we will need a function template:

template <typename T> tile_list Astar(T*** field, // link to the battlefield
                          size_t w, // battlefield width
                          size_t h, // battlefield height
                          bool(*checkFunc)(const T*), // function that checks whether 
                                                      // the given field is available
                                                      // to be moved on
                          int xStart, // starting tile x (where the units stands at)
                          int yStart, // starting tile y (where the unit stands at)
                          int xDest,  // destination tile x
                          int yDest, // destination tile y
                          bool include_destination, // do return destination tile 
                                                    // in the resulting final path?
                          int unit_w) //unit width
{
    if (areValidCoordinates(xStart, yStart, w, h) == false)
    {
        return {}; //empty list
    }

    // check if unit can actually fit in destination
    if (include_destination)
    {
        for (int newX = xDest + 1; newX < xDest + unit_w; newX++)
        {
            if (areValidCoordinates(newX, yDest, w, h) == false)
            {
                return{}; // empty list, one of the destination tiles is out of bounds
            }

            if (checkFunc(field[newX][yDest]) == false)
            {
                return{}; // empty list, one of the destination tiles is occupied
            }
        }
    }

    tile_list closed_set;
    tile_list open_set;

    std::vector<std::vector> evaluatedCoords(w); // array of array

    // initialize values, calculate initial predictions:
    for (size_t x = 0; x < w; x++)
    {
        evaluatedCoords[x] = std::vector(h);
        for (size_t y = 0; y < h; y++)
        {
            evaluatedCoords[x][y].isVisited = false;
            evaluatedCoords[x][y].G = 0;
            evaluatedCoords[x][y].H = HFunc(x, y, xDest, yDest);
        }
    }

    bool destinationReached = false;
    // add starting tile to open list
    evaluatedCoords[xStart][yStart].G = 0;
    evaluatedCoords[xStart][yStart].isStartingTile = true;
    evaluatedCoords[xStart][yStart].isVisited = true;

    if (areValidCoordinates(xStart, yStart, w, h))
    {
        open_set.push_back({ xStart, yStart });
    }

    // while we have not reached destination
    // and there are tiles that can still be evaluated
    while (open_set.empty() == false && destinationReached == false)
    {
        TileCoords currentTile;
        int minF = w * h; // minimum cost that is required to reach destination
        size_t tileNum;   // tile index number
        // select assumed lowest-cost path
        for (size_t i = 0; i < open_set.size(); i++)
        {
            int F = evaluatedCoords[xStart][yStart].G + evaluatedCoords[xStart][yStart].H;
            if (F < minF)
            {
                tileNum = i;
                currentTile = open_set[tileNum];
                minF = F;
            }
        }

        // make an array of adjacent coordinates
        TileCoords adjacentCoordinates[] = { { currentTile.x - 1, currentTile.y }, 
                                                { currentTile.x + 1, currentTile.y },
                                                { currentTile.x, currentTile.y - 1 },
                                                { currentTile.x, currentTile.y + 1 } };

        // ... then go through it and check the new possible tiles
        for (int i = 0; i < sizeof(adjacentCoordinates) / sizeof(*adjacentCoordinates); i++)
        {
            if (areValidCoordinates(adjacentCoordinates[i].x, adjacentCoordinates[i].y, w, h))
            {
                if (std::find(closed_set.begin(), closed_set.end(), adjacentCoordinates[i]) == closed_set.end())
                {
                    int adjX = adjacentCoordinates[i].x; // to make code look cleaner
                    int adjY = adjacentCoordinates[i].y; 
                    // if this tile has not been visited:
                    if (std::find(open_set.begin(), open_set.end(), adjacentCoordinates[i]) == open_set.end())
                    {
                        // we found are destination
                        if (adjX == xDest && adjY == yDest)
                        {
                            evaluatedCoords[xDest][yDest].comeFrom.x = currentTile.x;
                            evaluatedCoords[adjX][adjY].comeFrom.y = currentTile.y;
                            destinationReached = true;
                            break;
                        }

                        // see if found tiles are valid through the whole unit width
                        bool validTiles = true;
                        for (int newX = adjX; newX < adjX + unit_w; newX++)
                        {
                            // coordinates are valid?
                            if (areValidCoordinates(newX, adjY, w, h) == false)
                            {
                                validTiles = false;
                                break;
                            }

                            // field can be visited?
                            if (checkFunc(field[newX][adjY]) == false)
                            {
                                validTiles = false;
                                break;
                            }
                        }
                        
                        // if newfound tile is OK:
                        // we have an unocupied field
                        if (validTiles)
                        {
                            // say that we've came to evaluated coordinates from the current tile
                            evaluatedCoords[adjX][adjY].comeFrom.x = currentTile.x;
                            evaluatedCoords[adjX][adjY].comeFrom.y = currentTile.y;
                            evaluatedCoords[adjX][adjY].G = evaluatedCoords[currentTile.x][currentTile.y].G + 1;
                            open_set.push_back(adjacentCoordinates[i]);
                        }
                    }
                    else
                    {
                        // if we visited this tile already
                        if (evaluatedCoords[adjX][adjY].G > evaluatedCoords[currentTile.x][currentTile.y].G + 1)
                        {
                            // but the path would be shorter if we moved to this tile
                            // from the other one
                            evaluatedCoords[adjX][adjY].comeFrom.x = currentTile.x;
                            evaluatedCoords[adjX][adjY].comeFrom.y = currentTile.y;
                            evaluatedCoords[adjX][adjY].G = evaluatedCoords[currentTile.x][currentTile.y].G + 1;
                        }
                    }
                }
            }
        }

        // move the current tile to visited
        closed_set.push_back(currentTile);
        // remove it from unvisited tiles
        open_set.erase(open_set.begin() + tileNum);
    }

    if (destinationReached)
    {
        // let's make a path
        // go backwards from destination
        tile_list path;
        if (include_destination)
        {
            path.push_back({ xDest, yDest });
        }

        TileCoords currentTile = evaluatedCoords[xDest][yDest].comeFrom;

        // ... until we reach the starting tile
        while (currentTile.x != xStart || currentTile.y != yStart)
        {
            path.push_back(currentTile);
            currentTile = evaluatedCoords[currentTile.x][currentTile.y].comeFrom;
        }

        return path;
    }
    else
    {
        // could not find a way - return nothing
        return {};
    }
}


As a bonus, here’s the episode from the reworked battle system:

Blades of the Righteous: Postmortem

So, the development of blades of the righteous has come to an end some time ago, I’ve stopped actively advertising now and I thought that writing up an overall experience as well as giving more statistics about it could help others in their way of development.

Steam Greenlight Statistics

I’ve put the game on Steam Greenlight at around October 15th. Let’s review the visit/vote graph first.

postmortem2

There are two peaks in visits/votes. Unsurprisingly, I got the highest peaks of attention when publishing info about my game. At first, Facebook greatly helped, netting me around 200 “yes” votes. I’ve posted that MY game is being on Greenlight, and then my supportive friends did the rest, sharing the post and inviting other people to vote.

The second peak is when I got my game sold in a bundle on Groupees.com

The current game status is the following:
postmortem1

There was around 4000 bundle copies sold, my game got 800 yes-votes on Greenlight for that. 1:5 conversion, much higher than I’ve expected. What I’ve learned from this:

  • Start advertising earlier. I’ve almost had my game finished when I’ve published a video. I could have gathered more hype (and possibly gotten more feedback) if I started giving sneak-peeks earlier.
  • BUT if you are trying to tell the world about your game – have something to show. Either some screenshots or a gameplay video.
  • If you don’t have a lot of followers – try to get your game into bundles. It will help greatly. You might have to give out the copies of your game for mere cents, but those are the cents you would not be getting otherwise. Publicity is worth it.

Development

I’ve tried developing some games before, but I could never get them to an end. This time, it has been a bit different.

What made the difference:

  • Getting the assets from professionals. This time I have not attempted to draw every game sprite by myself. I’ve simply thought “OK, I hate doing this kind of stuff, better buy it.” Yes, I’ve lost some money on developing the game, but overall I’ve been really glad to see the professional drawings / music. I also could not say “meh, I’m bored, better do something else.” Why? Because I knew that I’ve invested money in my game.
  • Having a lot of things to do. Yes, I know that this sounds strange. However, when you know that you have only one hour free today, you simply can’t go and do something else. You know that you must do something to improve the game.
  • Issue tracking. I cannot stress this enough. When you write the exact things that you’re trying to do, the project stops being “cowboy coding.” I had a separate issue for all the bugs and new features, be it “rework combat system”, “add orc unit”, “fix the freeze during the combat when both combatants are killed simultaneously.” This helped me to get my aims properly. Instead of thinking “what am I going to do today,” I’ve had my issue tracker open and simply chose the tasks which I need to accomplish.

What went wrong:

  •  The game was too complicated to develop. Yes, I know that everyone writes that. Still, I can’t stress this enough. It’s better to make a simple game with perfectly polished controls, than a complex game without good feel of controls/UI.
  • Polishing. If you think that most of the effort will go to gameplay/feature development, I have bad news for you. The UI/sounds require at least as much effort that gameplay does. At least this was in my case. But the good news: it makes a difference. As soon as I’ve added sounds / blinking / screen fade-in and fade-out, the game started looking much better. Plan to polish your game ahead. Work on controls. See what works and what does not.

Managing hobby gamedev projects

When I was younger, working on hobby projects has been a huge problem: laziness combined with loss of enthusiasm both took their toll on my results. Now, however, while being far from perfection, I have found some personal techniques that help me to preserve enthusiasm and allow me to persist through the whole process while managing it more effectively. At one point I have been working 50h/week and studying about 30h and still found four or five hours during the week for my programming hobbies. Here are some technical tools and methods I’m using to keep developing:


Don’t be afraid to cut your losses

This has to be the first point. Based on that, if you cannot build a prototype in 2 week spare time and see how it plays – don’t bother. It would suck to develop the prototype for 2 months during the weekends and after-work hours and then see that it is completely unplayable.


Enthusiasm passes, goals stay. Write them down.

When you get an awesome idea, you feel excited. You see the final product and imagine how great it is going to be. Then, as you start developing, you notice that your “honeymoon phase” has passed, you’re no longer in love with the game you are making and you are now irritated by the time it will take to develop. The image of the final version you had in the beginning now gets blurry: you’ve spent time, you somehow get the idea what do you want to see, but now you feel the lack of enthusiasm to do something: you just feel the weight of responsibility and necessary man-hours required to complete the game. You’re (hopefully) halfway through, but you have no idea how to finish the other half, because you’re feeling so lazy that you’d rather watch a turtle race than write a new code lines.

Here’s what you need to do: as soon as you have the initial vision of the game, start writing down issues, split it into smaller sub-tasks. For example, when I’ve started developing my Blades of the Righteous game, I’ve began using bitbucket’s built-in issue tracker when I had an awesome idea of a feature. That way I’ve made lots of small issues like “Check distance when attacking”, “Add Item System”, “Allow player to inspect objects on game map”. You get the idea. My enthusiasm is almost gone now, but the open tracker issues are what keeps me going: the goal (to publish the game) remains, and I know exactly what I have to do to get to it. Speaking about bitbucket:


Use version control

If you are a professional software engineer, you’re probably already doing it. It is very important to do so for your hobby projects: not only it allows you to make backups of your projects, enforcing additional level of data safety, it also allows you to revert unnecessary changes / mistakes and see the code changes from the previous versions which saves you time. Speaking about the previous versions: if I ever get discouraged, I just go to my repository logs and see my progress.

Another important thing regarding logs: use meaningful commit messages. I’m pretty sure you won’t remember what did you mean with “Fixed a bug” message. Compare it with “Fixed a bug in combat when attack damaged the friendly unit.” It’s also going to make it easier for you to search for the necessary commit should something go wrong with your new changes.


Rather than increasing the number of game features, try to decrease it

It seems that perfection is attained not when there is nothing more to add, but when there is nothing more to remove” – Antoine de Saint Exupéry.

I’m sure your game will be cooler with all those 200 droppable items. But do you really need them? Unless you are A+ developer working 60+ hours a week on your dream game, try to reduce the content to a minimum. I’m not saying “remove everything”, I’m saying “remove everything that is not of the essence.” Don’t give up on things that you think will be great, but choose your battles carefully.

More than that: don’t bother to make all the features at once. Try to get your game going as soon as possible and then give it to your friends. They will provide you with feedback. Listen to it.


This is all I wanted to tell. Don’t give up on your aspirations: even if in the end you are the only one who plays the game you made, that still means that there IS a game to play. Good luck!

Extracting separate tiles from the tilesheet

When programming my game, I have encountered a following problem and had a bit of a struggle with it:

There are whole 2d tilesheets, available on the internet, the good example is the free tilesheet collection, kindly published by hyptosis:

http://hyptosis.newgrounds.com/news/post/793230

However, what if I want to get the separate tiles from them? (I.e, for my map editor, which takes single tiles). The need to split the whole tilesheet into single tiles arises.

The solution is quite simple:

  1. Take the spritesheet that you need. In my case, it has been http://www.newgrounds.com/art/view/hyptosis/tile-art-batch-1 – download to  your computer
  2. Download and install ImageMagick, http://www.imagemagick.org/script/index.php
  3. Run the following command:
    convert -crop 32x32 source.png tile%d.png
  4. 
    

    Voila. You have your tiles split into separate images. Now you can separate your spritesheets into smaller frames in the same way.

Source: http://stackoverflow.com/questions/4761365/i-have-a-1024×1024-png-i-want-to-split-it-into-64×64-256-equal-parts