Category Archives: Gamedev

Developing Multiplatform Game With Libgdx – part 2 – project structure

Heya! The next lesson adresses the project structure and introduces asset packing. The video turned out to be a bit confusing, but the extended transcript is below. Let me know if you have any questions!

What is a game and how we build it

If we think about it, what is a game? Let’s check out the main file, DodgingHero. If we really dumb it down, the game is a cycle of displaying info and getting user’s feedback. The game screen actually renews many times per second (FPS, frames per second, actually indicate this exact value). The render() function in Libgdx is doing exactly this. It cleans the screen (glClear command), then it draws our own things.

The create() function initializes our game. Those are the operations that need to be done once. Mainly, it’s resource allocation. We need to load the textures/sprites only once (the line img = new Texture(“badlogic.jpg”); does exactly that). We also initialize SpriteBatch (batch = new SpriteBatch();), essentially this is the structure that sends the commands to our graphic card.

On the opposite side, we have dispose() function, that is called after our game is done running. We need to free up resources. And this is exactly happens in this particular case: both batch and img are being disposed.

Now that we have a very general idea what’s going on, I’m going to tell you how I usually structure my projects. A good project structure ensures that project maintenance and code updates will go much smoother. As they say, “hours of planning can save you weeks of programming.”

Preparing our art

First thing first, let’s find some art for our prototype. I usually use opengameart if I want to build something fast, and this case will be no exception. After some search, I found http://opengameart.org/content/tiny-16-basic – tileset with some monsters and humans which we can use for our game prototype. I’m going to pick the tiles they have, pick two of them and will use them to show our initial background, repeated the tiles for the background. Essentially I’m doing some extra work here (because the tilesets on the link are already very neatly organized), but I need to show you what’s going on by an example.

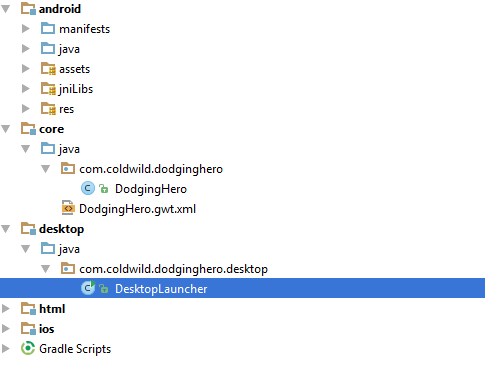
In our project root folder (the same folder where we have “android”, “core”, “html” … folders) , let’s make a folder named “assets.” Inside that folder, make another folder, named “unpacked.” From the tileset, cut out one floor and one wall tile (I usually use paint.net, http://www.getpaint.net/index.html for that purpose, but the simple ‘paint’ will do for now).Each image should be 16×16 pixels in size, save them as ground.png and wall.png accordingly. Now, we have two tile sprites, but what do we do with them? For a better performance, all sprites should be put into spritesheets. (It takes time for the graphic card to switch between textures/sprites). It’s really not a problem for modern computers most of the time (for a small game), but I’d rather teach you to do things the ‘proper’ way first. In our Android Studio, go to desktop package and open DesktopLauncher. For Desktop version, we’re going to add texture packing. (Whenever we run desktop version, the sprites are going to be packed into one file. We’ll be able to use this this pre-generated file in the other platforms, like android). The main reason I’m doing it this way is because TexturePacker is not supported by some of our platforms (at least HTML), so I’d rather execute it on Desktop only.

In DesktopLauncher class, add the following private function:

static void Pack()
{
      TexturePacker.Settings settings = new TexturePacker.Settings();
      settings.maxHeight = 2048;
      settings.maxWidth = 2048;
      settings.pot = true;
      TexturePacker.process(settings, "../../assets/unpacked", "packed", "game");
}

Then, right at the start of main() function, add the call to Pack() function, it will look like this now:

public static void main (String[] arg) {
   Pack();
   LwjglApplicationConfiguration config = new LwjglApplicationConfiguration();
   new LwjglApplication(new DodgingHero(), config);
}

Loading the art

Select the DesktopLauncher configuration and run our program on it (first launch might take some time). Now go and check the android\assets\ folder. There should be a new directory, “packed” there. Inside that directory, there should be two files: game.png and game.atlas. First one is the picture of two tiles put together. The other one is actually a text file (you can check it out with any text editor, I use Notepad++). It is, like extensions says, an atlas, that describes different sprites in it and coordinates of those sprites in our new big picture.

Now we’ll have to load this atlas. The next thing we do, make a resource class, which will hold the graphical data. Make it in the same package as your main game class. In my case, I right click on “com.coldwild.dodginghero”, choose “New” and pick “Java Class.”

create-new

New Class Creation

Name it “Resources.” This one will be responsible for loading and storing the assets for our game. Go to your new file, and inside Resources class declare the public constructor and TextureAtlas variable gameSprites.

public class Resources {

    TextureAtlas gameSprites;

    public TextureRegion ground;
    public TextureRegion wall;

    public Resources()
    {
        gameSprites = new TextureAtlas(Gdx.files.internal("packed/game.atlas"));
        ground = gameSprites.findRegion("ground");
        wall = gameSprites.findRegion("wall");
    }

    public void dispose()
    {
        gameSprites.dispose();
    }
}

Before constructor declaration, we declare TextureAtlas named “gameSprites”– this is the thing that is going to store our spritesheet  with game characters and background.

dispose() function will be called after the end of our program, to unload all resources that have been used.

We put the initialization of the gameSprites into our constructor with the following line:

    gameSprites = new TextureAtlas(Gdx.files.internal("packed/game.atlas"));

This will take the generated atlas from ourproject/android/assets/packed/ folder. After that, declare two TextureRegion variables, ground and wall right after gameSprites atlas.

TextureAtlas gameSprites;

public TextureRegion ground;
public TextureRegion wall;


Great, now let’s assign some values in our constructor. It’s not hard: just add the following lines:

ground = gameSprites.findRegion("ground");
 wall = gameSprites.findRegion("wall");


The final result should look like this:

public class Resources {
 
     TextureAtlas gameSprites;
 
     public TextureRegion ground;
     public TextureRegion wall;
 
     public Resources()
     {
         gameSprites = new TextureAtlas(Gdx.files.internal("packed/game.atlas"));
         ground = gameSprites.findRegion("ground");
         wall = gameSprites.findRegion("wall");
     }
 
     public void dispose()
     {
         gameSprites.dispose();
     }
 }


Testing what we have

Now ground and wall point to the specific tiles and we’re be able to draw them! Now go to your main class file (in my case it’s DodgingHero.java) in core folder and add new public variable, Resources right at the start of the file. You should initialize it at the start of create() function. Remove the “img” variable and all code related to it from the file. You won’t need it anymore. Let’s just test if we can draw our simple tiles. In dispose function, add res.dispose(); Final result should look like this:

  
 public class DodgingHero extends ApplicationAdapter {
     public Resources res;
     SpriteBatch batch;
 
     @Override
     public void create () {
         res = new Resources();
         batch = new SpriteBatch();
     }
 
     @Override
     public void render () {
         Gdx.gl.glClearColor(1, 0, 0, 1);
         Gdx.gl.glClear(GL20.GL_COLOR_BUFFER_BIT);
         batch.begin();
         batch.end();
     }
 
     @Override
     public void dispose () {
         batch.dispose();
     }
 }

Now, for the sake of testing our tiles, let’s add simple drawing between batch.begin() and batch.end() inside our render() function:

@Override
 public void render () {
     Gdx.gl.glClearColor(1, 0, 0, 1);
     Gdx.gl.glClear(GL20.GL_COLOR_BUFFER_BIT);
     batch.begin();
     batch.draw(res.ground, 0, 0);
     batch.draw(res.wall, 0, 16);
     batch.end();
 }

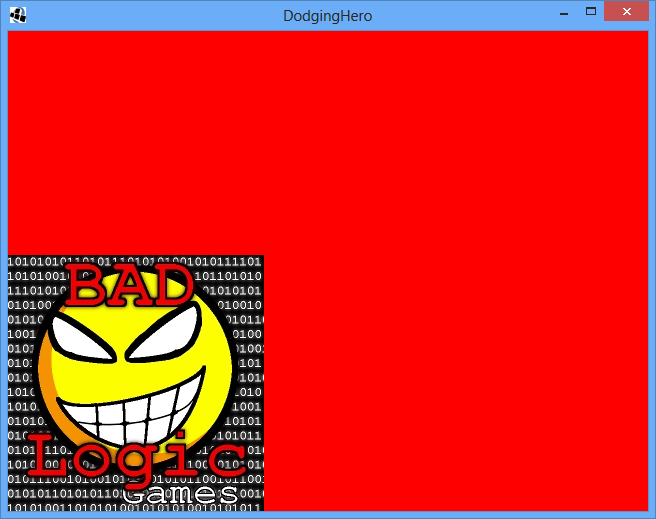
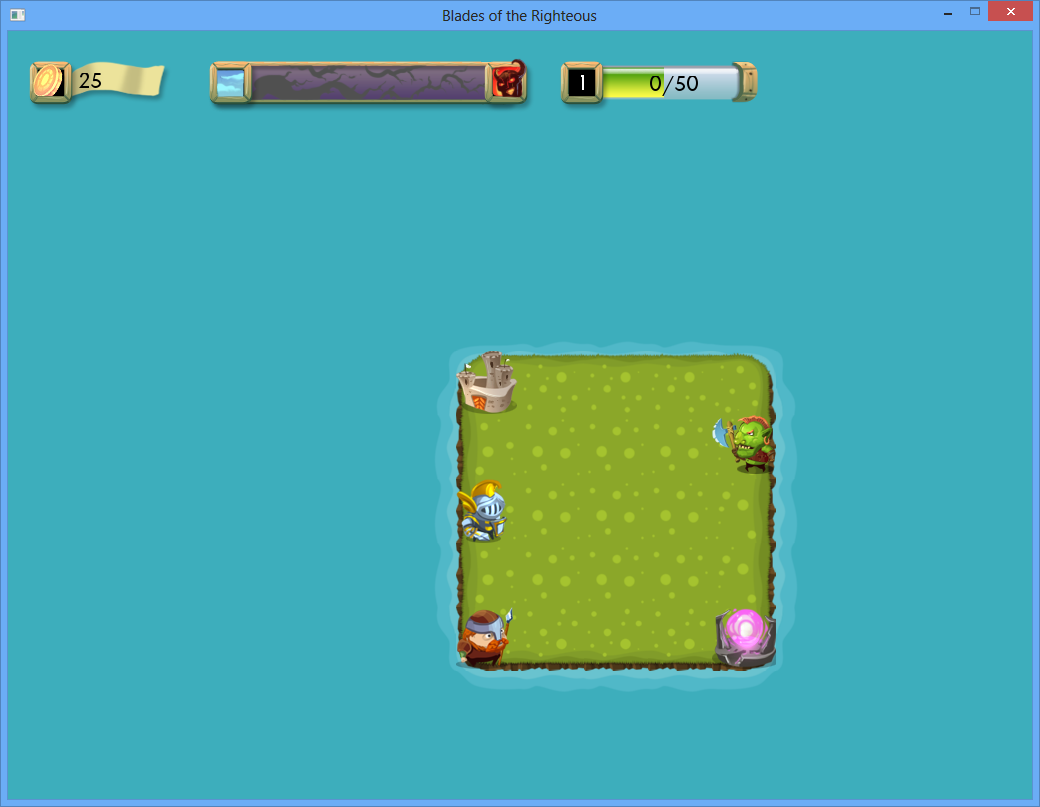
This way we should draw the wall above the ground. The first parameter is the sprite that we want to draw, the next is the coordinates(x, y). Unless you change something, the x coordinates are going from left side of the screen to right side (0->width) and y is going from bottom to top (0->height). 0 means the lowest point of the window. Run the program and you should see both small tiles drawn at the left side of the screen:

gamescreen

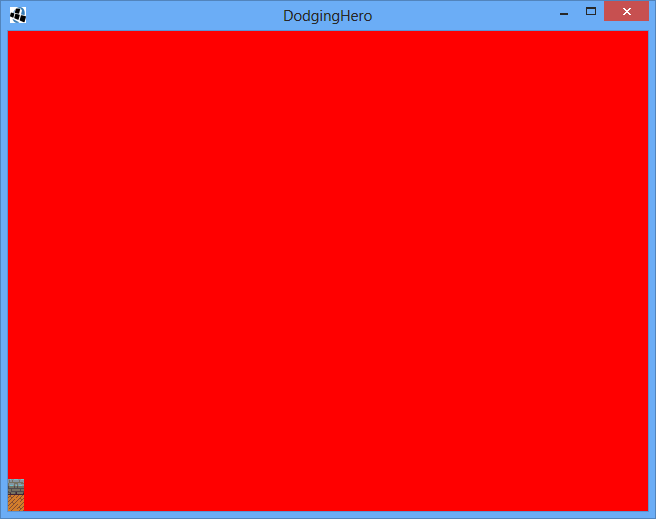
Our work in progress!

Adjusting Code Structure

So, Vladimir, are we ready to build the game right here? Hell no. It might seem like a good idea to write all code here, but it will quickly become bloated if nothing is done: imagine that we have to program all the menus and screens in one file. The way I usually do it is to split every separate screen into a separate file and do the rendering/control checking there. The good news is that libgdx allows you to do this quite easily.

In our core/java/com.yourname.gamename package, create a new package called “screens.” There, we’ll add the DefaultScreen parent class, which will store the link to our game object (and will be able to access our resources from there), from which we’ll inherit the next screens.

newpkg

New Package Creation

Right click on the “screens”, package select “new” -> “Java Class.” Name it DefaultScreen, make it implement Screen (public class DefaultScreen implements Screen), add the necessary import from Libgdx by placing map cursor over “Screen” and pressing alt+enter. Press alt-enter again to automatically implement the missing methods. Don’t touch them. (for now). Now, we’ll do two things:

  • Declare a variable of our main class (it will point out to game)
  • Create a constructor for DefaultScreen

That should not take much time:

public class DefaultScreen implements Screen {
 
     public DodgingHero game;
 
     public DefaultScreen(DodgingHero _game)
     {
         game = _game;
     }


Very good, our DefaultScreen class is ready.

Now we should implement the actual game screen. Right click on screens package, add new Java Class, let’s name it GameScreen. GameScreen should extend the Default Screen. (public class GameScreen extends DefaultScreen). Press alt+enter to implement the default constructor. Your class should look like this:

public class GameScreen extends DefaultScreen {
     public GameScreen(DodgingHero _game) {
         super(_game);
     }
 }


Now go to your main class (in my case it’s DodgingHero), and blatantly cut-paste render() function from there to GameScreen. Change the input parameters to accept float delta (public void render (float delta)). We now have this:


public class GameScreen extends DefaultScreen {
     public GameScreen(DodgingHero _game) {
         super(_game);
     }
 
     @Override
     public void render (float delta) {
         Gdx.gl.glClearColor(1, 0, 0, 1);
         Gdx.gl.glClear(GL20.GL_COLOR_BUFFER_BIT);
         batch.begin();
         batch.draw(res.ground, 0, 0);
         batch.draw(res.wall, 0, 16);
         batch.end();
     }
 }

batch is unresolvable. We need to move it from main class here. Main class should be very small now:

 public class DodgingHero extends ApplicationAdapter {
     public Resources res;
 
     @Override
     public void create () {
         res = new Resources();
     }
 
     @Override
     public void dispose () {
         res.dispose();
     }
 }


The last thing to do is to change batch.draw calls. We don’t have res variable here, but we can access it via our game variable. Change batch.draw(res.ground, 0, 0); to batch.draw(game.res.ground, 0, 0); Do the same change with wall. The final GameScreen class should look like this:

public class GameScreen extends DefaultScreen {
 
     SpriteBatch batch;
 
     public GameScreen(DodgingHero _game) {
         super(_game);
         batch = new SpriteBatch();
     }
 
     @Override
     public void render (float delta) {
         Gdx.gl.glClearColor(1, 0, 0, 1);
         Gdx.gl.glClear(GL20.GL_COLOR_BUFFER_BIT);
         batch.begin();
         batch.draw(game.res.ground, 0, 0);
         batch.draw(game.res.wall, 0, 16);
         batch.end();
     }
 
     @Override
     public void dispose()
     {
         batch.dispose();
     }
 }

Run the game now. Oh no! What do we have in front of us? It’s a black screen! Something went wrong. No worries, the issue is that we moved the code to the separate screen, but did not instantiate it in any way. We need to tell our game to explicitly switch to it. Go back to our main class, and do two things:

  • Change class declaration: public class DodgingHero extends ApplicationAdapter { should change to public class DodgingHero extends Game {
  • At the end of create() function add the following line: setScreen(new GameScreen(this)); Press alt+enter to resolve and auto-import GameScreen class

Run the game now. You should see the red screen with two tiles at the bottom. It might not look as much, but our project has changed a lot. After this, we’ll be able to independently work on specific screens, and adding new screens (like main menu, credits, etc) won’t be a problem.


Git Commit: https://github.com/vladimirslav/dodginghero/commit/d02228f6ecb39fdbf98bb4ad54e57b5fb8f29b73

I’ve taken assets from: http://opengameart.org/content/tiny-16-basic, they are made by Lanea Zimmerman. I’ve cut separate tiles so it would be easier to follow (see my git repo).

You might want to check https://libgdx.badlogicgames.com/documentation.html for more details and in-depth descriptions.

Developing Multiplatform Game With Libgdx – part 1

Hey everyone!
After learning things from different tutorials on Internet, I wanted to contribute something. There are lots of tutorials on how to make games. I want to make a tutorial that would go through the whole process: from setting up the work environment to game publishing.

Here’s the video of the project, but in case you’re more into reading, the transcript is given below.

Setting up our project

I’ll be making a multiplatform game that you will be able to run on PC, but my end goal is to publish it on Android. You don’t really need the Android device to follow this tutorial: I’ll explain how to make the game run on your desktop machine, without the need to launch it on Android.

The game idea is simple: on half of the screen, we have a 4×4 field and a character that moves between tiles to dodge enemy attacks. On the right side, there’s an enemy (or group of enemies) that stand and attack the hero (or, rather, some of the tiles).

Game Idea

Game Idea

If anyone promises to make you a gamedev expert simply from doing one tutorial – he’s probably lying. In this tutorial, the end goal is to make a game, but it’s up to you, my reader, to continue perfecting your skills. To me, game programming is a matter of curiosity and experimenting. You’ll have the initial base, but it’s up to you to try new things and experiment by trying out new ideas in the way you want to.

Requirements (In order of installation):

Here’s more info on preparing the environment in case you’re struggling with something: Link to Libgdx Article

Extra tools I’m using:

  • Git Client (For Source control), I’m using the command tools, but you can GUI at https://desktop.github.com/
  • Far Manager (For easier file managing + command line tools), get it for free at http://www.farmanager.com/ If you don’t want to use it, simply use windows explorer + command prompt

Creating Version Control Repository

You can skip this step if you want to, but I strongly advise you to store your code somewhere. Version control, like git/svn/mercurial is a perfect way to do this. Since this is a public project (you will be able to see my code), I will use github to create a project. If you want to focus on private projects, you can use mercurial (hg) or git, in combination with http://bitbucket.org, which provides free storage for your code soruce control.

First, create a new project (repository). Then, pull it to your machine. With git, I use the following command:

git clone http://linktomyrepo

With hg, it’s something similar:

hg clone http://linktomyrepo

Setting Up The Game Project Itself

After you install JDK8 and Android Studio, it’s time to launch Libgdx Setup App.

Gdx Project Setup Screen

Gdx Project Setup Screen

You can name the project however you want to. I’ll name mine Dodging Hero. The package name should be somewhat descriptive. The usual format is com.yourname.gamename, in my case (Since I’m the owner of coldwild games studio), I’m going to name it com.coldwild.dodginghero.

The game class is where the initial setup and high-level launch things happen. The name should not contain spaces.

The destination is up to you, if you are using source control, just pick the folder where you’ve checked out the Git repository. Try not to have destinations with spaces though. Might save you for potential issues later on. Android SDK is the folder of your android software development kit. It should have been installed with Android Studio. In my case the folder is G:\android

In sub Projects, you generally pick the Platforms that you want to support. This will probably require extra work, but we’re not here to rest. Mark “Desktop”, “Android”, “Ios”, “Html”

Extensions are the helping tools/code snippets and libraries that can make development much easier. Put the checkboxes under following options: “Freetype”, “Tools”, “Controllers”. Uncheck everything else. If you hover the mouse buttons on checkboxes, you are told what every tool means, feel free to read up on the other ones on internet and use them wisely when developing your next games.

To explain a bit more of our choices: “Freetype” – this is the font generation, OpenGL (which is basically behind libgdx) cannot simply display True Type Fonts (.ttf) that are used in our operating systems, so we’ll need to generate the images that contain letters in order to. “Tools” are various supporting functions, in our case we’ll need Texture Packer that comes with them. It will allow us to pack all of our smaller images into one big image, which can be faster process by graphic cards. “Controllers” is the controller/joystick support, I think it will be nice if we add it for our desktop if we have time.

Finally, press “Generate.” You might get a warning telling you that android build tools version is newer. Don’t mind it, confirm the build. After that, you’ll get a warning about Freetype extension not compatible with sub module HTML. This is perfectly fine, we’re not going to use it there. Go ahead and say “Yes, build it!” After that, the process starts, the dependencies are downloaded and after some time the generation is complete.

The time has come to import our project into Android Studio. Open up Android Studio, go to “File” -> “Open” -> go to your generated project folder and select “build.gradle” file. After that, the project is being imported. Great, we have our project opened! Congratulations on finishing the first step.

Setting up the Desktop Version

First thing’s first, let’s make testing the game comfortable without having to run it on Android. We’re going to configure libgdx project to run as a desktop application. In Android Studio, go to Run -> Edit Configurations -> Press the ‘+’ Icon (Add new configuration) -> select ‘Application.’

runsettings

Launcher Settings

At the top of the window that appeared, in the “Name” field, replace “Unnamed” to “Desktop Launcher.” (or whatever name you want to, this is purely cosmetical and is there for your own convenience).
In Main Class field, select your “DesktopLauncher” class.
The working directory should be located in YourProjectFoler/android/assets. This is necessary so that our desktop application would be able to read sprites intended for android.
Use Classpath of module” should list “desktop.”
Press OK.

The new option should appear in the dropdown list on top of the screen (near the run button triangle). Choose it.

Then press “Run” button. (The green triangle to the right) or simply press “Shift + F10.” This will build and launch your program. Here’s what you should see:

Great, you’re the boss! You see the initial screen, this is what the template project for libgdx looks like.

result

Initial Screen

Going Further, Project Structure Explained

In the panel on the left, you see the list of our subprojects/packages.

There’s the core module, which contains the code of our game. It is universal for all platforms (Desktop/Android/Ios/Html). But if you go for the desktop folder, you’ll see that it contains DesktopLauncher class. It is responsible for running our game on Desktop Platforms. We’ll be writing the Desktop Specific code here. Same is relevant for all the other platforms. For example, our Android Package Folder will contain ad handling code. Since the mechanism of how ads are displayed will probably be different on every platform, we can’t put Admob’s code (google’s library for displaying ads on Android) into core folder.

Project Structure

Project Structure

That concludes lesson 1. In lesson 2, we’ll try loading sprites and create a simple background.

Git commit: https://github.com/vladimirslav/dodginghero/commit/c37a9292d8bf06551abb8f5db289e1f033d5effc

Some Practical Things I’ve learned from developing my first game

Developing your first game is like walking into uncharted waters. You might read up a lot, but you will still encounter some problems that will be avoided on your next game. Here’s what I’ve noticed while working on my first big game.

Error Handling and Reporting

What seems like a luxury at first, quickly becomes a necessity when your game goes live. Build your system with that in mind. Steam offers a good error reporting service in case the game crashes, but it needs the data to send. In my case – I hold the stack of function calls and some arguments (about 10 entries) so there would be at least some information on when the game crashed. It’s not always enough, but it’s better than nothing.

Savegames

You ought to start thinking about implementing savegames at once. The more your game grows, the more data is added (i.e. player in my game had no need to save an army at first, but it became a must later on). The longer you wait, the harder it will be to implement. When I realized that I needed map savegames in Blades of the Righteous (already when the game has been released), I had to drop everything and work 3 days, 12hours nonstop just to implement and test everything. The rush and stress could have been avoided had I planned it right at first.

Literals

Sure, sometimes you just want to make a button and hardcode “Start” on it. My advice: don’t. Move all the string literals that you have in code (those that are visible to your users) into an external file. That way when you want to translate the game, the process won’t be painless. Right now I’d have to rewrite everything if I wanted to translate my game (I might actually do this).

Screen Resolution

Especially if you are working on 2d game. Read up on how others solve it. I had to realize that it’s the problem only after release (when people started explicitly asking for fullscreen). I’ve intended the game to be windowed, like “Knights of Pen and Paper”, first part (Awesome game, love it). However, I’ve been getting lots of requests to support fullscreen. In this cases, you can stick to your opinion (“Working as intended!”) or actually listen to people and their wishes. Making good resolution support also makes your game much more easier to record for letsplayers.

I think that’s all I can remember for now. If you have any similar experiences and things your are paying attention to – feel free to share them in comments.

Blades of the Righteous retrospective

It’s been almost 4 months since I’ve left the job to finish my game and potentially work on my other projects. I would not say that those 4 months felt like being in an avalanche. Rather, I felt like a small insignificant boat floating through the ocean. Not in a bad way. Except that maybe eventually the boat flips over because of the huge waves, the fisherman drowns and nobody can find him, while his wife is weeping back home and cursing the day he decided to go into an open sea and children become delinquents because they have no father figure which results in a dysfunctional family. Nevertheless, I think this is a good time to sum up some of my results and start writing them down.

It’s hard to focus on what I want to write. At one hand, I want to share my experiences. On the other hand, why should you care? So I am going try to write a small cycle of articles on how I planned, built and marketed my turn based strategy game, Blades of the Righteous. All of them are told from the programmer’s viewpoint and I’m hoping they will give some insights to those that are starting gamedev. I am not a huge fan of vague descriptions: “write to youtubers,” “split your code into smaller parts“ and “get lots of tasks so you won’t procrastinate” – those descriptions don’t usually say much to me. That’s why I don’t try to read self-help books anymore. When I write something, I’ll start with the general example and then describe how I did it.

Some background for the context: I am just an average dude. I’ve developed the game for about 2 years. Past 4 months – I quit my job to develop it full-time. It’s a turn-based strategy game, and has about 2500 activations on Steam (not much), about 90% of those were sold through the bundles (will cover it in separate article). I think this can be achieved by anyone if you work on it. But do you actually need something like that? It’s up to you to decide.

The game idea was born in early 2014. I was playing “Last Remnant” and thought that battle-system there was cool: although being turn-based, the game gave action feel and did not feel slow at all because lots was going on at the same time. So yes, iteration one: turn-based game with indirect ordering, units decide what they want to do on their own.

I’ve spent about 6 months of programming while working full-time and studying in the university. Spoiler alert: the result was as good as a broccoli pizza. Nevertheless, at that time I thought: “Cool, I’ve finished a game.” The same feeling that toddler experiences when he puts on his pants for the first time. The parents are excited, but nobody else cares.

Naturally, the game is done. “Gotta put it on greenlight then!” The first days were easy: you get lots of attention because Steam puts your game to the front page of Greenlight. I also got support from Latvian game developer association (shout out to gamedev.lv, thanks a lot!). Got about 200 ‘yes’ votes from that. After that, the votes were not coming, but I received an email from Groupees bundle. It gave me another 600 votes and the game was still hanging (as of Dec 2014). You get lots of comments: do not ignore them, users often know better. I wrote everything down and then tried to adjust it. The bundle turned out great, but there was still not enough votes. I put the game in that state on itch.io, sold it to one person, felt good “My first dollar, someone paid me!” (remember the toddler comparison). Thought “At least I tried.” Time to bury the dead game like you would bury the hatchet, so I wrote post-mortem (with greenlgiht statistics, in case you’re interested: http://vladimirslav.com/2014/12/blades-of-the-righteous-postmortem/ ). I successfully switched to my studies and was not doing any more game programming. That is, until the game passed the Greenlight in March 2015. Organically. I got ~300 votes just randomly. The game got greenlit with 1079 votes “for” and 1338 votes “against” (45:55 ratio).

Now here’s the catch and the main thing that I want you to understand from this article: if your game is good (or, rather, interesting to majority of the people), you’ll pass the greenlight by itself, I’d say in 2-3 months tops. The best games are much faster than this (2-3 weeks). The greenlight bundles definitely help, but if you don’t get any fans from the greenlight campaign – don’t expect your game to be received well (at least at first). But the fact that the game took 5 months to get greenlit and a special bundle promotion should have probably been my warning signal. But with the state of mind I had at that moment, I’d ignore it even if I saw a harp-playing angel who sang “drop your game m8” while staring directly into my eyes.

My current algorithm to game-development now if I want to make a game (and what you probably should do too unless you know what you’re doing) and get it to Steam:

  • Spend no more than 3 months on somewhat-polished prototype with minimal functions
  • Show it to my friends and make them play the game. Collect feedback.
  • Put the screenshots on twitter regularly, use #screenshotsaturday
  • If the game does not get enough traction on Steam and you see why (a lot of users will leave comments) – drop it.

The thing is, the greenlight decision motivated me to spend another year rewriting my game to (what I perceived) a decent level. I love my game and I love developing it, but it won’t be able to sustain me. If you have your game as a pet project – do whatever you want. If your well-being depend on it: do not ignore the signs. I’m going to describe the rework and second life of Blades of the Righteous, as well as what I think makes turn-based games great in my next article.

As a side note, I’ve put another game on Greenlight some time ago and got lots of those “game publishing proposals.” Not going to delve into that, but I think you must read this article (and never agree to those deals): http://morrisonlee.com/2016/05/23/game-publishers-in-2016-how-to-throw-your-lifes-work-away-in-seconds/

My experience on placing the game on Steam

As my game “Blades of the Righteous” is going to be published soon – I want to write a brief article to sum up the effort of integrating the Steam API into the game that perhaps will comfort the developers that are only planning to do so. When I first got access to Steam, I had some worries and concerns. As I look back, I want to address them once again.

First thing first: If you have worries about “not being able to do it” – don’t. SteamAPI integration itself is very well documented and shown in the video manuals. The DLL file is added. You areliterally guided through every step. I wrote my game in C++ – all I needed to do is include some headers, link Steam static library and put a dll into the release folder. There’s also a video how to upload the build of your game to store. (There’s also a script for that so this one is covered absolutely).

Achievements: Steam provides super-easy system to implement game achievements. You don’t need to do much on your side (just make sure to put the right ‘achievement-complete’ calls in the relevant parts of the game). The persistent variables are also provided by Steam: you can save, for example, the total win count for the player (the Steam handles the saving) that will keep through gaming sessions.

Trade cards: I suggest you implement them, since there are going to be people that will want your game just for the cards (your game will also show when someone filters games by trading card support on Steam). Start preparing those as soon as you get the Steam access. Steam gives you guidelines how you need to format them – talk to your designed and start working. In my case it took 3 days to fill all the requirements (and prepare card-specific images and backgrounds). For card support, you’ll need 6 badges (80×80 each), at least 5 emoticons (each 18×18 and 54×54), 5 cards and 5 backgrounds as rewards (1920×1080).

Same thing goes for shop / backgrounds: ideally, while you program, you need someone to start formatting the media / preparing the logos and images.

You’ll want to get the Steam Store Page out there as soon as possible (something that I failed to do) – so start completing the checklist (you will be provided one). Took me about 2 weeks to do everything. On the side of Steam, it takes them about 4 days to review the store page and cards and approve them.

Don not be lazy and register on Google Analytics: you will be able to include the analytics id for data gathering and extra statistics might always come in handy.

Here’s how the final store page looks like: http://store.steampowered.com/app/421140

So yes, if you are planning to put your game out there – it is going to take some effort, but I can guarantee you that it won’t be that hard. Good luck!

Blades of the Righteous: Postmortem

So, the development of blades of the righteous has come to an end some time ago, I’ve stopped actively advertising now and I thought that writing up an overall experience as well as giving more statistics about it could help others in their way of development.

Steam Greenlight Statistics

I’ve put the game on Steam Greenlight at around October 15th. Let’s review the visit/vote graph first.

postmortem2

There are two peaks in visits/votes. Unsurprisingly, I got the highest peaks of attention when publishing info about my game. At first, Facebook greatly helped, netting me around 200 “yes” votes. I’ve posted that MY game is being on Greenlight, and then my supportive friends did the rest, sharing the post and inviting other people to vote.

The second peak is when I got my game sold in a bundle on Groupees.com

The current game status is the following:
postmortem1

There was around 4000 bundle copies sold, my game got 800 yes-votes on Greenlight for that. 1:5 conversion, much higher than I’ve expected. What I’ve learned from this:

  • Start advertising earlier. I’ve almost had my game finished when I’ve published a video. I could have gathered more hype (and possibly gotten more feedback) if I started giving sneak-peeks earlier.
  • BUT if you are trying to tell the world about your game – have something to show. Either some screenshots or a gameplay video.
  • If you don’t have a lot of followers – try to get your game into bundles. It will help greatly. You might have to give out the copies of your game for mere cents, but those are the cents you would not be getting otherwise. Publicity is worth it.

Development

I’ve tried developing some games before, but I could never get them to an end. This time, it has been a bit different.

What made the difference:

  • Getting the assets from professionals. This time I have not attempted to draw every game sprite by myself. I’ve simply thought “OK, I hate doing this kind of stuff, better buy it.” Yes, I’ve lost some money on developing the game, but overall I’ve been really glad to see the professional drawings / music. I also could not say “meh, I’m bored, better do something else.” Why? Because I knew that I’ve invested money in my game.
  • Having a lot of things to do. Yes, I know that this sounds strange. However, when you know that you have only one hour free today, you simply can’t go and do something else. You know that you must do something to improve the game.
  • Issue tracking. I cannot stress this enough. When you write the exact things that you’re trying to do, the project stops being “cowboy coding.” I had a separate issue for all the bugs and new features, be it “rework combat system”, “add orc unit”, “fix the freeze during the combat when both combatants are killed simultaneously.” This helped me to get my aims properly. Instead of thinking “what am I going to do today,” I’ve had my issue tracker open and simply chose the tasks which I need to accomplish.

What went wrong:

  •  The game was too complicated to develop. Yes, I know that everyone writes that. Still, I can’t stress this enough. It’s better to make a simple game with perfectly polished controls, than a complex game without good feel of controls/UI.
  • Polishing. If you think that most of the effort will go to gameplay/feature development, I have bad news for you. The UI/sounds require at least as much effort that gameplay does. At least this was in my case. But the good news: it makes a difference. As soon as I’ve added sounds / blinking / screen fade-in and fade-out, the game started looking much better. Plan to polish your game ahead. Work on controls. See what works and what does not.

Blades of the Righteous game progress, part 4

I’ve been gradually tweaking the game to become more playable. I feel that there’s still a huge way to go, but I have some progress:

The game got included into Groupees.com bundle. It is observable here: https://groupees.com/bagb14

Some conclusions so far:

  • Details matter. Smoothness of control plays a huge factor in overall enjoyment from the game. The menus must be interactive (sounds when something changes, button presses should be as smooth as possible).
  • The Rome was not built in a day, but if you work on small details daily, you can see the bigger picture growing. The game is 12% to the Greenlight top by the way and I’m happy about that. Much more than I’ve anticipated. 🙂

I’m at the beginning of my way, but the last month has been very eventful.

Blades of the Righteous game grogress, part 3

Apart from various UI adjustments and newly added units (mage, cyclops, rogue, orc archer), I’ve decided to work on game publicity:

I’ve submitted my game to Steam Greenlight: http://steamcommunity.com/sharedfiles/filedetails/?id=326962855
Also, I’ve made a game page here, http://vladimirslav.com/blades-of-the-righteous/

I’ll try to make a more detailed summary as soon as there’s something more to add.

Managing hobby gamedev projects

When I was younger, working on hobby projects has been a huge problem: laziness combined with loss of enthusiasm both took their toll on my results. Now, however, while being far from perfection, I have found some personal techniques that help me to preserve enthusiasm and allow me to persist through the whole process while managing it more effectively. At one point I have been working 50h/week and studying about 30h and still found four or five hours during the week for my programming hobbies. Here are some technical tools and methods I’m using to keep developing:


Don’t be afraid to cut your losses

This has to be the first point. Based on that, if you cannot build a prototype in 2 week spare time and see how it plays – don’t bother. It would suck to develop the prototype for 2 months during the weekends and after-work hours and then see that it is completely unplayable.


Enthusiasm passes, goals stay. Write them down.

When you get an awesome idea, you feel excited. You see the final product and imagine how great it is going to be. Then, as you start developing, you notice that your “honeymoon phase” has passed, you’re no longer in love with the game you are making and you are now irritated by the time it will take to develop. The image of the final version you had in the beginning now gets blurry: you’ve spent time, you somehow get the idea what do you want to see, but now you feel the lack of enthusiasm to do something: you just feel the weight of responsibility and necessary man-hours required to complete the game. You’re (hopefully) halfway through, but you have no idea how to finish the other half, because you’re feeling so lazy that you’d rather watch a turtle race than write a new code lines.

Here’s what you need to do: as soon as you have the initial vision of the game, start writing down issues, split it into smaller sub-tasks. For example, when I’ve started developing my Blades of the Righteous game, I’ve began using bitbucket’s built-in issue tracker when I had an awesome idea of a feature. That way I’ve made lots of small issues like “Check distance when attacking”, “Add Item System”, “Allow player to inspect objects on game map”. You get the idea. My enthusiasm is almost gone now, but the open tracker issues are what keeps me going: the goal (to publish the game) remains, and I know exactly what I have to do to get to it. Speaking about bitbucket:


Use version control

If you are a professional software engineer, you’re probably already doing it. It is very important to do so for your hobby projects: not only it allows you to make backups of your projects, enforcing additional level of data safety, it also allows you to revert unnecessary changes / mistakes and see the code changes from the previous versions which saves you time. Speaking about the previous versions: if I ever get discouraged, I just go to my repository logs and see my progress.

Another important thing regarding logs: use meaningful commit messages. I’m pretty sure you won’t remember what did you mean with “Fixed a bug” message. Compare it with “Fixed a bug in combat when attack damaged the friendly unit.” It’s also going to make it easier for you to search for the necessary commit should something go wrong with your new changes.


Rather than increasing the number of game features, try to decrease it

It seems that perfection is attained not when there is nothing more to add, but when there is nothing more to remove” – Antoine de Saint Exupéry.

I’m sure your game will be cooler with all those 200 droppable items. But do you really need them? Unless you are A+ developer working 60+ hours a week on your dream game, try to reduce the content to a minimum. I’m not saying “remove everything”, I’m saying “remove everything that is not of the essence.” Don’t give up on things that you think will be great, but choose your battles carefully.

More than that: don’t bother to make all the features at once. Try to get your game going as soon as possible and then give it to your friends. They will provide you with feedback. Listen to it.


This is all I wanted to tell. Don’t give up on your aspirations: even if in the end you are the only one who plays the game you made, that still means that there IS a game to play. Good luck!

Blades of the Righteous, Game Progress #2

I’ve hit another milestone with my game. Summer is coming to an end, and I wanted to sum up things that have been done since the previous post:

  • Added two new units, Samurai and Demon Lord
  • Map ui & tile overhaul
  • Combat UI overhaul
  • Added music to combat and map
  • Item system added (units can use items)
  • Relic system added (some buildings require extra artifacts to be built)

Overally, I’d say that the engine is mostly complete, the effort should be put into content now (adding new units, making a campaign/custom map system), etc.

map1_progress battle2_progress1 battle1_progress1


Credits: