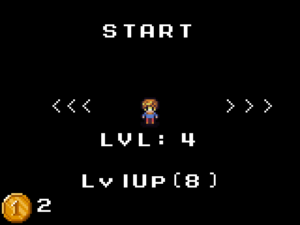
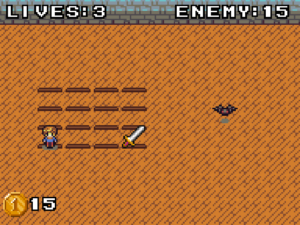
Author Archives: vladimirslav

Developing Multiplatform Game with LibGDX, part 21: Gold Gathering

Lesson 21: Gold Gathering

Last lesson, we’ve added multiple characters and made it possible to pick them. We’ve also introduced  the levelling stats. Unfortunately, since there are no levels, there’s no point of stats.

First thing’s first, how are we going to level up our characters? Well, this is quite easy! They’ll have to push the “Upgrade” button! What’s that? We cannot simply allow player to mash the upgrade button? Fine, we’ll introduce in-game currency to solve the issue of infinite upgrading.

First thing: we’ll add a coin that can be picked on the battlefield. Yes, similar to health / attack. Here’s how it looks (drawn by https://twitter.com/ElenaNazaire):

coin

First, go to our Bonus.java file. Add a new static byte to mark our coin bonus.

public static byte BONUS_TYPE_COIN = 2;

In our “setup” function, add a case for bType == BONUS_TYPE_COIN:

else if (bType == BONUS_TYPE_HEALTH)
{
    set(res.healthBonus);
}
else if (bType == BONUS_TYPE_COIN)
{
    set(res.coinBonus);
}

You’ll notice that coinBonus is not defined yet. That’s allright. Go to Resources class and right under our healthBonus sprite, define a new sprite:

public Sprite healthBonus;
public Sprite coinBonus;

Then, down below, load it the same way you would load healthBonus.

healthBonus = gameSprites.createSprite("health");
coinBonus = gameSprites.createSprite("coin");

Now, make sure we create the bonus in-game. In GameLogic, let’s adjust oru SpawnBonus function. Now if you’ve played the game as much as I did, you can already notice that hearts spawn a bit too much. Let’s reduce their rate and increase the attack spawn rate a bit. Say, 5 out of 8 times we want attacks, 2 out of 8 times we want coins and 1 time we want health bonus.

Replace this part:

bonuses.add(Bonus.Create(fx,
        fy,
        MathUtils.random(3) < 1 ? Bonus.BONUS_TYPE_HEALTH : Bonus.BONUS_TYPE_ATTACK,
        game.res));

With:

byte activeBonus = Bonus.BONUS_TYPE_ATTACK; // use it by default
int rnd = MathUtils.random(7); // 0 .. 7
if (rnd > 6)
{
    activeBonus = Bonus.BONUS_TYPE_HEALTH;
}
else if (rnd > 4)
{
    activeBonus = Bonus.BONUS_TYPE_COIN;
}

bonuses.add(Bonus.Create(fx,
        fy,
        activeBonus,
        game.res));

Use attack bonus by default, then in a few special cases switch it to health and coins. Let’s run the game! You now see that the coins are spawning, but picking them does nothing. Let’s fix that!

Handling the logic behind coins

Great, so what do we do now? How do we make coins work? We need to introduce a separate variable that would store the coins. Let’s handle it in GameProgress.

public static int currentGold = 0;

Add saving/loading at once.

private static final String SAVE_KEY_PLAYER_GOLD = "playergold";

In our Load() function, let’s handle the loading of our gold:

currentGold = prefs.getInteger(SAVE_KEY_PLAYER_GOLD, 0);

And a bit further, in our Save() function, let’s handle the proper saving of the value!

prefs.putInteger(SAVE_KEY_PLAYER_GOLD, currentGold);

Good, the gold is saved, but it is not gathered properly. Time to implement that. Remember, in our GameLogic class, we have the AssignPlayerPosition function? In it, we process the bonus pickups. Let’s alter it to actually handle the coin pickups. Here’s how my full check looks now:

if (currentBonus.getBonusType() == Bonus.BONUS_TYPE_HEALTH)
{
    player.addLives(1);
}
else if (currentBonus.getBonusType() == Bonus.BONUS_TYPE_ATTACK)
{
    enemy.takeDamage(GameProgress.playerDamage);
    if (enemy.getLives() <= 0)
    {
        GameProgress.currentLevel++;
        player.markVictorious();
        eventListener.OnGameEnd(true);
    }
}
else if (currentBonus.getBonusType() == Bonus.BONUS_TYPE_COIN)
{
    GameProgress.currentGold += 1;
}

That should do it.

Displaying the coin amount to the player

Now let’s ensure we display our coins both in GameScreen and CharacterSelectionScreen.

Start with CharacterSelectionScreen. We want to display coins on the bottom left side of the screen. To do this, we’ll show the coin image and write amount of coins we have beside it. Open our CharacterSelectionScreen class. Go to prepareUi() function, and add the following lines to the end of it:

// coin image
Image coinImage = new Image(game.res.coinBonus);
coinImage.setPosition(1, 1);
uiStage.addActor(coinImage);

// amount of coins
Label.LabelStyle textStyle = new Label.LabelStyle(game.res.gamefont, Color.WHITE);
Label coinAmntLbl = new Label("" + GameProgress.currentGold, textStyle);

// set X position to the right of our coin and Y to be exactly in the middle of it
coinAmntLbl.setPosition(coinImage.getX() + coinImage.getWidth() + 3,
        coinImage.getY() + (coinImage.getHeight() - coinAmntLbl.getHeight())/ 2);
uiStage.addActor(coinAmntLbl);

Now let’s add it in our GameScreen now. Since we don’t use Stage in gamescreen for ui elements, let’s just draw it “roughly”. Go to our DrawUi function and add the following code:

batch.draw(game.res.coinBonus,
        gameStage.getViewport().getScreenX() + 2,
        gameStage.getViewport().getScreenY() + 5
);
DrawShadowed("" + GameProgress.currentGold,
        gameStage.getViewport().getScreenX() + game.res.coinBonus.getWidth() + 4,
        gameStage.getViewport().getScreenY() + 10 + game.res.coinBonus.getHeight() / 2,
        gameStage.getWidth() - 5,
        Align.left,
        Color.WHITE);

Pretty self-explanatory, first we draw a coin, then: the amount of gold we actually have. Run the game! You’re going to see the coins on our main screen and in the game, as well as notice how the amount increases after you pick them.

final

This took a bit more time and changes that I’ve expected, so I’ll try to cover levelling in our next tutorial.

Relevant git commit: https://github.com/vladimirslav/dodginghero/commit/6eb79301a6ce8727379edc00b431c6a17b6ff506

Tags:

Android game tutorial, game development, multiplatform game development, beginning game development, gamedev tutorial, libgdx, android gamedev

Developing Multiplatform Game with LibGDX, part 20: Introducing Character Variety

Lesson 20: Introducing Character Variety and Upgrade system

So as you’ve seen in our previous lesson, we had added the character select screen. Unfortunately, there were no characters to select 🙂 Let’s fix that!

What do we need? We’ll need a data structure to describe each character’s stats. We can do the following: introduce multiple characters and make them upgradable for game currency. The trick is: each character has its own strongpoints. I.e. one character will be getting +1 health after every upgrade, the other: after every two, another one: after every three. Same goes for attack strength from picking relevant bonus and for hp regeneration (how much hp you restore from picking hearts). That way we can create a character that restores lots of hp, but has small healthpool. Or the character that does lots of damage, but has trouble with hp regeneration.

In our logic/objects package, create a new class and name it “CharacterRecord.” I suggest we make four different stats:

  • Upgrade levels needed for hp upgrade (player buys one upgrade level, the character’s hp upgrades after every N levels). Similar to that:
  • Upgrade levels needed for hp regen upgrade (how much hp player regenerates per heart picked?)
  • Upgrade levels needed for attack upgrade (how much damage player deals per attack?)
  • Upgrade levels needed for bonus time upgrade (let’s make bonus spawn time dependant on player’s character!)

Obviously, each character will also need a name (at least for display purposes on the menu). CharacterRecord will store the base stats, but not the level by itself. So, it should be simple, really. We can create a simple constructor and pre-define the characters this way:

public class CharacterRecord {

    public final int levelsForHpUpgrade;
    public final int levelsForHpRegenUpgrade;
    public final int levelsForAttackUpgrade;
    public final int levelsForBonusSpawnUpgrade;

    public final String name;

    public CharacterRecord(int lvlHp, int lvlRegen, int lvlAttack, int lvlBonus, String _name)
    {
        levelsForHpUpgrade = lvlHp;
        levelsForHpRegenUpgrade = lvlRegen;
        levelsForAttackUpgrade = lvlAttack;
        levelsForBonusSpawnUpgrade = lvlBonus;
        name = _name;
    }

    public static String CHAR_NAME_HUMAN = "Human";
    public static String CHAR_NAME_SPIDER = "Spider";
    public static String CHAR_NAME_SKELETON = "Mr.Skeletal";
    public static String CHAR_NAME_GHOST = "Ghost";
    public static String CHAR_NAME_SLIME = "Slimey";

    public static CharacterRecord CHARACTERS[] =
    {
        new CharacterRecord(2, 2, 4, 4, CHAR_NAME_HUMAN),
        new CharacterRecord(3, 6, 3, 3, CHAR_NAME_SPIDER),
        new CharacterRecord(6, 12, 1, 3, CHAR_NAME_SKELETON),
        new CharacterRecord(4, 4, 2, 4, CHAR_NAME_GHOST),
        new CharacterRecord(3, 3, 4, 1, CHAR_NAME_SLIME),
    };
}

My general character idea is:

  • Human has good health, but not so good attack / bonus spawn rate.
  • Spider gets good health, but bad regen. Better attack than human, but bonus spawn times are getting upgraded slower.
  • Skeleton is terrible at health/healing, but does good damage at good intervals.
  • Ghost is mostly average. Good stats, but nothing exceptional.
  • Slime has amazingly fast bonus spawns and a bit wors stats otherwise.

Adjusting the character selection screen

Before we actually make stats relevant, we’ll have to create different character selection at first. So we have some stats pre-defined, but what do we do now? Let’s actually start by allowing to select different characters. Before we even talk about swapping active character index, let’s discuss how we get the relevant character sprite and name to be displayed in our CharacterSelectionScreen. I suggest we start working on resources class. Similar to the way we return enemySprites, we should make a hashmap that stores player sprites. This time, I’m making it with <String,Sprite> pair (as I am going to use it sparcely), but I must let you know that using strings as lookup won’t do if you do some real-time rendering and not single sporadic lookups. It just takes a big hit on performance (alright, it probably depends on the implementation of hashmap, but I won’t go that deep in this tutorial).

Open up our Resources.java class. Right beside our enemySprites declaration, declare another Hashmap:

public HashMap<String, Sprite> playerSprites;

This will store various player sprites. Initialize it at the same place where you initialize the enemySprites. Then fill it with relevant content.

playerSprites = new HashMap<String, Sprite>();
playerSprites.put(CharacterRecord.CHAR_NAME_HUMAN, gameSprites.createSprite("player"));
playerSprites.put(CharacterRecord.CHAR_NAME_SPIDER, gameSprites.createSprite("spider"));
playerSprites.put(CharacterRecord.CHAR_NAME_SKELETON, gameSprites.createSprite("skeleton"));
playerSprites.put(CharacterRecord.CHAR_NAME_GHOST, gameSprites.createSprite("ghost"));
playerSprites.put(CharacterRecord.CHAR_NAME_SLIME, gameSprites.createSprite("slime"));

That should do it.

Making character selection work

OK, we got player sprite list. What do we do? Go to CharacterSelectionScreen. We’ll need to adjust a few things. First, move currentCharacter variable into GameProgress class:

public class GameProgress {

    public static int currentCharacter = 0;

This is necessary, because we’re going to save the selected character (a bit later). Go back to our CharacterSelectionScreen. See our hero image creation in prepareUi()? Let’s make heroSprite be initialized with the current selected character’s sprite.

Image heroSprite = new Image(
        game.res.playerSprites.get(CharacterRecord.CHARACTERS[GameProgress.currentCharacter].name)
);

Also, remove the line

currentCharacter = 0;

From constructor. Try running the game. You should see the good old human sprite. The difference is that we’re looking it up from our hashmap instead of directly providing it to our heroSprite Image. With that, the preparations are mostly done. Let’s finally get to switching the active character sprite! All we need to do is to add listeners to nextBtn and prevBtn (which are somewhat similar).

TextButton nextBtn = new TextButton(">>>", buttonStyle);
nextBtn.addListener(new ClickListener() {
    public void touchUp (InputEvent event, float x, float y, int pointer, int button) {
        GameProgress.currentCharacter += 1;
        if (GameProgress.currentCharacter == CharacterRecord.CHARACTERS.length)
        {
            GameProgress.currentCharacter = 0;
        }
        uiStage.clear();
        prepareUi();
    }
});

nextBtn.setPosition(uiStage.getWidth() * 5 / 6 - nextBtn.getWidth() / 2, uiStage.getHeight() / 2);
uiStage.addActor(nextBtn);

TextButton prevBtn = new TextButton("<<<", buttonStyle);
prevBtn.addListener(new ClickListener() {
    public void touchUp (InputEvent event, float x, float y, int pointer, int button) {
        GameProgress.currentCharacter -= 1;
        if (GameProgress.currentCharacter < 0)
        {
            GameProgress.currentCharacter = CharacterRecord.CHARACTERS.length - 1;
        }
        uiStage.clear();
        prepareUi();
    }
});
prevBtn.setPosition(uiStage.getWidth() / 6 - prevBtn.getWidth() / 2, uiStage.getHeight() / 2);
uiStage.addActor(prevBtn);

Just to explain a bit: we assign click listeners to next/prev buttons. What we do is increase/decrease current character index. If it is out of bounds – go to the beginning/end of the list (to allow player scrolling through the characters without limitation). After that, we clear all Ui elements from the stage and reinitialize them. This might seem like an overkill (we just have to switch the heroSprite, right? But in truth this won’t be the only thing later on (when we’ll be writing stats on the main screen). So we clear all the ui elements from the screen and then repopulate it again.

Now as the final thing for this tutorial part, let’s just make out GameScreen to show the new selected sprite (but not be affected by the stats in any way).

Go to our Player.java file, and replace

set(res.player);

In player’s constructor with:

set(res.playerSprites.get(CharacterRecord.CHARACTERS[GameProgress.currentCharacter].name));

Run the game and try picking any character! You should see that our player character sprite has successfully changed. That concludes lesson 20! Next time, we’ll actually try to make those stats affect the game and introduce the upgrade/unlock system.

Relevant git commit: https://github.com/vladimirslav/dodginghero/commit/62d13eecf8b7d3a016d973276b7bf6af0c2515b0

Developing Multiplatform Game with LibGDX, part 19: basic character selection screen

Adding Different Playable Heroes

Allright, our enemies attack differently. But how can we diversify the gameplay of our player? Let’s introduce different playable characters.

First, let us ask ourselves, what do we want to display here? We want to make a screen where player chooses (and later – unlocks/upgrades) the character he wants to play with. Each character will have its strengths: it is important to give choice when it comes to game decisionmaking.

We’ll need to make a separate screen for that. In our screens package, create a new class, name it “CharacterSelectionScreen.” Make it extend DefaultScreen.

Similar to our GameScreen, we need a stage that is going to process player input / display UI elements. Declare it:

Stage uiStage;

We also need to track the currently selected character. Let’s make an integer index specially for that.

int currentCharacter;

The constructor is simple:

public CharacterSelectionScreen(DodgingHero _game) {
    super(_game);
    currentCharacter = 0; //TODO: Load it from settings later
    FitViewport viewport = new FitViewport(160, 120);
    uiStage = new Stage(viewport);
    Gdx.input.setInputProcessor(uiStage);
}

We create a stage using fit viewport to always maintain the resolution. We use our stage as inputProcessor, because it would allow stage to capture the inputs. Now we need to define dispose and render functions. Let’s make them real simple first.

@Override
public void render(float delta)
{
    Gdx.gl.glClearColor(0, 0, 0, 1);
    Gdx.gl.glClear(GL20.GL_COLOR_BUFFER_BIT);
    uiStage.act(delta);
    uiStage.draw();
}

@Override
public void dispose()
{
    Gdx.input.setInputProcessor(null);
    uiStage.dispose();
    super.dispose();
}

Render simply clears the screen, updates the stage and draws it. Dispose resets the input, then frees resources taken up by stage.

Finally, go to our DodgingHero.java class, and change

setScreen(new GameScreen(this));

to:

setScreen(new CharacterSelectionScreen(this));

This will make the game show us Character Selection Screen instead of GameScreen (at once) where we’ll be able to pick necessary characters. Run the game. You should see the black blank screen. Great! That means we could set our new screen.

Now, to progress further, let’s add a simple “Start” button. Well, not really a button since it’s going to be a text caption that you need to press to start the game. Still, it’s going to be great.

In our CharacterSelectClass, let’s prepare a new function, name it prepareUi(). We’re going to call it at the bottom of our constructor (right after Gdx.input.setInputProcessor(uiStage);).

The first version of the function looks like this:

void prepareUi()
{
    TextButton.TextButtonStyle buttonStyle = new TextButton.TextButtonStyle();
    buttonStyle.font = game.res.gamefont;
    buttonStyle.fontColor = Color.WHITE;
    TextButton startBtn = new TextButton("START", buttonStyle);
    startBtn.setPosition((uiStage.getWidth() - startBtn.getWidth()) / 2, uiStage.getHeight() / 6);
    startBtn.addListener(new ClickListener() {
        public void touchUp (InputEvent event, float x, float y, int pointer, int button) {
            dispose();
            game.setScreen(new GameScreen(game));
        }
    });
    uiStage.addActor(startBtn);
}

We’re creating a TextButton that has “Start” writte on it. First, we make the button style where we define the font and color of the font. If you have graphics – it’s also possible to define up/hover/down states of the button (however, I – don’t).

Then, the button is being initialized by passing the text and the style and setting the position. The trickiest part is handling button clicks: in this case we’re calling addListener and defining our own version of ClickListener, by overriding the touchup function. At this point, as soon as player clicks our “Start” button, the screen is going to switch for our GameScreen.

Finally, don’t forget to add out new button to the stage by calling addActor method! After that, run the game.

Good, we have a start button. Now let’s display our hero and make arrow-like buttons (that are going to be used later). Again, in this lesson, let’s just do a simple display, without functionality. At the end of our prepareUi function, add these lines:

Image heroSprite = new Image(game.res.player);
heroSprite.setPosition((uiStage.getWidth() - heroSprite.getWidth()) / 2,
                       (uiStage.getHeight() - heroSprite.getHeight()) / 2);
uiStage.addActor(heroSprite);

TextButton nextBtn = new TextButton(">>>", buttonStyle);
nextBtn.setPosition(uiStage.getWidth() * 5 / 6 - nextBtn.getWidth() / 2, uiStage.getHeight() / 2);
uiStage.addActor(nextBtn);

TextButton prevBtn = new TextButton("<<<", buttonStyle);
prevBtn.setPosition(uiStage.getWidth() / 6 - prevBtn.getWidth() / 2, uiStage.getHeight() / 2);
uiStage.addActor(prevBtn);

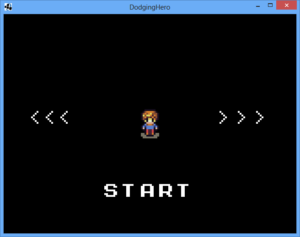
That’s it! After you run the game, you should see something like this now:

final_screen

That concludes lesson 19! In the next lesson, we’re actually going to work on implementing the character choice, but for now the screen should be enough. Relevant git commit: https://github.com/vladimirslav/dodginghero/commit/e46d43eac5dcba21b3e3df502a0706d1436885c3

Developing Multiplatform Game with LibGDX, part 18: adding enemy types

Our game starts to take shape – let’s adjust the gameplay by adding multiple enemies with different attacks!

Loading the sprites

After developing the persistence and basic progression, it’s time to diversify the gameplay: our enemy quickly becomes boring. I think it makes sense to adjust the attack patterns.

Let’s cut out 4 new characters from our character spritesheet. (We’ve used it before: http://opengameart.org/content/tiny-16-basic )

Here’s what I have:

bat ghost skeleton slime

My idea is to make different attack patterns for different enemies. We have vertical lines for spider. Let’s make horizontal lines for ghost, diagonal lines for bat, random attack pattern for slime and all four possibilities for skeleton.

Before we load the resources in game, let’s adjust the Resources and Enemy class constructor: it is going to accept the type of enemy now. In our Resources class, make a public static final int constants, that would enumerate the enemy types.

public static final int ENEMY_VERTICAL = 0;
public static final int ENEMY_HORIZONTAL = 1;
public static final int ENEMY_DIAGONAL = 2;
public static final int ENEMY_RANDOM = 3;
public static final int ENEMY_UNIVERSAL = 4;

We are using the int’s instead of Enum because there’s no easy way in java to convert int to enum (and we are going to generate a random int to determine enemy type). Now, add the type variable to our Enemy class and adjust the Enemy constructor.

public final int type;

public Enemy(Resources res, EnemyAttackListener listener, int _type)
{
    super(GameProgress.getEnemyLives());
    type = _type;

Depending on type, we’re going to load the appropriate enemy sprite. Now, to load them, we could declare 5 different sprites, but let’s think of a more optimal approach (so it would be easy to lookup later). In our Resources class, Let’s remove our enemy sprite declaration. Instead, let’s make a HashMap of &lt;Integer, Sprite&gt; pair, which would link our enemy type integers to actual enemy sprite.

public HashMap&lt;Integer, Sprite&gt; enemySprites;

Remove our enemy sprite loading line of code in Resources constructor. Instead of this, let’s initialize the enemySprites HashMap and fill it with values:

enemySprites = new HashMap&lt;Integer, Sprite&gt;();
enemySprites.put(ENEMY_VERTICAL, gameSprites.createSprite("spider"));
enemySprites.put(ENEMY_HORIZONTAL, gameSprites.createSprite("ghost"));
enemySprites.put(ENEMY_DIAGONAL, gameSprites.createSprite("bat"));
enemySprites.put(ENEMY_RANDOM, gameSprites.createSprite("slime"));
enemySprites.put(ENEMY_UNIVERSAL, gameSprites.createSprite("skeleton"));

A bit repetitive, but I’m sure it will pay off 🙂 Now, let’s actually go to Enemy class and replace the

set(res.enemy);

command with something more advanced:

set(res.enemySprites.get(type));

We grab the sprite according to the type. Careful! In bigger projects, it’s better to create a getter function, which would check if enemySprites has the value of (type) first, in order to avoid nasty errors of all sorts when you add a new enemy.

Let’s make an in-between test run. However, the game won’t compile now. That’s because we’ve changed the Enemy constructor. In our GameLogic, when we create a new Enemy object, let’s add an extra parameter:

enemy = new Enemy(game.res, this, MathUtils.random(Resources.ENEMY_UNIVERSAL));

The enemy is going to be chosen randomly. Run the game. Repeat it a few times. The enemy sprite should be randomly chosen on launch now. Also, if you defeat an enemy (and progress to the next round), the enemy is chosen randomly too. Pretty cool, huh?

Adjusting the attack time

Meanwhile, let’s reduce the time between enemy attacks to make the game more dynamic. First, let’s save the player from being attack as the round starts. Add the constant:

private static final float WARM_UP_TIME = 2.0f;

Adjust the enemy update function a bit, the moment when we determine to attack:

if (timeAlive &gt; WARM_UP_TIME &amp;&amp; timeSinceAttack &gt; nextAttackTime)
{

You can see that I’ve added the first condition: we don’t want an enemy to attack for the first two seconds, let’s call it a warm-up time for player to understand that the game started / level changed.

Then, change

private static final float BASE_ATTACK_TIME = 3.0f;

To

private static final float BASE_ATTACK_TIME = 1.0f;


It’s going to be OK, because we add 0..2 seconds between attacks in resetAttackTimer function. This should make the game much more dynamic.

Adjusting the attack patterns

If you check our Enemy class, update function, you’ll see where we determine the attack coordinates. You can imagine, if we add 4 different attack types, the function will get quite bloated. Let’s delegate it to a separate functions.

Move the code inside the

if (timeAlive &gt; WARM_UP_TIME &amp;&amp; timeSinceAttack &gt; nextAttackTime)
{
    // FROM HERE
    int col1 = MathUtils.random(GameLogic.MAX_BASE_X);
    int col2 = 0;
    do {
        col2 = MathUtils.random(GameLogic.MAX_BASE_X);
    } while (col2 == col1);
    // not very effective, but guaranteed to get different results

    for (int x = 0; x &lt;= GameLogic.MAX_BASE_X; x++)
    {
        for (int y = 0; y &lt;= GameLogic.MAX_BASE_Y; y++)
        {
            targetTiles[x][y] = (col1 == x || col2 == x);
        }
    }
    // UP UNTIL HERE

    attackListener.OnAttack(targetTiles);
    resetAttackTimer();
}

Except for the two last lines! Into separate function, let’s name it performVerticalLineAttack();

Now, let’s make a similar function, which we’ll call performHorizontalLineAttack (it’s going to be pretty similar, so let’s copy performVerticalLineAttack and adjust it accordingly). In similar way, horizontal attack will choose 2 horizontal lines and mark them. Here’s how it looks:

private void performHorizontalLineAttack()
{
    int row1 = MathUtils.random(GameLogic.MAX_BASE_Y);
    int row2 = 0;
    do {
        row1 = MathUtils.random(GameLogic.MAX_BASE_Y);
    } while (row2 == row1);

    for (int x = 0; x &lt;= GameLogic.MAX_BASE_X; x++)
    {
        for (int y = 0; y &lt;= GameLogic.MAX_BASE_Y; y++)
        {
            targetTiles[x][y] = (row1 == y || row2 == y);
        }
    }
}

Now, let’s get to diagonal function. Let’s make a separate function which would fill a row (based on selected direction).

private void fillDiagonal(int xstart, int dx)
{
    for (int i = 0; i &lt;= GameLogic.MAX_BASE_Y; i++) { int nx = xstart + dx * i; if (nx &gt; GameLogic.MAX_BASE_X)
        {
            nx = nx - GameLogic.MAX_BASE_X - 1;
        }

        if (nx &lt; 0)
        {
            nx = nx + GameLogic.MAX_BASE_X + 1;
        }

        targetTiles[nx][i] = true;
    }
}

We pass the initial x and the direction (dx). Then we go through full height of the field and pick one tile that is positioned diagonally to the previous one. All that is left is to make the function that actually picks two x coordinates and directions.

private void performDiagonalAttack()
{
    int dx1 = -1 + MathUtils.random(1) * 2; // either -1 or 1
    int dx2 = -1 + MathUtils.random(1) * 2; // either -1 or 1

    int col1 = 0;
    int col2 = 0;
    do {
        col1 = MathUtils.random(GameLogic.MAX_BASE_Y);
    } while (col2 == col1);

    // reset all the tiles to false
    for (int x = 0; x &lt;= GameLogic.MAX_BASE_X; x++)
    {
        for (int y = 0; y &lt;= GameLogic.MAX_BASE_Y; y++)
        {
            targetTiles[x][y] = false;
        }
    }

    // mark the necessary ones
    fillDiagonal(col1, dx1);
    fillDiagonal(col2, dx2);
}

3 done, 2 more to go! The random one is quite simple: let’s not care about filling the repeated tiles. It’s part of life. Instead, just pick 10 random tiles on the field and mark them as used for attack. Here’s the final function:

private void performRandomAttack()
{
    for (int x = 0; x &lt;= GameLogic.MAX_BASE_X; x++)
    {
        for (int y = 0; y &lt;= GameLogic.MAX_BASE_Y; y++)
        {
            targetTiles[x][y] = false;
        }
    }

    for (int i = 0; i &lt; 10; i++)
    {
        int nx = MathUtils.random(GameLogic.MAX_BASE_X);
        int ny = MathUtils.random(GameLogic.MAX_BASE_Y);
        targetTiles[nx][ny] = true;
    }
}

The easiest one so far: reset the tiles, then generate random coordinates for 10 times and mark the tiles as “under attack” accordingly.

The final one will be a mix of all 4:

private void performUltimateAttack()
{
    int rnd = MathUtils.random(4);
    switch (rnd)
    {
        case 0:
            performVerticalLineAttack();
            break;
        case 1:
            performHorizontalLineAttack();
            break;
        case 2:
            performDiagonalAttack();
            break;
        default:
            performRandomAttack();
    };
}

The only thing left is to add a check on enemy type (and performing an attack based on that type). Do it in Enemy update function, after our attack timing check:

if (timeAlive &gt; WARM_UP_TIME &amp;&amp; timeSinceAttack &gt; nextAttackTime)
{
    switch (type)
    {
        case Resources.ENEMY_VERTICAL:
            performVerticalLineAttack();
            break;
        case Resources.ENEMY_HORIZONTAL:
            performHorizontalLineAttack();
            break;
        case Resources.ENEMY_DIAGONAL:
            performDiagonalAttack();
            break;
        case Resources.ENEMY_RANDOM:
            performRandomAttack();
            break;
        default:
            performUltimateAttack();
            break;
    }

We’re done! Now, I’ve noticed that we’re drawing effects below the player. In this case, it won’t be a good idea because we need to explicitly show the red warning signs (and they are poorly visible otherwise). Move the

gameStage.getCamera().position.set(gameStage.getWidth() / 2, gameStage.getHeight() / 2, 0);

Line below

player.draw(batch, sizeEvaluator);
enemy.draw(batch, sizeEvaluator);
batch.end();
// place it here!

Great. Now the warning signs are going to be shown above player (timely telling him to get out of the blast zone!). The other thing: the delay of 0.5 seconds is not enough to react appropriately. Go to WarningEffect.java and change WARNING_TIME constant to be equal to 0.75f (up from 0.5f).

Relevant github commit: https://github.com/vladimirslav/dodginghero/commit/012b57d39ed7c12e902acc83a5e7f351069753db

Conventions: Things I understood from visiting GameOn

Promised myself to write at least something on what I’ve learned, but I’m really tired, so to keep it brief:

  • Make a mailing list on-side, allow people to fill their email and receive updates
  • If you show your game and take 2 computers, take 3 people with you. Otherwise it’s hard to move around / attend presentations and get acquainted with people.
  • Make an effort to build a community, not just promote your game, this will help more
  • Traveling is fun when you have an objective: attending a convention can be a good one
  • Just be friendly and interested in people / what they do, everyone is there to socialize (and play games of course!)

Developing Multiplatform Game with LibGDX, part 17: progression and data persistence

Lesson 17: Progression and Data Persistance

So we’ve made a scene transition. But it does not make much sense: the game essentially is restarting. I believe that player needs some sense of progression. Let’s work on this today!

In our logic package, create a new class, called „GameProgress” –  we’re going to store player’s lives and level there. Now I usually store game progress in static variables. If you don’t like it – you may trying making a class and instantiate it accordingly once you start the game. Anyways, here goes:

public class GameProgress {

    public static int playerLives = 3;
    public static int maxPlayerLives = 3;
    public static int playerDamage = 1;
    public static int currentLevel = 0;
}

Not much to say: we’re going to store player lives, the maximum lives/damage our player can have (we might want to increase that value as game progresses!) and the current level.

Let’s start adding functions. We will be determining the health of the enemy according to the player’s progress. Let’s make a static function for that.

public static int getEnemyLives()
{
    return 3 + currentLevel * 2;
}

Nothing fancy. Enemy health will equal to the the current level multiplied by two while adding a constant value.

Now, I did not say data persistence in vain. Let’s implement Load/Save functions. LibGDX offers a really good way to work with simple text / setting files. It’s called Preference Files (https://github.com/libgdx/libgdx/wiki/Preferences). Not really suitable for saving complicated game data (use Binary Files http://www.javapractices.com/topic/TopicAction.do?Id=245 for that)., but will do for a simple game such as ours.

At the top of the GameProgress class, add a static string constants:

private static final String PROGRESS_SAVE_NAME = "progress";
private static final String SAVE_KEY_LIVES = "lives";
private static final String SAVE_KEY_LIVES_MAX = "livesmax";
private static final String SAVE_KEY_CURRENT_LEVEL = "currentlevel";
private static final String SAVE_KEY_PLAYER_DAMAGE = "playerdamage";

It will store the name of our save file, as well as lookup keys. After that, add two simple functions, named “Save()” and “Load()” respectively. Load function is a bit easier, let’s start with that:

public static void Load()
{
    Preferences prefs = Gdx.app.getPreferences(PROGRESS_SAVE_NAME);
    playerLives = prefs.getInteger(SAVE_KEY_LIVES, 3);
    maxPlayerLives = prefs.getInteger(SAVE_KEY_LIVES_MAX, 3);
    currentLevel = prefs.getInteger(SAVE_KEY_CURRENT_LEVEL, 0);
    playerDamage = prefs.getInteger(SAVE_KEY_PLAYER_DAMAGE, 1);
}

Pretty straightforward: open save file, then read integer values with getInteger function. The second parameter is default value (in case we’ve failed to load the value from the file).

Save function is bigger by one line:

public static void Save()
{
    Preferences prefs = Gdx.app.getPreferences(PROGRESS_SAVE_NAME);

    prefs.putInteger(SAVE_KEY_CURRENT_LEVEL, currentLevel);
    prefs.putInteger(SAVE_KEY_PLAYER_DAMAGE, playerDamage);

    prefs.putInteger(SAVE_KEY_LIVES, playerLives);
    prefs.putInteger(SAVE_KEY_LIVES_MAX, maxPlayerLives);

    prefs.flush();
}

We open the preference file, write the game progress there, then we call the “flush” command that actually finalizes the file writing, ensuring that our values are saved. That’s about it! Now let’s make use of our progress. First thing: go to the Enemy class and remove our DEFAULT_ENEMY_LIVES constant. We’re not going to need it anymore. Replace the constructor value with call to our static getEnemyLives function:

super(DEFAULT_ENEMY_LIVES);

now becomes

super(GameProgress.getEnemyLives());

The Player Class will also use some adjustments now. In our constructor, change the max_lives variable assignment to:

max_lives = GameProgress.maxPlayerLives;

Now move to our GameLogic class. Remove DEFAULT_PLAYER_LIVES constant and in our Player initialization, pass GameProgress.playerLives as the life amount.

player = new Player(
        MathUtils.random(MAX_BASE_X),
        MathUtils.random(MAX_BASE_Y),
        game.res,
        GameProgress.playerLives
);

One more thing: Let’s address the damage on bonus pickup.

else if (currentBonus.getBonusType() == Bonus.BONUS_TYPE_ATTACK)
{
    enemy.takeDamage(GameProgress.playerDamage);

And finally, we need to adjust the GameLogic part to account for victory or defeat. First, the victory (same function, after enemy takes damage):

if (enemy.getLives() <= 0)
{
    GameProgress.currentLevel ++;
    GameProgress.playerLives = player.getLives();

Just adjust the level and save the player’s lvies. Now, on defeat, let’s reset all the values. Check our OnEffectOver Method in GameLogic class. We need to add a few lines after player takes the damage:

@Override
public void OnEffectOver(WarningEffect effect) {
    if (effect.getFieldY() == player.getFieldY() &&
        effect.getFieldX() == player.getFieldX())
    {
        player.takeDamage(1);
        if (player.getLives() <= 0)
        {
            GameProgress.Reset();
        }
    }
}

Since we’re planning to reset a lot of functions (player’s lives / max lives / current level), it makes sense to make a function inside our GameProgress class to do those things.

public static void Reset() {
    playerLives = 3;
    maxPlayerLives = 3;
    currentLevel = 0;
    playerDamage = 1;
}

Now, the only thing left to do is to actually implement loading and saving. We load the data once the game is open. Adjust our DodgingHero class, create() function:

@Override
public void create () {
    res = new Resources();
    GameProgress.Load();
    setScreen(new GameScreen(this));
}

And dispose function here should do the save:

@Override
public void dispose () {
    GameProgress.Save();
    res.dispose();
}

Looks good! Now try to run the game. Complete one level and restart the game. You should notice that the data persisted (player lives and enemy has more lives now). Good job!

Relevant git commit: https://github.com/vladimirslav/dodginghero/commit/21dfa37a4f3cf190185e36281e70ffa6a99c20ea

Developing Multiplatform Game with LibGDX, part 16: fade in, fade out and progression

Lesson 16: screen transition

Now that we have transactions, let’s switch to gameplay enhancements: first thing – move to next screens on victory.

In GameLogic class, create a new interface.

public interface GameEventListener
{
    void OnGameEnd(boolean playerWon);
}

Modify GameLogic to take the listener as one of the constructor’s parameters:

GameEventListener eventListener;

public GameLogic(DodgingHero _game, GameEventListener _listener)
{
    eventListener = _listener;

We should notify our victory listener at the same time when we mark our player as victorious.

In our AssignPlayerPosition, where we check bonus pickups and mark player victorious on killing enemy, add a new line:

if (enemy.getLives() <= 0)
{
    player.markVictorious();
    eventListener.OnGameEnd(true); // added this line!
}

It will notify the player about the end of the game. Now, make GameScreen implement the said listener.

public class GameScreen extends DefaultScreen implements InputProcessor, GameLogic.GameEventListener {

As usual, press Alt+Enter to implement the missing method.

Now, what do we want to do on GameEnd? We need a smooth fadeout, and then a progression to next level. Well, a restart for now. It is going to be a progression in the next lesson though. Since we are using sprites (and not gamestag eactors), we won’t be able to use libgdx in-built fadeout action. No worries, it’s not hard to implement ourselves. In advance, make two static constants at the beginning of the GameScreen class:

public static final float GAME_END_FADEOUT = 0.5f;
public static final float GAME_START_FADEIN = 0.25f;

Then, get to working on GameEnd function call.

@Override
public void OnGameEnd(boolean playerWon) {
    gameStage.addAction(Actions.sequence(
            new Action() {
                float t = 0;
                @Override
                public boolean act(float delta) {
                    t += delta;
                    float tempt = t / GAME_END_FADEOUT;
                    tempt *= tempt;
                    batch.setColor(1, 1, 1, 1 - tempt);
                    return t >= GAME_END_FADEOUT;
                }
            },
            new Action() {
                @Override
                public boolean act(float delta) {
                    dispose();
                    game.setScreen(new GameScreen(game));
                    return true;
                }
            }
    ));
}

We’ll ignore playerWon Boolean for now (we’ll implement another transaction on loss). Now, what do we want to do on GameEnd? We create a sequence of actions. First is essentially a fade-out timer, we fade the screen out for GAME_END_FADEOUT seconds (0.5 in this case), then we return true, which indicates that that time has been spent. And then actually we create a new GameScreen that restarts the game.

Now, to get further with our implementation, in our logic initialization, add the line:

logic = new GameLogic(game, this);

Now, that we’ve added a smooth fadeout, we should actually add a smooth fadein. In our GameScreen initialization, add a new action to our freshly initialized stage (at the end of GameScreen constructor).

gameStage.addAction(new Action() {
    float t = 0;
    @Override
    public boolean act(float delta) {
        t += delta;
        float tempT = t / GAME_START_FADEIN;
        tempT *= tempT;
        if (tempT > 1.0f)
        {
            tempT = 1.0f;
        }

        batch.setColor(1, 1, 1, tempT);
        return t >= GAME_START_FADEIN;
    }
});

It’s the same quadratic fadein as you’ve seen before: take the time, add the delta, divide by expected time for fadein (0.25) in our case, thus normalizing the value to 0..1. After that, square it. Great! We got a new transparency.

Finally, if the time has passed the necessary fadein time, return true (thus ending the action). Run the game. As you see when screens actually fadeIn, you have a quick flicker (if you look closer: it’s a scaled-down version of your screen). To prevent this, we need to update a gameStage camera before drawing frame one. At the end of GameStage constructor, add:

gameStage.getCamera().update();
batch.setProjectionMatrix(gameStage.getCamera().combined);

Final thing. By now you’ve probably noticed that enemy attacks are very easy to evade. Decrease WARNING_TIME from 0.75 to 0.5f. Try the game out. FadeIns/Fadeouts should be smooth now.

Relevant git commit:

https://github.com/vladimirslav/dodginghero/commit/1a2fb0896293a80e1b12ae4fc60ee73167cdcabf

Developing Multiplatform Game with LibGDX, part 15: smooth leave on victory

Player Leaving On Victory

Now that we’ve implemented a smooth approach- let’s work on smooth leave. Whenever player wins a battle – let’s make him move to the right side of the screen (to make an illussion of leaving and progressing further).

In our Player.java, add two variables:

private boolean winning = false;
private float winTime = 0;

Now, we need to add an extra condition to our draw:

if (timeAlive < APPROACH_TIME)
{
    float t = timeAlive / APPROACH_TIME; // 0..1
    t = t * t;
    setPosition(
            t * sizeEvaluator.getBaseScreenX(fieldX),
            sizeEvaluator.getBaseScreenY(fieldY));
}
else if (winning)
{
    float t = 1;
    if (timeAlive - winTime < APPROACH_TIME)
    {
        t = (timeAlive - winTime) / APPROACH_TIME; // 0..1
        t = t * t;
    }
    float fx = sizeEvaluator.getBaseScreenX(fieldX);
    setPosition(
            fx + t * (sizeEvaluator.getRightSideX() - fx),
            sizeEvaluator.getBaseScreenY(fieldY));
}
else
{
    setPosition(sizeEvaluator.getBaseScreenX(fieldX),
            sizeEvaluator.getBaseScreenY(fieldY));
}

As you see, we need to know the right side of the screen. In our SizeEvaluator, let’s add methods setRightSideX and getRightSideX. Since the width of our window (and therefore screen) can change, we need to keep it updated. SizeEvaluator constructor should also accept right side x.

private float rightSideX;

public SizeEvaluator(Stage _stage, Resources _res, int maxBaseX, int maxBaseY, float _rightSideX)
{
    measuredStage = _stage;
    resources = _res;
    maxTileBaseX = maxBaseX;
    maxTileBaseY = maxBaseY;
    rightSideX = _rightSideX;
}

public void setRightSideX(float value)
{
    rightSideX = value;
}

public float getRightSideX() {
    return rightSideX;
}

Now adjust GameScreen constructor to pass gameStage.getWidth() as the last parameter into SizeEvaluator constructor.

sizeEvaluator = new SizeEvaluator(gameStage,
        game.res,
        GameLogic.MAX_BASE_X,
        GameLogic.MAX_BASE_Y,
        gameStage.getWidth());

Then, we have to take care that sizeEvaluator adjusts properly on screen resize. In our GameScreen’s resize method, add the call to sizeEvaluator’s setRightSideX function.

@Override
public void resize(int width, int height)
{
    super.resize(width, height);
    gameStage.getViewport().update(width, height, true);
    sizeEvaluator.setRightSideX(gameStage.getWidth());
}

One more thing: we need to tell our player class that the game is won. There’s also a problem now: the player’s time is updated inside our logic calls. But we’re not updating the logic if the game has ended (enemy or player died). Time for some refactoring! Change GameScreen’s update function from:

public void update(float delta)
{
    gameStage.act(delta);
    if (player.getLives() > 0 && logic.getEnemy().getLives() > 0)
    {
        logic.update(delta);
    }
}

To:

public void update(float delta)
{
    gameStage.act(delta);
    logic.update(delta);
}

And adjust GameLogic accordingly:

public void update(float delta)
{
    gameTime += delta;
    player.update(delta);

    if (player.getLives() > 0 && enemy.getLives() > 0) {
        effectEngine.update(delta);
        enemy.update(delta);

        if (lastBonusSpawn + BONUS_SPAWN_INTERVAL < gameTime &&
                bonuses.size() < MAX_BONUSES_ON_FIELD) {
            SpawnRandomBonus();
        }
    }
}

Player is always updated, but all the other stuff gets updated only if both player and enemy are alive. Now the only thing is left is to tell our player object that we won! In our Player class, add new function:


public void markVictorious()
{
    winTime = timeAlive;
    winning = true;
}

Then, in our gamelogic, when we damage the enemy, we have to check enemy health. If it equals zero – tell the player that we won! Adjust the part of code with attack bonus pickup:

else if (currentBonus.getBonusType() == Bonus.BONUS_TYPE_ATTACK)
{
    enemy.takeDamage(1);
    if (enemy.getLives() <= 0)
    {
        player.markVictorious();
    }
}

Great! Now our player leaves after the game ends, marking the continuation of the journey. Looks much better!

Frequent Flyer: Promotion Stats so Far

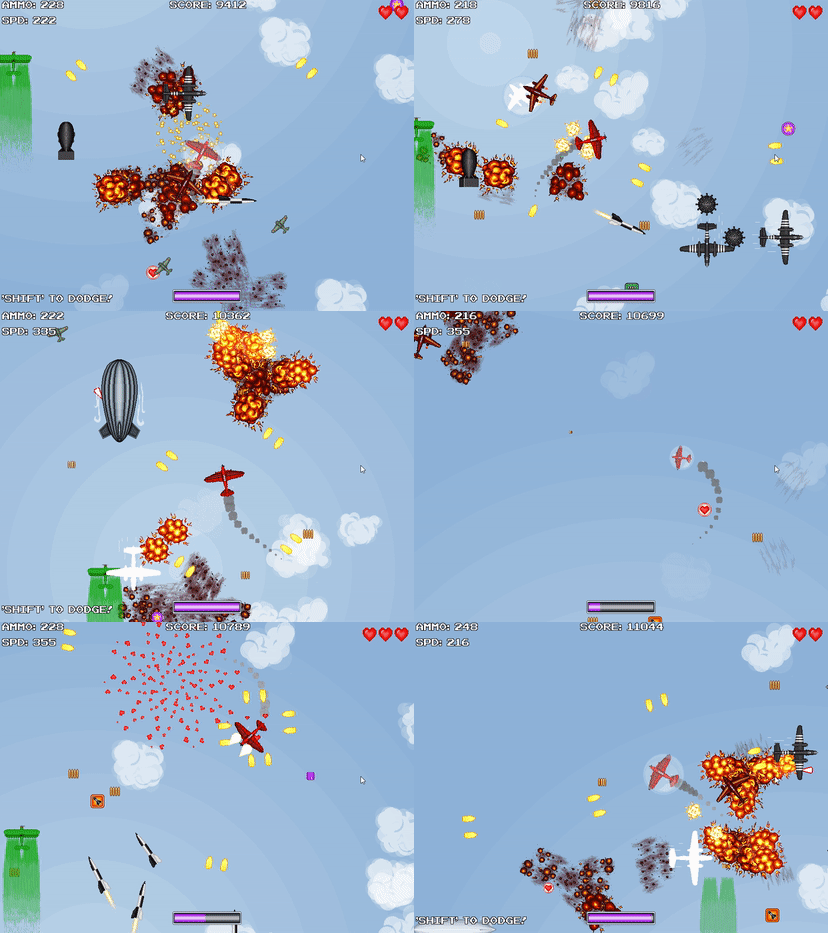
As development of Frequent Flyer is coming to an end, we’re actively preparing to take part in GameOn convention in Lithuania, so I think it’s a good idea to show some stats on publicity and my observations so far.

pleasantscentedfennecfox-size_restricted

Facebook, Google Adwords, Twitter

First, let’s clear up some lightweight and most obvious stuff that comes to mind when someone mentions marketing: facebook ads and google adwords. In my case, both of those did not work.

Adwords: high CPI, impossible to beat A+ games. Offered $0.5 for install in US. I know, it’s not much. Offered $0.3 for install in Pakistan (you know, for science) and still got nothing.

Facebook Ads:

Not really related, but spent $10 on Unblocking Puzzle Link (http://coldwild.com/unblocking/) promo. Targeted olderpeople in US/UK who like puzzles: 182 likes, 22 link visits, 1000 shows. I don’t consider it a good result for $10 spent, especially since the link was leading directly to the game. Likes != visits.

Regarding Frequent Flyer: tried using facebook ad campaign to promote steam greenlight link. Even worse. One like, zero visits, stopped it as amount spent got to $3. Audience: retro shmup fans in US/UK (again).

For the future projects: not going to use it much (unless I want to boost a game that already had some traction). OK, now for the good parts.

Some thoughts about twitter (not backed up by hard facts): seems like a huge circlejerk sometimes. In my case, I often see  developers following developers. If you have a real player follow: be happy about it, value it like a 100 business followers. Coldwild Games has ~1000 followers and almost no conversions (direct link to web version of FF got about 40 views).

Forums

I’ve made a post on reddir.com/r/gamedev almost as soon as I had greenlight on. Not much publicity, but good feedback from players, lots of which I’ve tried to implement. The greenlight really came early, the game was much less polished and it’s no surprise it did not take off.

In the thread, I’ve got comments from Bigosaur with link to his blog and his game promoting experience (http://bigosaur.com/blog/27-marketing-android-game) <- if you are starting out, check this out, very informative and decided that I’m going to do the same.

Overall, I’ve posted on six forums:

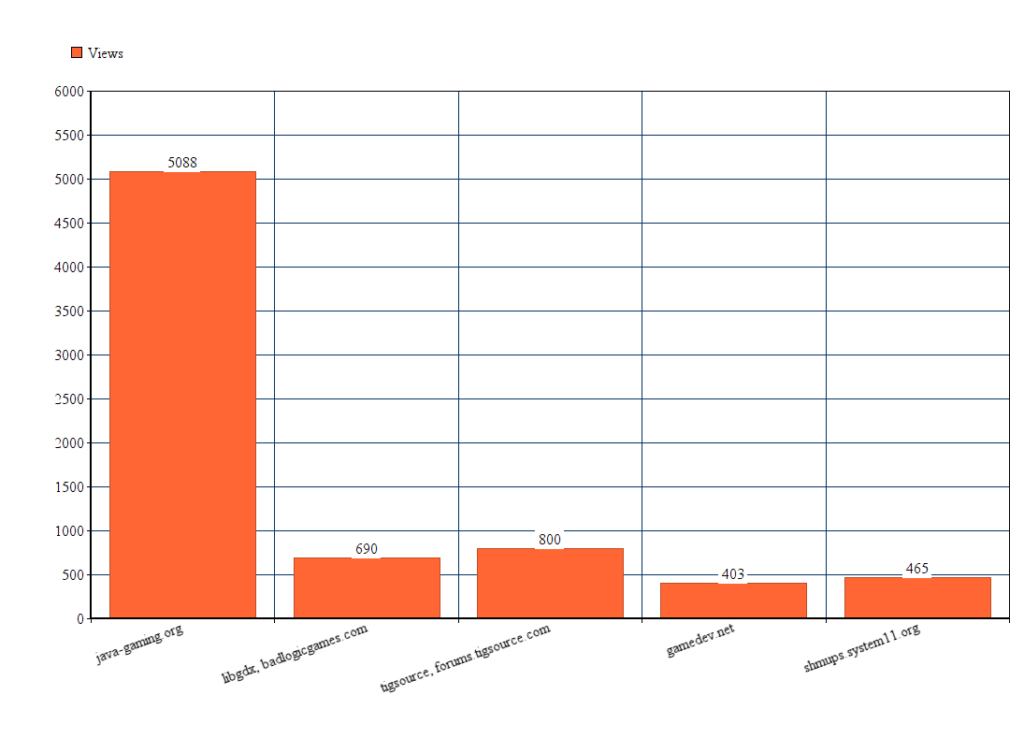
Java-gaming.org, LibGDX forums (badlogicgames.com), TigSource, Gamedev.ru, Gamedev.net, shmups.system11.org. Apart from gamedev.ru (does not give any stats), here’s how everything turned out regarding views and discussion:

Forum Thread Views

Forum Thread Views

Java-Gaming turned out to be the most popular one. I understand that this is very specific (especially since I’m developing on Java/Libgdx), but you can try to get similar results on Unity forums.

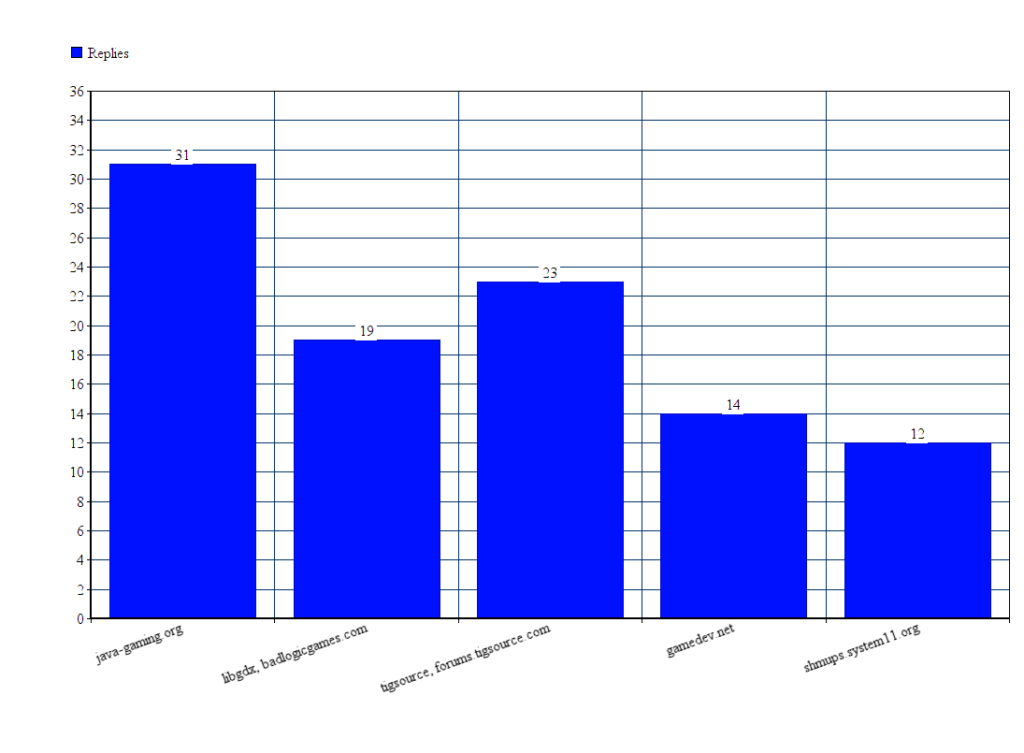
Here’s how I fared reply-wise (including my posts, you can substract 12 from every reply). Not many people were replying, but again, java-gaming turned out to be a popular one.

Forum Replies

Forum Replies

Right, so I actually got more replies/suggestions/bug reports on java-gaming too. Tigsource, despite smaller amount of views, got me a good amount of people replying and being interested.

Important note: you have to write all the time. At first I had maybe 100 views on most of the forums, but as I kept putting the progress, I started getting replies and increasing amount of views. It does not take much time, you get used to it (use the similar forum posts with similar BBCode that links to your awesome images and gifs). If you are starting out a serious project – I suggest you publish your devlogs on the forums. This thing helps, really and in the end each devlong won’t take more than an hour of your time (you can do it once or twice a week).

Making a Web Version

Forums are one thing. But what about actually putting your game out there? Since I was developing in LibGDX, it was no trouble to prepare a web version and put it online. Which I did. Here: http://coldwild.com/flyer/ Plot twist? Nobody cares. And technically, why should they? Why would anyone, who can visit kongregate / itch.io / newgrounds / etc, go to your website to play this one single game?

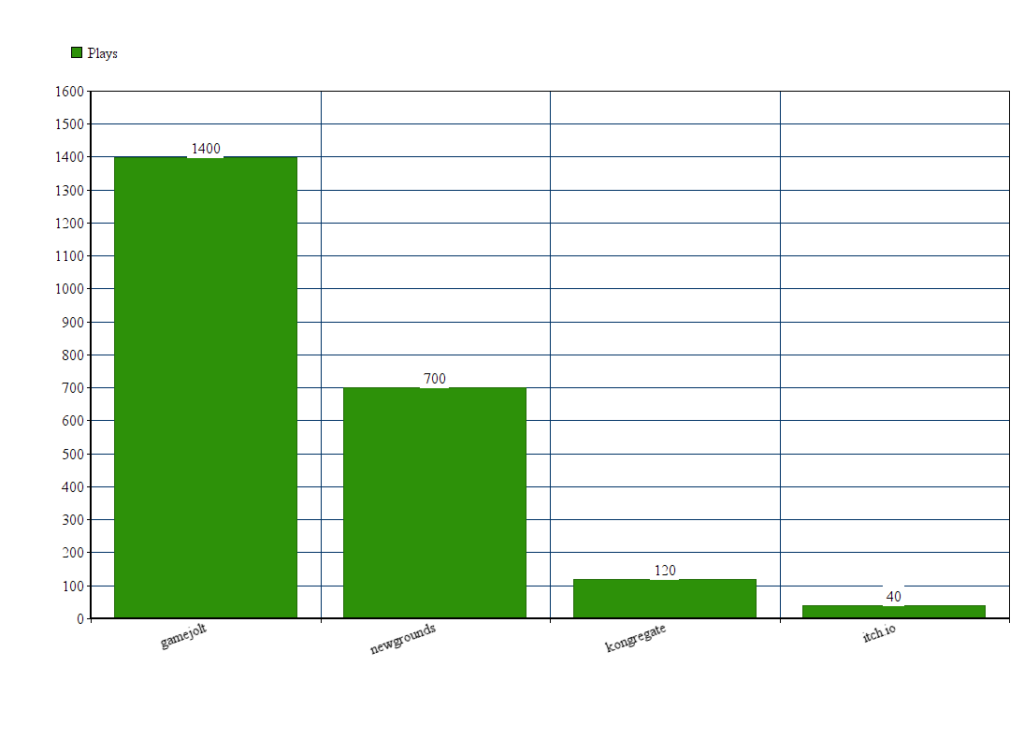
So, the time has come to spread the word further. I’ve put the game on four networks: itch.io / newgrounds / kongregate / gamejolt.

itch.io turned out to have worst performance for me. Maybe it’s the logo or the page looks ugly, dunno. Total, in two months, I had fourty views (I’m pretty sure half of those is me checking if the game works after I update the version).

kongregate is easiest of them all: http://www.kongregate.com/games/comrad_gremlin/frequent-flyer/, 120 plays. You have some views when you just publish (they show it somewhere I think), but after that: silence. On the bright side: you can embed your website into their player, so I’ve simply put the link to my coldwild.com/flyer and forgot about it. No more reuploads, the version is updated automatically as soon as I upload a new one to my hosting!

newgrounds turned out better: http://www.newgrounds.com/portal/view/680363  ~700 plays so far, and the number gradually keeps going up. No complaints. But you need to reupload/review the game every time you have an update.

So, essentially, The more places you put your game, the higher you maintenance time cost. (obviously). I regret putting html version of my game on itch.io (~40 views in 2 months), because itch.io does not allow embedding your html simply and seems to not give much organic views (maybe I did something wrong?).

Gamejolt deserves a separate word. I’ve put the game there and in first few weeks was getting results similar to itch.io. I’ve kept updating it regularily and writing my devlog. On about fourth week, the game got featured on front page. This got me: 5.3k Views, 1.4k Plays, 75 Ratings, with average score 3.7867 out of 5.

I was not ready for this. Only when my highlight time was coming to an end, I’ve figured out that I should add a popup that asked players to vote. Got maybe 10 greenlight votes after I made a simple popup (shown to returning players asking them to vote).

Here’s a total amount of times my game has been played online:

Game Plays Online

Game Plays Online

It might not seem much, but it’s much more than my previous games, so I’m really happy about that. I was also happy when I got the messages  from some players that they’ve unlocked all the planes. Feelsgoodman.

Sad Part: The Greenlight

The game looks much better now, but the momentum has been lost.

Frequent Flyer: before

Frequent Flyer: before

FF: Now

FF: Now

The Greenlight Marketing tips seem obvious, but they are spot on. Put the best possible version out there, polish one level instead of making 20 (my mistake: was trying to make all enemies/player planes first). Make the game look as good as possible. You get the initial spotlight from Valve, but after that it becomes increasingly complicated. I got maybe 20 votes from web version, but here’s how Greenlight looks now:

greenlight

As you can see, not much hope is left 🙂 I’m definitely going to show the game off at GameOn and see if I can get some good feedback and traction. If not – I’m going to consider this a lesson learned, will employ the promo things that I’ve learned (forums / web games).

Summary

  • Post devlogs on Forums regularly, as soon as you have a simple prototype to show (make sure to update the first post to indicate the biggest advancements)
  • For web version in my case, best results came from: gamejolt > newgrounds > kongregate
  • Greenlight: put it out there only when you have a decent version to show. No surprise, getting votes after the launch is much more complicated.

In case you want to support me with the vote, here’s the link: http://steamcommunity.com/sharedfiles/filedetails/?id=744697163


Developing Multiplatform Game with LibGDX, part 14: screenshake and appearance

Screenshake

In our previous lesson, we made our character blink on hit. That feels better, but it’s not enough. Let’s make our screen shake to indicate how hurt the player is!

In our Character class, let’s make a public function that returns last time our character has been hurt:

public float getTimeOfDmgTaken()
{
    return timeOfDmgTaken;
}

We also need one getter to see time alive:

public float getTimeAlive()
{
    return timeAlive;
}

In our GameScreen.java, define two new constants:

private static final float SHAKE_TIME_ON_DMG = 0.3f;
private static final float SHAKE_DIST = 4.0f;

One is responsibe on how long the shake is going to happen, the other one for the intensity of shake (Shake Distance, amplitude). After we do that – we’re ready to start screenshake process! In our GameScreen render function, before DrawUi() call, we have to add the following lines:

gameStage.getCamera().position.set(gameStage.getWidth() / 2, gameStage.getHeight() / 2, 0);
if (player.getLives() > 0 &&
    player.getTimeAlive() - player.getTimeOfDmgTaken() < SHAKE_TIME_ON_DMG)

    gameStage.getCamera().translate(-(SHAKE_DIST/2) + MathUtils.random(SHAKE_DIST),
            -(SHAKE_DIST / 2) + MathUtils.random(SHAKE_DIST), 0);
}
gameStage.getCamera().update();

The sequence:

  1. Reset camera position
  2. If player has recently taken damage, move the camera. Note that player must be alive (otherwise we’ll get an infinite shake)
  3. Apply our camera movement

Run the game and take damage! The screen should be shaking after receiving damage now 🙂

Appearance at the start of the game

Right now our player and enemy both appear at the fixed position at the start of the game. Let’s make them appear from the side of the screen and then take the initial positions.

In our Player class, make a separate constant,

private static final float APPROACH_TIME = 0.5f;

Then, modify our draw method call.

public void draw(SpriteBatch batch, SizeEvaluator sizeEval)
{
    preDraw();

    if (timeAlive < APPROACH_TIME)
    {
        float t = timeAlive / APPROACH_TIME;
        setPosition((t * t) * sizeEval.getBaseScreenX(fieldX), sizeEval.getBaseScreenY(fieldY));
    }
    else
    {
        setPosition(sizeEval.getBaseScreenX(fieldX), sizeEval.getBaseScreenY(fieldY));
    }
    super.draw(batch);

    postDraw();
}

To explain: in the first 0.5 seconds, the player is going to seemingly move from left to right side.

Let’s do something different for our enemy. Why not make him increase in size (starting from very small)?

Modify our Enemy class, declare a constant:

private static float SCALE_TIME = 0.5f;

And modify our Enemy.draw method:

public void draw(SpriteBatch batch, SizeEvaluator sizeEval)
{
    preDraw();
    setPosition(sizeEval.getEnemyX(this), sizeEval.getEnemyY(this));
    if (timeAlive < SCALE_TIME)
    {
        float t = timeAlive / SCALE_TIME;
        t = t * t;
        setScale(t);
    }
    else
    {
        setScale(1);
    }
    super.draw(batch);
    postDraw();
}

Finally, make a small bugfix to prevent spawning on already existing places: in our gamelogic.java, in SpawnRandomBonus function, change for cycle from

for (int i = 0; i < bonuses.size() && targetNonEmpty; i++)

to

for (int i = 0; i < bonuses.size() && (targetNonEmpty == false); i++)

Run the game. You can see that both player and spider smoothly appear on the screen now.

Relevant Github commit: https://github.com/vladimirslav/dodginghero/commit/ab9d4e938bf8dde615bacbccdc87005672770ebc