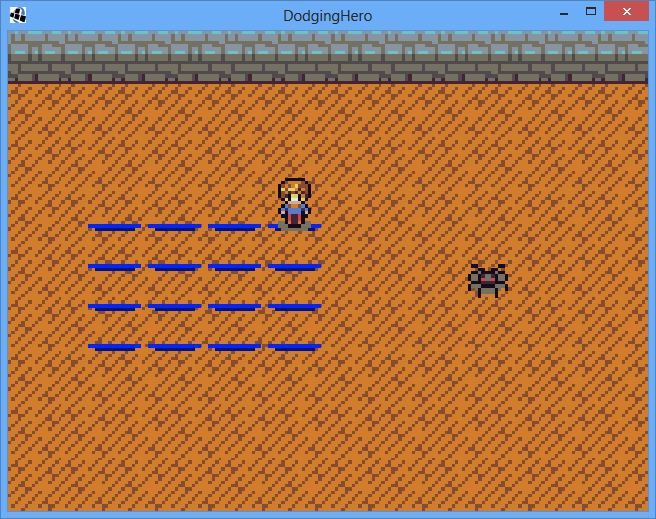
Now that we’ve implemented a smooth approach- let’s work on smooth leave. Whenever player wins a battle – let’s make him move to the right side of the screen (to make an illussion of leaving and progressing further).
Now, we need to add an extra condition to our draw:
if (timeAlive < APPROACH_TIME)
{
    float t = timeAlive / APPROACH_TIME; // 0..1
    t = t * t;
    setPosition(
            t * sizeEvaluator.getBaseScreenX(fieldX),
            sizeEvaluator.getBaseScreenY(fieldY));
}
else if (winning)
{
    float t = 1;
    if (timeAlive - winTime < APPROACH_TIME)
    {
        t = (timeAlive - winTime) / APPROACH_TIME; // 0..1
        t = t * t;
    }
    float fx = sizeEvaluator.getBaseScreenX(fieldX);
    setPosition(
            fx + t * (sizeEvaluator.getRightSideX() - fx),
            sizeEvaluator.getBaseScreenY(fieldY));
}
else
{
    setPosition(sizeEvaluator.getBaseScreenX(fieldX),
            sizeEvaluator.getBaseScreenY(fieldY));
}
As you see, we need to know the right side of the screen. In our SizeEvaluator, let’s add methods setRightSideX and getRightSideX. Since the width of our window (and therefore screen) can change, we need to keep it updated. SizeEvaluator constructor should also accept right side x.
private float rightSideX;

public SizeEvaluator(Stage _stage, Resources _res, int maxBaseX, int maxBaseY, float _rightSideX)
{
    measuredStage = _stage;
    resources = _res;
    maxTileBaseX = maxBaseX;
    maxTileBaseY = maxBaseY;
    rightSideX = _rightSideX;
}

public void setRightSideX(float value)
{
    rightSideX = value;
}

public float getRightSideX() {
    return rightSideX;
}
Now adjust GameScreen constructor to pass gameStage.getWidth() as the last parameter into SizeEvaluator constructor.
sizeEvaluator = new SizeEvaluator(gameStage,
        game.res,
        GameLogic.MAX_BASE_X,
        GameLogic.MAX_BASE_Y,
        gameStage.getWidth());
Then, we have to take care that sizeEvaluator adjusts properly on screen resize. In our GameScreen’s resize method, add the call to sizeEvaluator’s setRightSideX function.
@Override
public void resize(int width, int height)
{
    super.resize(width, height);
    gameStage.getViewport().update(width, height, true);
    sizeEvaluator.setRightSideX(gameStage.getWidth());
}
One more thing: we need to tell our player class that the game is won. There’s also a problem now: the player’s time is updated inside our logic calls. But we’re not updating the logic if the game has ended (enemy or player died). Time for some refactoring! Change GameScreen’s update function from:
public void update(float delta)
{
    gameStage.act(delta);
    if (player.getLives() > 0 && logic.getEnemy().getLives() > 0)
    {
        logic.update(delta);
    }
}
To:
public void update(float delta)
{
    gameStage.act(delta);
    logic.update(delta);
}
Player is always updated, but all the other stuff gets updated only if both player and enemy are alive. Now the only thing is left is to tell our player object that we won! In our Player class, add new function:
Then, in our gamelogic, when we damage the enemy, we have to check enemy health. If it equals zero – tell the player that we won! Adjust the part of code with attack bonus pickup:
else if (currentBonus.getBonusType() == Bonus.BONUS_TYPE_ATTACK)
{
    enemy.takeDamage(1);
    if (enemy.getLives() <= 0)
    {
        player.markVictorious();
    }
}
Great! Now our player leaves after the game ends, marking the continuation of the journey. Looks much better!
In our previous lesson, we made our character blink on hit. That feels better, but it’s not enough. Let’s make our screen shake to indicate how hurt the player is!
In our Character class, let’s make a public function that returns last time our character has been hurt:
public float getTimeOfDmgTaken()
{
    return timeOfDmgTaken;
}
We also need one getter to see time alive:
public float getTimeAlive()
{
    return timeAlive;
}
In our GameScreen.java, define two new constants:
private static final float SHAKE_TIME_ON_DMG = 0.3f;
private static final float SHAKE_DIST = 4.0f;
One is responsibe on how long the shake is going to happen, the other one for the intensity of shake (Shake Distance, amplitude). After we do that – we’re ready to start screenshake process! In our GameScreen render function, before DrawUi() call, we have to add the following lines:
If player has recently taken damage, move the camera. Note that player must be alive (otherwise we’ll get an infinite shake)
Apply our camera movement
Run the game and take damage! The screen should be shaking after receiving damage now 🙂
Appearance at the start of the game
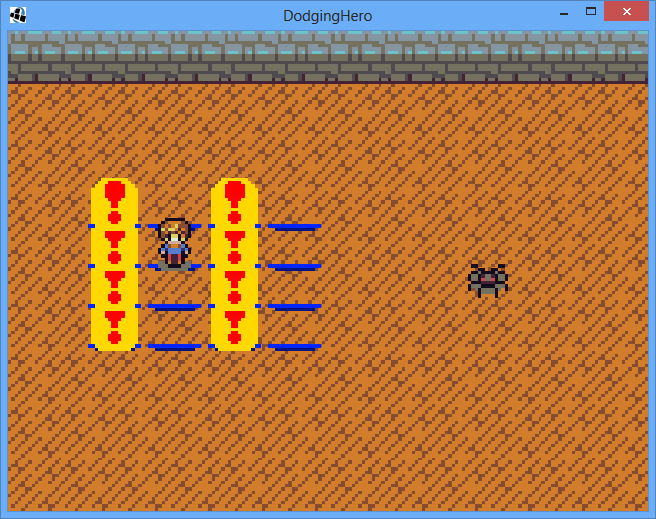
Right now our player and enemy both appear at the fixed position at the start of the game. Let’s make them appear from the side of the screen and then take the initial positions.
To explain: in the first 0.5 seconds, the player is going to seemingly move from left to right side.
Let’s do something different for our enemy. Why not make him increase in size (starting from very small)?
Modify our Enemy class, declare a constant:
private static float SCALE_TIME = 0.5f;
And modify our Enemy.draw method:
public void draw(SpriteBatch batch, SizeEvaluator sizeEval)
{
    preDraw();
    setPosition(sizeEval.getEnemyX(this), sizeEval.getEnemyY(this));
    if (timeAlive < SCALE_TIME)
    {
        float t = timeAlive / SCALE_TIME;
        t = t * t;
        setScale(t);
    }
    else
    {
        setScale(1);
    }
    super.draw(batch);
    postDraw();
}
Finally, make a small bugfix to prevent spawning on already existing places: in our gamelogic.java, in SpawnRandomBonus function, change for cycle from
for (int i = 0; i < bonuses.size() && targetNonEmpty; i++)
to
for (int i = 0; i < bonuses.size() && (targetNonEmpty == false); i++)
Run the game. You can see that both player and spider smoothly appear on the screen now.
Right now, the only way to tell that the player or enemy has been damaged is by checking their hp. This is not very observable. Let’s try to implement basic blinking on player / enemy damage.
We are starting to notice more and more similarities between our enemy and a player. Let’s refactor this a bit and move common functions into an abstract parent class. In our logic/objects package, create a new abstract class, Character. It should inherit from Sprite. Let’s move the similar functions from both player and enemy into the character class.
We need to move following stuff from Player/Enemy to our Character Class:
Variable lives. Also, make this variable protected. Other stuff:
Create a Character constructor, that takes “lives” as a parameter; since both enemy and player have lives – it’s a good idea to move this variable into parent class.
TakeDamage function works the same way for player and enemy. getLives apply to both. That’s it. For now. Here’s the final look of all 3 classes.
Character.java:
public class Character extends Sprite {

    protected int lives;

    public Character(int _lives)
    {
        lives = _lives;
    }


    public int getLives()
    {
        return lives;
    }


    public void takeDamage(int amount) {
        lives -= amount;
        if (lives < 0)
        {
            lives = 0;
        }
    }
}
Player.java:
public class Player extends Character {

    private final int max_lives;
    protected int fieldX;
    protected int fieldY;

    public Player(int fx, int fy, Resources res, int _lives)
    {
        super(_lives);
        fieldX = fx;
        fieldY = fy;
        max_lives = _lives;
        set(res.player);
    }

    public int getFieldX() {
        return fieldX;
    }

    public void setFieldX(int fx) {
        fieldX = fx;
    }

    public int getFieldY() {
        return fieldY;
    }

    public void draw(SpriteBatch batch, SizeEvaluator sizeEval)
    {
        setPosition(sizeEval.getBaseScreenX(fieldX), sizeEval.getBaseScreenY(fieldY));
        super.draw(batch);
    }

    public void setFieldY(int fy) {
        fieldY = fy;
    }

    public void addLives(int amount) {
        lives += amount;
        if (lives > max_lives)
        {
            lives = max_lives;
        }
    }
}
Enemy.java:
public class Enemy extends Character {

    private static final float BASE_ATTACK_TIME = 3.0f;
    private static final int DEFAULT_ENEMY_LIVES = 10;
    private float timeSinceAttack;
    private float nextAttackTime;
    private EnemyAttackListener attackListener;

    private boolean targetTiles[][];

    public interface EnemyAttackListener
    {
        void OnAttack(boolean[][] tiles);
    }


    public Enemy(Resources res, EnemyAttackListener listener)
    {
        super(DEFAULT_ENEMY_LIVES);
        attackListener = listener;
        set(res.enemy);
        resetAttackTimer();
        targetTiles = new boolean[GameLogic.MAX_BASE_X + 1][];
        for (int i = 0; i <= GameLogic.MAX_BASE_X; i++) { targetTiles[i] = new boolean[GameLogic.MAX_BASE_Y + 1]; } } public void update(float delta) { timeSinceAttack += delta; if (timeSinceAttack > nextAttackTime)
        {
            int col1 = MathUtils.random(GameLogic.MAX_BASE_X);
            int col2 = 0;
            do {
                col2 = MathUtils.random(GameLogic.MAX_BASE_X);
            } while (col2 == col1);
            // not very effective, but guaranteed to get different results

            for (int x = 0; x <= GameLogic.MAX_BASE_X; x++)
            {
                for (int y = 0; y <= GameLogic.MAX_BASE_Y; y++)
                {
                    targetTiles[x][y] = (col1 == x || col2 == x);
                }
            }

            attackListener.OnAttack(targetTiles);
            resetAttackTimer();
        }
    }

    private void resetAttackTimer()
    {
        timeSinceAttack = 0;
        nextAttackTime = BASE_ATTACK_TIME + MathUtils.random(2.0f);
    }


    public void draw(SpriteBatch batch, SizeEvaluator sizeEval)
    {
        setPosition(sizeEval.getEnemyX(this), sizeEval.getEnemyY(this));
        super.draw(batch);
    }
}
Cool. Now let’s start modifying stuff! The task is to make enemy and player blink whenever they are damaged. We’ll do it the following way: when character gets damaged, we record the current time of damage. For the next 0.5 seconds, it will be blinking. Sounds easy enough?
The reasoning behind making timeAlive protected is that we may use it later somewhere. Outside of the character class. In our Character class, init those two variables:
timeAlive = 0;
timeOfDmgTaken = -1;
We want timeOfDmgTaken to represent a negative number for now, so that the game would not think that we took damage on second 0.
In our Character class, add an update function:
public void update(float delta)
{
    timeAlive += delta;
}
It simply adds to the total time alive. Now add a public constant, which would show how much time (total) we want our character to blink.
public static final float BLINK_TIME_AFTER_DMG = 0.25f;
Great, the character should be blinking for a quarter of a second. Now, for the blinking part. In our takeDamage function, set the valuje of timeOfDmgTaken to our current time.
timeOfDmgTaken = timeAlive;
And now we’ll have to check the player out. Now, right after the same place in GameLogic where we call enemy.update (GameLogic.update method), add player.update(delta) call.
Great. Speaking about enemy update: in our enemy’s update function, right at the start, add a call to our Character’s update function (super.update(delta)). Also, add an @Override keyword before update to indicate that we’re overriding the parent function.
Enemy.java:
@Override
@Override
public void update(float delta)
{
    super.update(delta);
Great. So how do we do the blinking? Since both enemy and player will blink the same way, we want such functionality function in Character. The issue is: player’s and enemy draw functions are different. We’ll need two functions: a function that we call before drawing and one that we call after.
Let’s call them preDraw and postDraw. Both should be inside the Character class.
public void preDraw()
{
    if (timeAlive < timeOfDmgTaken + BLINK_TIME_AFTER_DMG)
    {
        float t = (timeAlive - timeOfDmgTaken) / BLINK_TIME_AFTER_DMG;
        t = t * t;
        setColor(1, 1, 1, t);
    }
}
So what does it do? The idea is simple: as soon as character is hit, he disappears (his alpha channel iz zero). Then, he gradually reappears on the screen. The thing is, we don’t want him to reappear in linear timing. We want him to be transparent for a bit more time, and then to reappear rapidly. To do this, we apply something that is called an easing function. It makes animation/transaction look smoother. In our case, it’s Quadratic Easing (take the current time, remove the time of damage taken and divide it by the time when our sprite should be blinking. Then, we multiply the value with itself. In case of lower values (not much time passed) – we get even smaller transparency value: if our time has passed (timeAlive – timeOfDmgtaken is 0.05 seconds, then we have 0.05 / 0.25 = 0.2. After multiplying it with itself, we get 0.04 – much smaller transparency value). There are various formulas and various approaches to this: you can check out http://gizma.com/easing/ on how animation changes depending on an easing equation.
postDraw is much easier:
public void postDraw()
{
    setColor(1, 1, 1, 1);
}
We reset the transparency of the sprite. Sounds good! Now add it to both Player’s and Enemy draw functions.
Run the game! Even though we have not changed anything gameplay-wise, you can see that it feels a bit better now, because player is getting more feedback when something happens.
Putting Game Logic behind bonus visuals. Winning the game.
In our previous lesson, we’ve discussed how to display bonus pickups, but we have not introduced a way for the player to actually pick them. Time to change that! We want our player to pick bonuses in order to restore health and deal damage. To do this, we need to check when player moves to a tile to see if the tile contains something. If it does – we pick it up.
In our GameLogic, let’s extend our AssignPlayerPosition function. After the player moves to a new coordinates, let’s check if there’s actually a bonus there. If there is – do something according to the bonus type.
Since we don’t have many bonuses at the same time, we’ll go through the whole list (from end to the beginning) and check the coordinates of each bonus. If they match – we remove the bonus and apply its effect to the game. Sounds easy? Let’s get to it.
public void AssignPlayerPosition(int fx, int fy)
{
    player.setFieldX(fx);
    player.setFieldY(fy);

    for (int i = bonuses.size() - 1; i >= 0; i--)
    {
        Bonus currentBonus = bonuses.get(i);
        if (currentBonus.getFieldX() == fx &&
                currentBonus.getFieldY() == fy)
        {
            currentBonus.release();
            bonuses.remove(i);
            break;
        }
    }
}
As I said: go through the bonus list from end to beginning. In this case it does not make a difference if you go from beginning or end (since you remove bonus only once), but if you remove multiple elements, you want to do the traversal from end to beginning, because removing an element decreases all next indexes by one which makes traverse via for cycle unreliable. (You might skip an element that needs to be deleted).
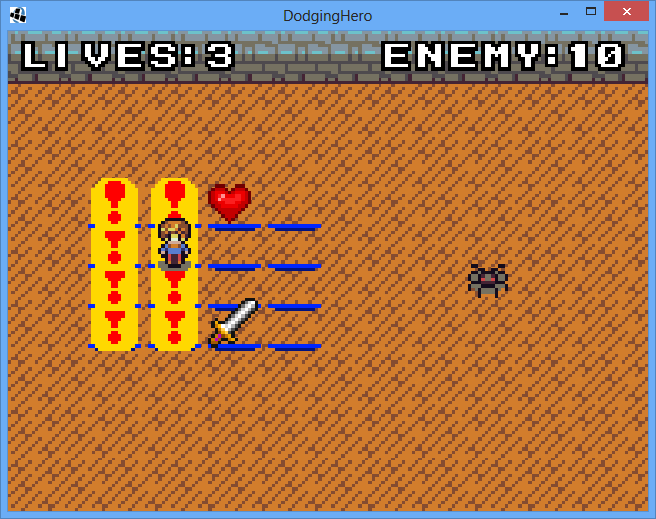
Run the game. Try moving around and picking up bonuses. You can see that it is working, bonuses are disappearing as you step on them! Now, we need to actually do something when you pick them up. Before you release the bonus, let’s check the bonus type and do something depending on that type.
We know what should be happening: on life pick, increase player lives. On attack bonus pick – reduce enemy lives. Unfortunately, we have no means (yet!) to do this.
if (currentBonus.getBonusType() == Bonus.BONUS_TYPE_HEALTH)
{
    player.addLives(1);
}
else if (currentBonus.getBonusType() == Bonus.BONUS_TYPE_ATTACK)
{
    enemy.takeDamage(1);
}
Increasing Player’s Lives
We’ll need to add addLives function to our Player and takeDamage function to our enemy. Start with the first. Adding lives is not complicated, but it gets a bit tricky: we don’t want to go over the top when player picks extra lives. We only want to restores the ones our player has lost. Let’s cap the lives of the player. Introduce a private final variable max_lives. It’s going to hold the initial amount of lives player was assigned. Modify our Player constructor:
private int lives;
private final int max_lives;

public Player(int fx, int fy, Resources res, int _lives)
{
    max_lives = _lives;
Great, our max_lives are saved. Now we’ll have something to check player’s lives against. Let’s start working on addLives function.
public void addLives(int amount) {
    lives += amount;
    if (lives > max_lives)
    {
        lives = max_lives;
    }
}
Add the lives, then if our lives are above the cap, reduce them to a max possible value.
Reducing enemy lives, winning the game
With enemy, it’s going to be even easier. Introduce the function takeDamage that substracts the amount from lives. For the aesthetical reasons, let’s not allow the enemy lives go below zero.
public void takeDamage(int amount)
{
    lives -= amount;
    if (lives < 0)
    {
        lives = 0;
    }
}
Simple. If you run the game now, you’ll see that your lives get restored and enemy lives are taken away once you pick the right bonus. Cool. But you still can’t win the game. As the final step, let’s adjust our GameScreen.
We don’t want to update the game (for now) once enemy got destroyed, so adjust our update() function to add an extra condition.
Enemy lives should be greater than zero. Also, adjust AttemptMove function to restrict player movement in case enemy lives are less than zero. How it will look now:
Then, in our DrawUI function, let’s make sure we tell the player that he won. Create a separate function ShowGameResult(String result) and move the “Defeat” writing there.
The DrawUI part where we used to write “DEFEAT” should look like this now:
if (player.getLives() <= 0)
{
    ShowGameResult("DEFEAT!");
}
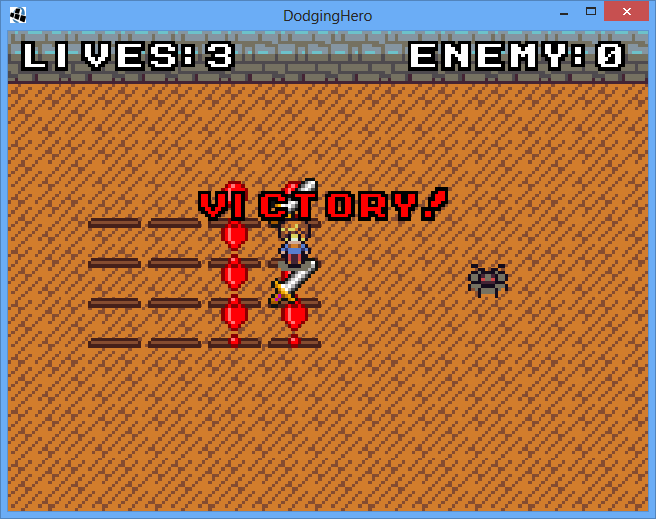
Add an extra condition that will write “Victory!” in case player won. Should be easy:
else if (enemy.getLives() <= 0)
{
    ShowGameResult("VICTORY!");
}
Run the game. Everything works! Wooho. One thing I suggest doing to make the game a bit more dynamic, is to reduce warning effect time (WARNING_TIME) from 2 to, say, 0.75 seconds. Whatever makes the game more interesting for you.
Today, we’ve reached an important achievement! We have a working prototype. Took us about 5 hours total. Usually, at this stage you can see if the game is worth working on (is it at least slightly entertaining to play the prototype?).
If this was a book, it would conclude volume one. The next volume I’ll spend on polishing the looks and the feel on the game. And finally, I’m going to work on publishing things (Android: ads / in-app purchases / achievements / leaderboards). So, stay tuned, and let’s have a great journey developing the game together!
Our victory screen, after you take all of the enemy lives
Building Html Version
A side note: to build and compile web version, go to “Terminal” tab in Android Studio and write “gradlew html:dist” command, without quotes. It will take some time, but you’ll have a web version that you’ll be able to upload/show off somewhere online. Just check yourproject/html/dist folder, it has all the necessary files.
Some people really don’t know when to stop. I mean, as if implementing the game losing process was not enough? Sigh. Fine, we’re going to allow our player to win.
I’m actually excited. This means that today we’re getting a first „real” prototype of the game 🙂 Usually at this stage you can see how do things feel and if it’s worth continuing to work on it.
Let’s start small. Add health value to our enemy. We’ll need to take it down before we win. Go to our „Enemy” class. Same as our player, add variable to count lives there;
private int lives;
Great! Now initialize it in our constructor. I’m setting it to 10, but you can pick however many you want. The point is not to make the game too annoying to play, so the enemies definitely should be beatable, but not very easily (leave some challenge!).
private static final int DEFAULT_ENEMY_LIVES = 10;
…
public Enemy(Resources res, EnemyAttackListener listener)
{
    lives = DEFAULT_ENEMY_LIVES;
…
Good! The only thing left to do here is to make a getter.
public int getLives()
{
    return lives;
}
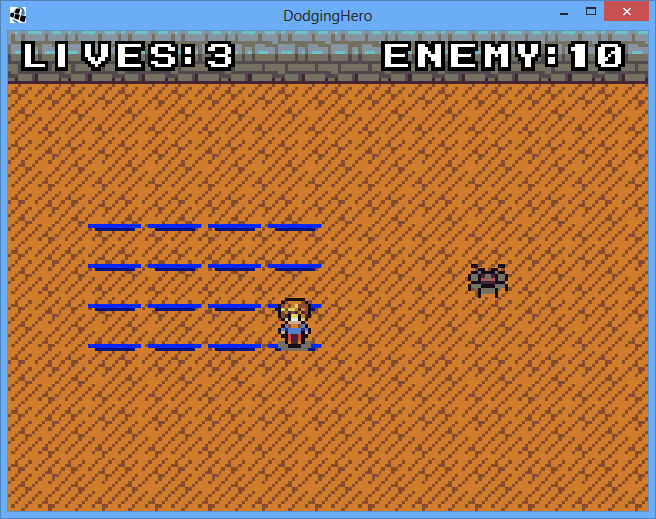
This part should be good. Let’s show the enemy lives on our gamescreen. Go to GameScreen class and in our DrawUI function, add the line which will draw enemy lives in the top right corner. Use our good-old DrawShadowed function for that.
Run the game. You’ll see that enemy lives are written on the right corner now.
Enemy Lives Displayed On The Right Top Corner
Cool, huh?
Spawning Bonuses and Attacking
Now let’s find a way how we can make them go down. Since our mechanics involve stepping on the field and dodging attacks, why not add some pickups on the same tiles that would trigger the damage on an enemy? Or even heal the player?
First, add the graphics for those pickups. I’m going to use two pictures that my girlfriend Helen drew for me (https://twitter.com/ElenaNazaire). Those are two icons, named attack.png and health.png
Declare and load them up in our Resources class!
public Sprite attackBonus;
public Sprite healthBonus;

public Resources()
{
…
    attackBonus = gameSprites.createSprite("attack");
    healthBonus = gameSprites.createSprite("health");
}
Next, in our objects package, create a new class, name it “Bonus”; As usual, let’s think first what we want from our Bonuses.
– Same as with our effects, we should strive to reuse the bonuses instead of reinitializing them.
– We want two bonus types: one that takes enemy health away, the other gives health to our player.
– How do we detect that player gets the bonus?
Make Bonus extend Sprite (after all, the bonus needs to be displayed?) and, same as effect, implement Poolable. Let’s add bonus type and fieldX and fieldY as a private variables. Here’s what we have now:
public class Bonus extends Sprite implements Pool.Poolable {

    private byte bonusType;
    private int fieldX;
    private int fieldY;

    @Override
    public void reset() {

    }
}
Now make an empty constructor.
public Bonus()
{

}
Good. It will be called when our pool cannot locate any free unused bonuses. Now define two type constants:
public static byte BONUS_TYPE_ATTACK = 0;
public static byte BONUS_TYPE_HEALTH = 1;
Now, define setup function, which will assign the proper values.
public void setup(int fx, int fy, byte bType, Resources res)
{
    fieldX = fx;
    fieldY = fy;
    bonusType = bType;
    if (bType == BONUS_TYPE_ATTACK)
    {
        set(res.attackBonus);
    }
    else if (bType == BONUS_TYPE_HEALTH)
    {
        set(res.healthBonus);
    }
}
Should be self-explanatory, but the last conditions assign our bonus pictures. Now, similar to our WarningEffect, let’s make a bonus pool.
static final Pool<Bonus> bonusPool = new Pool<Bonus>() {
    @Override
    protected Bonus newObject() {
        return new Bonus();
    }
};
It will store unused bonuses (or create new if there are no free ones). Speaking about creating and releasing bonuses, let’s make a functions that do this:
public void release() {
    bonusPool.free(this);
}

static public Bonus Create(int fx,
                           int fy,
                           byte bType,
                           Resources res)
{
    Bonus bonus = bonusPool.obtain();
    bonus.setup(fx, fy, bType, res);
    return bonus;
}
Let’s not forget the drawing process too. Just cheat (the only time you should) and copy it from the Player.
Finally, don’t forget the fieldX, fieldY and bonusType getters.
public int getFieldX()
{
    return fieldX;
}

public int getFieldY()
{
    return fieldY;
}

public byte getBonusType()
{
    return bonusType;
}
This should be enough for the bonus implementation (for now). Let’s get to the game logic. Since our field is small and player moves relatively rarely (maybe a few times per second max), we can make a list of bonuses and go through the list every time when player makes a move to check whether there was a collision with bonus and something should be done.
Go to our GameLogic class. Declare the bonus list, elapsed game time and the time of the last bonus spawn:
Initialize those variables it in the GameLogic constructor.
bonuses = new ArrayList<Bonus>();
lastBonusSpawnTime = 0;
gameTime = 0;
How often do we want to spawn bonuses? Let’s make it two seconds for experimentation purposes. Make a constant to show that:
private static final float BONUS_SPAWN_INTERVAL = 2.0f;
Great. Now to the actual spawn process. We should do this in our update function. First, we want to increase the game time, no matter what happens. Since update passes the delta value, we just add this to our gameTime and in the end we have the total game time. Then, we compare the gametime to the last spawn time and if it is greater than the bonus spawn interval, we spawn a new bonus (magic number, let’s cap our bonus amount to three. So, don’t spawn a bonus if we already have three bonuses). Yes, we need a separate function for that. Here’s how my update function looks now:
Now, let’s get to SpawnRandomBonus function. We need to ensure that our new coordinates do not overlap with player or other bonuses. Also, let’s not generate the bonus on the same column and row where player is standing. That leaves us with plenty of space (9 tiles, to be exact).
private void SpawnRandomBonus()
{
    int fx = 0;
    int fy = 0;
    boolean targetNonEmpty = true;
    do {
        fx = MathUtils.random(MAX_BASE_X);
        fy = MathUtils.random(MAX_BASE_Y);
        targetNonEmpty = player.getFieldX() == fx || fy == player.getFieldY();

        for (int i = 0; i < bonuses.size() && targetNonEmpty; i++)
        {
            if (bonuses.get(i).getFieldX() == fx &&
                    bonuses.get(i).getFieldY() == fy)
            {
                targetNonEmpty = true;
            }
        }
    } while (targetNonEmpty);

    bonuses.add(Bonus.Create(fx, fy,
            MathUtils.random(3) == 0 ? Bonus.BONUS_TYPE_HEALTH : Bonus.BONUS_TYPE_ATTACK,
            game.res));
    lastBonusSpawnTime = gameTime;
}
The function might look tricky, but let’s go through it:
First, we generate new coordinates for the bonus. We check if those are equal to players coordinates. Then we go through already existing bonuses and if we find the bonus that has the same coordinates – we stop searching. We simply generate the new coorindates.
After acceptable coordinates have been found, we add the new bonus to the list. We don’t want health bonuses to spawn too often, so we generate a number from 0 to 3. If the number is 0, we spawn a health bonus. Otherwise, we spawn an attack bonus (which will damage our enemy).
Finally, we set our last bonus spawn time to current game time.
I feel that this tutorial is getting long, so let’s no program the logic of the bonuses, but only draw them. Create a bonus list getter in GameLogic:
public ArrayList<Bonus> getBonuses()
{
    return bonuses;
}
Then, in our GameScreen, right before we draw our player, let’s draw our bonuses. Here’s how the last part of the code looks:
So, our player has lives and he can lose the game. But he has no way to find out the lives left and when the game ends – everything just closes. Not cool. We’ll fix it today.
The simplest thing to fonts libgdx has to offer is BitmapFont class. Without paramters, it will simply show arial 12 font. The problem? Resizing that font. Our game cannot open ttf files, so the texture with font needs to be generated first. BitmapFont is going to use that texture, but it needs to be prepared beforehand. To do this, we are going to use Hiero. I’m downloading it here: https://libgdx.badlogicgames.com/tools.html
Make sure to pick a ttf font you want first. For pixel-art styled games, I normally use http://www.pentacom.jp/pentacom/bitfontmaker2/gallery/ to get a freely available font. I’m picking up Megaman10 by YahooXD: http://www.pentacom.jp/pentacom/bitfontmaker2/gallery/?id=528 (public domain). Download it to your computer, save it wherever you want to (but I usually save it in the project assets folder, separate from the one that is being packed).
Run the downloaded runnable Hiero. Open your font file, and pick the size you want. For out case, since the game is really low-resolution, I think 16px will be more than enough. I usually set padding to 2 (to have some extra space between letters) and use rendering type: java.
After that – go to “File” -> Save BMFont files. Name it gamefont and put the files into android/assets folder, since this is the one that is used for resource loading by default. There should now be two files: fnt file (which is a font descriptor) and png file, which is actually a texture of the font.
If you are going to use the same font throughout the game – I think it’s a good idea to put it into Resources class too:
public BitmapFont gamefont;
Initialize it in Resources constructor:
gamefont = new BitmapFont(Gdx.files.internal("gamefont.fnt"),
        Gdx.files.internal("gamefont.png"), false);
To test it, go to our GameScreen and add DrawUI function, which will draw our font at top of the screen.
The thing with font is… It’s drawn from top to bottom, a complete opposite of what we have when drawing textures. I can’t explain why it is (if you can – please comment!). So in our case, when we want to draw it on top of the screen, we get the screen Y position (in case not all height is covered) and add an actual stage height. Add the DrawUI call inside our render function, right before our gamestage.draw() call.
@Override
public void render (float delta) {
// …
// old code here, not copying it
// …
    DrawUi();
    gameStage.draw();
}
Run the game. Great, now we can actually see how our lives are being deducted. What about the endgame? What I think is important – it to show the message that the player lost instead of quitting the game (sure, that’s the only thing left for our player to do now, but not for long).
Remove this part from our GameLogic:
if (player.getLives() <= 0)
{
    Gdx.app.exit();
}
Our OnEffectOver(WarningEffect effect) should look like this:
public void OnEffectOver(WarningEffect effect) {
    if (effect.getFieldY() == player.getFieldY() &&
        effect.getFieldX() == player.getFieldX())
    {
        player.takeDamage(1);
    }
}
Good. Now let’s get back to our GameScreen. We need to do two things: disable update and player controls after player died (so that player cannot move / monsters cannot attack).
Alter our AttemptMove function:
public void AttemptMove(int dx, int dy)
{
    if (player.getLives() > 0 &&
            logic.CheckMove(player.getFieldX() + dx, player.getFieldY() + dy))
    {
        logic.AssignPlayerPosition(player.getFieldX() + dx, player.getFieldY() + dy);
    }
}
After that – check our update call. Stop updating logic on player death, it is unnecessary.
We set font color to red, then we show 0 as X coordinate and take stageWidth as targetWidth because the writing will automatically be aligned to center. After that, we switch font color back to white (don’t forget this step!)
If you run the game now, you can see that both ‘lives’ and ‘defeat’ text are poorly visible. How can we fix this? One way to do this is to add a black border. Let’s make a new function: drawShadowed(x, y, width, align, color)
Our function will draw the background of our word in black and then will overlap the background with the word of chosen color.
private void DrawShadowed(String str, float x, float y, float width, int align, Color color)
{
    game.res.gamefont.setColor(Color.BLACK);
    for (int i = -1; i < 2; i++)
    {
        for (int j = -1; j < 2; j++)
        {
            game.res.gamefont.draw(batch, str, x + i, y + j, width, align, false);
        }
    }

    game.res.gamefont.setColor(color);
    game.res.gamefont.draw(batch, str, x, y, width, align, false);
    game.res.gamefont.setColor(Color.WHITE);
}
After that, change our DrawUI to actually draw shadowed text:
Today we have an important day: we actually get to implement an important part of the game: the losing process. To make it simple: if player does not get out of harm’s way in time – he gets punished (his lives are reduced). After the lives drop down to zero: the game ends. Since we don’t have any fonts attached, we don’t have a way to inform the player about this. So we’ll just exit the game. Yes, pretty abruptly. We’ll deal with this later. Also, don’t freak out. I’ve replaced my horribly-drawn tiles with the ones that my girlfriend has drawn for me. You can get them in the project repo.
Modifying our Effect
First, we need to modify our warning effect so that it would inform our logic that it is actually over (timed out). In our WarningEffect class, add a public interface:
public interface WarningEffectListener
{
    public void OnEffectOver(WarningEffect effect);
};
Declare the variable which will point to the actual interface.
private WarningEffectListener listener;
Modify our init method and Create function to include the interface parameter.
Also, make fieldX and fieldY variables private and create a getter for them.
public int getFieldX()
{
    return fieldX;
}

public int getFieldY()
{
    return fieldY;
}
Great, this part is done. Now we only have to call it as effect ends. Modify our update function:
@Override
public void update(float delta)
{
    super.update(delta); // pass the time change
    // add an aditional security in order not to call death trigger twice
    if (timeAlive > WARNING_TIME && isAlive)
    {
        isAlive = false;
        if (listener != null)
        {
            listener.OnEffectOver(this);
        }
    }
}
To expand upon this: we’ve added additional check in our condition: isAlive should be true, this is to prevent double calls of OnEffectOver.
If listener has been set (let’s leave an option not to set it, might be useful later) – call OnEffectOver and pass the pointer to this effect.
Cool, we can call our effect over checks, but we can’t reduce player’s lives yet. Because he does not have them defined. Go to our Player class. Add a private integer field that indicates the lives of our player. In our constructor, let’s pass the amount of lives our player will have.
private int lives;

public Player(int fx, int fy, Resources res, int _lives)
{
    lives = _lives;
…
Great. Now the two things we need to do is: get the amount of lives player has and reduce the lives of the player. This should not be too hard:
public void takeDamage(int amnt)
{
    lives -= amnt;
}

public int getLives()
{
    return lives;
}
Done! Now the only thing left is to modify our logic. Create a constant DEFAULT_PLAYER_LIVES (private static final int) and set it to three. Adjust the player initialization to pass amount of lives.
Make GameLogic implement WarningEffectListener. It’s quite simple:
public class GameLogic implements Enemy.EnemyAttackListener, WarningEffect.WarningEffectListener {
Press alt+enter to implement the missing method. It will be very simple. We will compare the effects position to player’s current position and if they match – reduce the lives of a player.
@Override
public void OnEffectOver(WarningEffect effect) {
    if (effect.getFieldY() == player.getFieldY() &&
        effect.getFieldX() == player.getFieldX())
    {
        player.takeDamage(1);
        if (player.getLives() <= 0)
        {
            Gdx.app.exit();
        }
    }
}
Now run the game and try to get hit intentionally 3 times. The game will exit. Not pretty (yet), but it shows the point.
In our previous lesson, we’ve created an enemy. Now, it is time we teach how to attack. Our enemy will be responsible for timing attacks and telling the logic that there should be a warning given to the player (so that he can dodge).
First, in our Enemy class, let’s make a float variable that will count time since last attack (name it timeSinceAttack). We don’t want our attacks to be too predictable, so we’re going to use another variable to determine how long should we wait until performing our next attack. Declare float variable nextAttackTime. It is going to use a constant value of 3 seconds and add some random time interval (up to two seconds).
Declare a private static final variable BASE_ATTACK_TIME, set it to 3.
Define a private void function resetAttackTimer(), which will regen the timers. Here’s how my Enemy class looks now:
So I’m going to make an interface (something like a listener), accept it in the enemy’s constructor and make our logic implement it.
public interface EnemyAttackListener
{
    void OnAttack(boolean[][] tiles);
}
It will contain one method declaration OnAttack that accepts two-dimensional Boolean array which by size mirrors battlefield tile amount. (It will also be 4×4). If value is true, that means that logic should create warning effect on the given tile.
Now create a variable that will store the reference to our listener and adjust constructor to accept one.
Now, the only thing that’s left is to create the actual Boolean array. We could initialize it on every attack, but it’s better to initialize it once for every enemy and reuse it on every attack (memory management on mobile devices, right?). Declare it in the Enemy class:
private boolean targetTiles[][];
Initialize those in Enemy constructor:
targetTiles = new boolean[GameLogic.MAX_BASE_X + 1][];
for (int i = 0; i <= GameLogic.MAX_BASE_X; i++)
{
    targetTiles[i] = new boolean[GameLogic.MAX_BASE_Y + 1];
}
First, we initialize the columns (Array that contains arrays), then, we initialize the rows (child arrays).
Great, now we’re ready to actually get to attacking process. In our update function, check the current time versus the time when we need to attack. If our time to attack has come, fill the tiles that we want attacked.
We’re actually going to diversify attacks later on, but for now let’s make a very basic one: pick two columns (non-consecutive), leave others untouched.
Here’s how our update function is going to look now:
public void update(float delta)
{
    timeSinceAttack += delta;

    if (timeSinceAttack > nextAttackTime)
    {
        int col1 = MathUtils.random(GameLogic.MAX_BASE_X);
        int col2 = 0;
        do {
            col2 = MathUtils.random(GameLogic.MAX_BASE_X);
        } while (col2 == col1);
        // not very effective, but guaranteed to get different results

        for (int x = 0; x <= GameLogic.MAX_BASE_X; x++)
        {
            for (int y = 0; y <= GameLogic.MAX_BASE_Y; y++)
            {
                targetTiles[x][y] = (col1 == x || col2 == x);
            }
        }

        attackListener.OnAttack(targetTiles);
        resetAttackTimer();
    }
}
Note that
targetTiles[x][y] = (col1 == x || col2 == x);
Is just a short way of writing:
if (x == col1 || x == col2)
{
    targetTiles[x][y] = true;
}
else
{
    targetTiles[x][y] = false;
}
You can use whatever type you like (if it helps you to understand the code better), but I prefer the shorter version.
Amazing, now let’s make our gamelogic implement attack listener:
public class GameLogic implements Enemy.EnemyAttackListener
Press Alt+Enter to implement the suggested method. We just simply need to go through the array that has been passed to us and check every tile. If the tile is set to true, we create an effect on that tile.
First thing: go to GameScreen constructor and remove the WarningEffect creationg line from there:
Remove SizeEvaluator from WarningEffect constructor. We don’t need it there. We need it on drawing only, similar to our Player and Enemy. Keep sizeEvaluator in WarningEffect’s draw method, but remove all other mentions and declaration of SizeEvaluator in our WarningEffect class. Adjust “draw” function to accept SizeEvaluator as second parameter. Do the same thing with our parent class, Effect.
public abstract void draw(SpriteBatch b, SizeEvaluator sizeEvaluator);
Add the same parameter to our EffectEngine.
public void draw(SpriteBatch batch, SizeEvaluator sizeEvaluator)
{
    for (int i = 0; i < effects.size(); i++)
    {
        effects.get(i).draw(batch, sizeEvaluator);
    }
}
Go back to GameLogic. In Gamelogic’s update method, let’s add the update call of our enemy:
public void update(float delta)
{
    effectEngine.update(delta);
    enemy.update(delta);
}
Yup, only that. Now, to an actual OnAttack method:
@Override
public void OnAttack(boolean[][] tiles) {
    for (int x = 0; x < tiles.length; x++)
    {
        for (int y = 0; y < tiles[x].length; y++)
        {
            if (tiles[x][y])
            {
                WarningEffect.Create(x, y, game.res, effectEngine);
            }
        }
    }
}
As discussed before, we go through all the tiles, and create the effect when necessary. The only thing left to do is to adjust the effect drawing call in our GameScreen.
Launch the game, see what we get.
I’ve actually noticed a bug: in our WarningEffect, we’re not assigning fieldX and fieldY variables in init function. Let’s fix this:
public void init(int x, int y, EffectEngine parent, Resources res)
{
    super.init(parent);
    resources = res;
    fieldX = x;
    fieldY = y;
}
Run the game! You should be getting the enemy attack warnings shown once in a while.
In the previous lesson, we’ve implemented a possibility to show the effect before the enemy attack. But to actually send attack effects, we need an enemy to do that. Today, let’s try adding the enemy.
First thing: open our character tileset (http://opengameart.org/content/tiny-16-basic) and cut out any enemy that you’d like. It should be a 16×16 sprite. I’m going to save it as spider.png (It’s up to you how you want to save yours, just make sure you load it properly in our resource class).
Spider
Now go to your project, and open Resources class. In it, declare:
public Sprite enemy;
Initialize it as we initialize the player sprite (make sure to change the region name though!):
enemy = new Sprite(gameSprites.findRegion("spider"));
Next, right beside our Player object (in our logic.objects package), let’s declare another class, called Enemy. It, too, will be derived from Sprite class.
Opposite from player, it won’t have fieldX and fieldY (we’re always drawing our enemy in one place, right?), so in constructor let’s simply set the sprite value to be equal to our spider sprite. For that, we need to pass Resources to our constructor, just to be able to set the enemy sprite properly.
public class Enemy extends Sprite {

    public Enemy(Resources res)
    {
        set(res.enemy);
    }
}
We’ll also need a draw method(), which will take our size evaluator and set the enemy position accordingly.
To make it possible, let’s go to SizeEvaluator class and introduce two new methods that return float values: getEnemyX() and getEnemyY(). Both will accept enemy Sprite and use it’s length to center the enemy at the right half of the screen.
In case of X coordinate, we take the coordinates of second half of the screen (first half is measuredStage.getWidth() / 2, and add an half of an half (measuredStage.getWidth() / 4), thus resulting in (measuredStage.getWidth() * 3 / 4). From that value, we’re decreasing enemy width divided by two, so that our enemy will be exactly centered in the middle of the right half.
In case of Y, we simply take the vertical middle of the stage and substract half of enemy height (for the same, exact centering purpose).
Now go back to our Enemy class. Let’s introduce the draw method, which will set position of our enemy sprite in the necessary coordinates and then will call parent’s (sprite’s) draw method. We should get something like that:
A bit of side thoughts: I’ve been reevaluating my Player class, and I think it’s a better idea if we make constructor similar to enemy’s contructor. Pass the resource class to constructor, everything will be set inside the class itself. It’s a good idea to make class modifications inside the class itself. So, let’s rewrite the Player class in this way:
Constructor:
public Player(int fx, int fy, Resources res)
{
    fieldX = fx;
    fieldY = fy;
    set(res.player);
}
It will do the same thing as our enemy’s draw function. Now let’s do some refactoring. Go to GameScreen, remove RefreshPlayer function.
Also, in GameScreen constructor, remove following line:
player.set(game.res.player);
We won’t be setting a sprite in GameScreen anymore, this should be an inner doing of Player class. In our render function of GameScreen’s class, player drawing should look like this:
player.draw(batch, sizeEvaluator);
After that, let’s adjust our GameLogic class. I think it’s fair if we let it store the pointer to our DodgingHero class (which, in turn, will allow to access game resources). In GameLogic class, declare DodgingHero game; variable. Modify GameLogic constructor to actually assign the variable value and pass game.resources to our player Constructor. Here’s how it looks now:
DodgingHero game;

public GameLogic(DodgingHero _game)
{
    game = _game;
    player = new Player(
            MathUtils.random(MAX_BASE_X),
            MathUtils.random(MAX_BASE_Y),
            game.res
    );
    effectEngine = new EffectEngine();
}
This should suffice for now. In GameScreen class, make sure to change logic initialization:
logic = new GameLogic(game);
Try running the game. Try resizing the window. Everything should work fine now.
Let’s finally get to our enemy now. Go back to GameLogic, and, besides our Player, let’s declare our Enemy:
Enemy enemy;
Make the necessary import (alt + enter), there won’t be a choice. Initialize our enemy in GameLogic constructor.
enemy = new Enemy(game.res);
Create a getter that will return the pointer to our enemy object (similar to getPlayer function).
public Enemy getEnemy()
{
    return enemy;
}
The only thing that remains to do is to draw our enemy in our GameScreen! We are not going to do the same thing we did with Player in GameScreen (where we called logic.getPlayer() only once, inside the constructor), because our enemies might change while player remains the same. So simply do this. After our:
player.draw(batch, sizeEvaluator);
call, add
enemy.draw(batch, sizeEvaluator);
Run the game, it should show something like that:
Our Enemy!
Now we have an enemy which will attack us!
Don’t worry, I still remember that we made an Effect which will show above the battlefield. We’re definitely going to use it in our next lesson, in which we are actually going to teach our enemy how to attack.
Don’t forger to commit your changes! Also note that you have to run manual git add command every time you add a new file. I actually had to add spider drawing by using „git add” command before commiting.
We have the field where our character can walk. But what’s the point of walking if you can’t get anywhere? Or rather, if we cannot dodge the attacks of the enemy?
We’ll try to address this today. Let’s add the base marks on the field that will indicate where will the next enemy attack will go (essentially telling player to avoid these bases). We’ll just show a huge exclamation mark above the dangerous bases for now.
After exclamation mark passes, the player will be damaged if he stays on the marked fields. Even though it’s a graphical effect, we’ll need it to essentially affect the game logic (trigger an attack after it’s done showing).
In our graph package, let’s create „effects” package. Inside that package, create „EffectEngine” class. Create an empty public constructor and leave it as is for now. The effect engine will contain the list of all effects that are currently present in the game. It will also update them and issue drawing commands.
Let’s create an “Effect” abstract class in the same package that will implement Pool.Poolable.
To get back on this: if we’re making a game for android, it is good to reuse objects instead of creating them anew. Imagine if we have one effect in place, it vanishes and then the new one appears. If we reallocate the memory for it, it will take much more time to do this (especially with Android’s Garbage Collector). Instead, we’ll make a Pool of objects that we’re going to reuse.
For our base Effect class, we’ll just keep the most necessary things. To me, it usually comes down to two variables. Each effect should have its lifetime counted. We also need to know if the effect is alive or not (so that EffectEngine will know when to destroy it). Declare them this way:
public abstract class Effect implements Pool.Poolable {

    protected boolean isAlive;
    protected float timeAlive;
They need to be declared protected, as it means that they will be accessible by derived classes. Since those will be reinitialized often, the constructor won’t do much apart from setting the variables to initial values.
public Effect()
{
    isAlive = false;
    timeAlive = 0;
}
After this, let’s actually get to our Init function, which will reset the values to zero and will add the effect to the engine (will add it a bit later). The release function should also be there in case we’ll need extra disposal.
public void Init(EffectEngine parent)
{
    isAlive = true;
    timeAlive = 0;

}

public void release()
{

}
Now to other functions: there is a need for draw() and update functions. Update will update the current effect (most of them will have the lifetime, update will be responsible for checking if our effect has expired). In our case, we simply adjust the timeAlive.
public void update(float delta)
{
    timeAlive += delta;
}
draw is self-explanatory. It will take the batch and draw the effect. Since we do not plan to instantiate the effect class, declare draw function abstract.
public abstract void draw(SpriteBatch b);
One more thing remains: let’s allow to access isAlive variable to check whether effect is alive by adding isAlive method:
public boolean isAlive()
{
    return isAlive;
}
Now, let’s get back to EffectEngine class. First thing we need to do: declare a List of Effects:
List<Effect> effects;
public EffectEngine()
{
    effects = new ArrayList<Effect>();
}
The whole interaction is going to happen with this list. Our EffectEngine essentially needs only four functions: draw(), update(), clear(), add(). Draw will be calling draw() on all existing effects, add will be used to add a new effect to the list, clear will clear all the effects (in case we exit the gamescreen) and update will do the necessary updates (and remove the dead effects from the list). Let’s start with add function, as it is going to be the simplest one out there:
public void add(Effect effect)
{
    effects.add(effect);
}
Nice and simple, just add a new effect to an existing list. The update function is going to be a bit trickier though. First, we’ll go through the effect list and call their ‘update’ functions. After that, it’s time to root out the dead (expired) effects.
public void update(float delta)
{
    int i = 0;
    while (i < effects.size())
    {
        effects.get(i).update(delta);
        if (effects.get(i).isAlive())
        {
            i++;
            // just go forward in our list
        }
        else
        {
            effects.get(i).release();
            effects.remove(i);
        }
    }
}
First, we call the update function of every separate effect. After that, we check if the effect is alive. If it is, we simply proceed to the next effect in our list. But if it is not, we remove the effect with the current index (and do not increase our index, because the next element in the list moved to the current index).
The draw function is much simpler:
public void draw(SpriteBatch batch)
{
    for (int i = 0; i < effects.size(); i++)
    {
        effects.get(i).draw(batch);
    }
}
Go through all effects and draw them. And finally, clear function. The idea behind it is to mark the effects reusable (released) so that the next time (in case we restart the GameScreen) our effect pool won’t need to create any new elements, but reuse the old ones.
public void clear()
{
    while (effects.size() > 0)
    {
        effects.get(0).release();
        effects.remove(0);
    }
}
Finally, go back to Effect class and modify it’s Init function: at the end of it, call parent.add(this);
Here’s how my code looks for Effect class:
public abstract class Effect implements Pool.Poolable {

    protected boolean isAlive;
    protected float timeAlive;

    public Effect()
    {
        isAlive = false;
        timeAlive = 0;
    }

    public void init(EffectEngine parent)
    {
        isAlive = true;
        timeAlive = 0;
        parent.add(this);
    }


    public boolean isAlive()
    {
        return isAlive;
    }

    public abstract void draw(SpriteBatch b);

    public void update(float delta)
    {
        timeAlive += delta;
    }

    public abstract void release();
}
And EffectEngine class:
public class EffectEngine {

    List<Effect> effects;
    public EffectEngine()
    {
        effects = new ArrayList<Effect>();
    }

    public void add(Effect effect)
    {
        effects.add(effect);
    }

    public void update(float delta)
    {
        int i = 0;
        while (i < effects.size())
        {
            effects.get(i).update(delta);
            if (effects.get(i).isAlive())
            {
                i++;
                // just go forward in our list
            }
            else
            {
                effects.get(i).release();
                effects.remove(i);
            }
        }
    }

    public void draw(SpriteBatch batch)
    {
        for (int i = 0; i < effects.size(); i++) { effects.get(i).draw(batch); } } public void clear() { while (effects.size() > 0)
        {
            effects.get(0).release();
            effects.remove(0);
        }
    }
Adding the warning effect
Well, time to do a bit more preparations before we actually .Let’s draw the Warning sign effect. (16×16). Here’s mine:
Save it as “warning.png”
Now we’ll derive a new class (WarningEffect) which will show the warning on the field. In our effects package, create a new Java Class, name it “WarningEffect.” Make it extend the Effect class. Automatically implement the suggested methods (draw, release, reset). Create a constructor that won’t do anything but call super(), constructor of the parent. Here’s what we have now:
public class WarningEffect extends Effect {

    public WarningEffect() {
    }

    @Override
    public void draw(SpriteBatch b) {

    }

    @Override
    public void release() {

    }

    @Override
    public void reset() {

    }

}
Here’s where it gets a bit tricky: since every type of effect requires it’s own pool, I usually make a static Pool in every separate class. And make a separate function that instantiates the object (either by creating a new one or by taking an unused one from the pool).
At the bottom of our WarningEffect class, add a new static variable warningPool:
static final Pool<WarningEffect> warningPool = new Pool<WarningEffect>() {
    @Override
    protected WarningEffect newObject() {
        return new WarningEffect();
    }
};
Essentially it will initialize a new WarningEffect if there are no released ones that are available for reinitialization. In our release() function, write
warningPool.free(this);
Which will indicate that the current object is available for reuse.
Now we need a Create function that will take care of returning a new effect instance and setting the base values to it.
Now as you have probably noticed, there’s an error when you’re trying to call inti function. We absolutely need to pass the resources (will contain warning texture region) and SizeEvaluator (will allow us to draw the effect in a proper place).
Let’s add our own init method and add a few extra variables to handle that. Make a good habit of declaring variables and constants at the start of the class: that way you’ll be able to find them easier, it improves readability. Put these lines at the start of our class:
Resources resources;
SizeEvaluator sizeEvaluator;
public int fieldX;
public int fieldY;
Let’s go back to Resources. Add a new TextureRegion declaration named warning.
public TextureRegion warning;
All that’s left is to add update() and draw() methods. Initialize it the same way you initialize any other Texture Region.
warning = gameSprites.findRegion("warning");
Now go back to WarningEffect class. In draw() method, add the actual drawing of a warning.
@Override
public void draw(SpriteBatch b) {
    b.begin();
    b.draw(resources.warning,
            sizeEvaluator.getBaseScreenX(fieldX),
            sizeEvaluator.getBaseScreenY(fieldY));
    b.end();
}
The last thing we need to do here is to set the update function. At the start of the class, declare a constant:
private static final float WARNING_TIME = 2.0f;
Our warning will be shown for 2 seconds. After that, the player will get damaged if he did not get out of the way.
Let’s override the update function now:
@Override
public void update(float delta)
{
    super.update(delta); // pass the time change
    if (timeAlive > WARNING_TIME)
    {
        isAlive = false;
    }
}
The backend part is done, let’s connect it to our logic and ensure it draws fine on our GameScreen. In our GameLogic, declare the EffectEngine variable and initialize it in constructor:
EffectEngine effectEngine;

public GameLogic()
{
    player = new Player(
            MathUtils.random(MAX_BASE_X),
            MathUtils.random(MAX_BASE_Y)
    );
    effectEngine = new EffectEngine();
}
Add the update(float delta) method, and make sure effectEngine.update(delta) is called there:
public void update(float delta)
{
    effectEngine.update(delta);
}
Now in our GameScreen’s update function, make sure to call logic.update(delta):
Run the game. The warning sign will show at the leftmost bottom tile. That should be enough for now, we’ll continue to add better warning effect changes and player damage in our next lesson.